Showing posts with label Utah living. Show all posts

11/21/13

Harvest Salad with Buttermilk Sage Dressing


Tuesday night I made a salad for a creative group of crafters and bloggers who attended
"Spark Your Holidays Soiree" put on by Margie Romney -Aslett (Justagirl) and hosted by Jamie Soucy.  I didn't stay for the festivities, but heard the ladies who attended had a fabulous time! I was amazed at Jamie's  gorgeous fully decorated Christmas house and the work Margie put into assembling craft kits. It was all so festive, that I may have to sign up next time they have an event and try my hand at creating outside of the kitchen...


I wanted to share a salad that was savory and a reflection of the season. I started with greens and decided on three main ingredients for toppings: roasted butternut squash, pomegranates and avocados. Keeping the dressing harvest-style, I topped the salad with pumpkin seeds and made a basic buttermilk dressing and added fresh sage. It was simple, fresh and a bit out of the ordinary.
This dish is perfect for your holiday table, not your mother's ho-hum green salad, and also a change from the fruit-candied nut-cheese salad we see at  almost every holiday gathering.
One week till Thanksgiving!
So excited.


Harvest Salad with Buttermilk Sage Dressing 
A Bountiful Kitchen
print recipe

Salad:
8-10 cups Romaine Lettuce, chopped
8-10 cups spinach (preferably baby spinach)
3 cups butternut squash, peeled and cut into 1 inch cubes
1 ripe and slightly firm avocado
1 large pomegranate, seeded or about 1 - 1 1/2 cups of seeds
1/2 cup pumpkin seeds (green type, roasted, salted)

Buttermilk Sage Dressing:
1 cup buttermilk
1 cup mayo ( light is ok, but regular is better)
5-7 fresh sage leaves, chopped
1 clove garlic
1 tablespoon fresh lime juice
1/2 teaspoon salt
1/2 teaspoon pepper

Place all ingredients in blender and blend until smooth or place ingredients in container and shake or use an immersion blender. The dressing will keep for a week refrigerated.

To assemble salad:
About 1 hour before assembling salad-
Preheat oven to 450 convection, or 500 bake. Move rack to middle of oven.
Place butternut squash on a baking sheet. Sprinkle with coarse salt and pepper. Drizzle with about 1-2 tablespoons of olive oil. Roast just until squash begins to turn color and get a nice brown edge. This usually takes about 15 minutes on convection or 20 in a regular bake setting. Watch closely so it does not burn.
Remove from oven and let cool completely.
Place greens on a  large platter or  bowl.
Top with cooled roasted squash, chunked avocado and sprinkle with pomegranate seeds.
When ready to serve, sprinkle generously with pumpkin seeds.
Serve with dressing on the side.
Serves about 20+ as a side dish.

Tips:
-I doubled this salad for a group of 50-60 women. I used 3 heads of Costco regular (not mini) Romaine heads, 1/2 box of baby organic Spinach and 1 container of pre-cut butternut squash. I also used about 1 1/2 containers of pre-seeded pom seeds also purchased at Costco.
-For buttermilk dressings, I like to purchase Winder Dairy buttermilk. It is a bit thicker than other brands and whips up nicely in dressings. My second choice is Meadow Gold. Both brands found in Utah.

11/13/13

Maddox Ranch Rolls


If you have lived in the Beehive State for any length of time, you've been to the Maddox in Perry, Utah. My favorite meal at Maddox is fried chicken, a Ranch Roll with honey, and a slice of fresh strawberry or peach pie with whipped cream.  I know- grease, carbs and sugar. I didn't say it was healthy.

 Maddox has been around for a looong time-
Maddox Ranch Rolls are famous in our state. They're light and fluffy. Best served warm from the oven with some honey or raspberry butter.  I wanted to recreate the Maddox roll at home, so I set out to find a recipe that baked up like the rolls at the restaurant.  After one failed attempt (the rolls tasted alright but not similar in shape),  I remembered my blogger friend, Bonnie, at City Home Country Home posted a recipe for Maddox Ranch Rolls a while back. I gave it a try last Sunday. Jackpot. This is it. The same roll I've scarfed in my car while driving back from trips to Logan. 
If you want to attempt making rolls for Thanksgiving, but are looking for an alternative to traditional shaped rolls, this is the recipe for you.  No rolling or cutting out. Just mix, raise and plop into muffin tins. 
Thanksgiving. It's coming. 


Maddox Ranch Rolls
Adapted from Bonnie at City Home, Country Home

To insure success, read all of the tips below the recipe before starting the process of making rolls

2 cups whole milk ( I used 1/3 cup of powdered milk and 2 cups lukewarm water)
1/2 cup butter, cut into chunks
1/3 cup granulated sugar
1/2 cup of warm water
1 Tablespoon plus 1 teaspoon yeast
3 large eggs, beaten
1 1/2 teaspoons salt
5 1/2 - 6 1/4 cups flour

Warm milk in microwave for 2 minutes. Place butter in milk and let melt. Add sugar and mix with whisk or fork to dissolve. Set aside and let cool a bit. The butter will continue to melt as the milk cools.
Pour 1/2 cup of warm water into a large bowl, sprinkle yeast over top of water, sprinkle about 1 teaspoon sugar on top of yeast. Let sit for a few minutes until yeast bubbles.
Pour the the cooled milk, (the milk should be warm- not hot), butter and sugar into the yeast mixture (never add a hot liquid to yeast).  Add beaten eggs and salt to yeast mixture. Mix in flour  with a large spoon one a cup at a time, just until blended and no lumps of flour remain. Do not over-mix. 
Let the dough raise until doubled, about 45 minutes in a warm kitchen.
Spoon or scoop dough (grease the scoop for easier handling) into greased muffin tins and let the dough  raise again for about 30-45 minutes. 
Place rack in middle of oven. Preheat the oven to 375 degrees. 
Bake for 12-15 minutes or until the rolls are golden brown.
Loosen rolls by running a table knife around the edge of muffin cup.
Yields about 30 dinner-size rolls.

Tips, aka Si's epistle on Maddox Ranch Rolls made at home:
-I often use powdered milk when making rolls or breads that call for milk. It's a good way to use up the dry milk I have in my food storage. I buy the dry non-fat milk at the LDS Dry Pack Cannery, and have found it mixes up best with warm or lukewarm water and a whisk.  
-Make sure to grease the muffin tins, this is a sticky dough. 
- Use a large cookie scoop to fill the muffin tin. I greased the scoop a few times with cooking spray to prevent dough from sticking to the inside of scoop. 
-The first recipe I tried for Maddox Rolls had too much liquid and not enough flour in the dough. I believe this is why the rolls tasted good, but didn't bake up into a nice dome shape. Also, after the rolls cooled a bit, they shriveled, which I believe was a result of not enough flour in the dough in relation to the liquid. I wanted a roll that looked beautiful even after cooling a bit. Not asking too much, right?  The recipe from Bonnie had two tablespoons of yeast, I reduced it to 1 tablespoon plus one teaspoon, because I wanted the dough to have a little less of a rise and hold its shape better. If you are looking for a roll that is a bit puffier, use two tablespoons of yeast. 
-Add just enough flour to take away the wet look of the dough. This should be between 5 1/2 to 6 cups of flour total. I added about 6 1/4 cups of flour total, keep in mind I live in a very dry climate. The dough should still be "scoopable".  The dough will be very soft. Do not add too much flour, or you will not be able to scoop the dough out of the bowl. When in doubt, use less, not more flour. See the photo below to see what my dough looked like during the rise in muffin pan. 
- To create the perfect place for dough to raise, I use a trick Frieda taught me in a bread making class. Place a cup of water in a microwave. Microwave on high for 1-2 minutes. Remove cup of water. Place covered bowl (I use plastic wrap) in microwave, close door and let dough raise. I have an oven with a "proof" setting, but prefer Frieda's method. This is also a great tip for making bread in a small kitchen! 
-Of course, It may be easier to just jump in the car and pick up rolls at Maddox :)


This photo was taken just before the rolls were placed in the oven. 

10/11/13

Pumpkin Spiced Hot Cocoa


Corrine called me the other day and asked if I had a recipe for Starbucks Pumpkin Spiced Hot Cocoa.
My reply: What's that?
Her reply: YOU HAVE TO GO GET ONE.
I waited for the next cold day and drove to Starbucks. Big line. This is not Seattle. We only have one Starbucks in town (soon to be two). Note to me: be ready to wait wait wait when visiting Starbucks on a cold day in Btown. No drive thru. No bueno. I ordered myself a tall. When the barista finally handed me the cup (seriously 15 minutes later) I took a sip and knew I was in trouble. Cream. Spice.  Chocolate.  Pumpkin.
This is not a drink. It's dessert.

Theirs and mine. 


I've been back a few times for research/ homework, ABK style. Each time, tasting and comparing. This is serious work.
Back at the ranch, I looked online for "Starbucks Pumpkin Spice Hot Cocoa". Found this recipe from Cookies and Cups and adapted it to my taste, adding a home made hot cocoa which was adapted from Alton Brown, Food Network. Combining these two recipes resulted in a homemade version of my new favorite pumpkin-spiced-chocolaty treat.
If you are out in your car and want to sip a dessert in a cup, stop by Starbucks. If you're cozied up at home, watching the rain or snow fall from inside your steamed up windows, mix up this treat. It's like comfort in a cup.
Fall style.


Pumpkin Spiced Hot Cocoa
A Bountiful Kitchen
print recipe

2 cups low fat or whole milk ( I used skim)
2 tablespoons pumpkin puree
1 cup hot cocoa mix, recipe below
1/2 teaspoon pumpkin pie spice
whipped cream, chocolate syrup and additional pumpkin pie spice for garnish

Pour milk into a saucepan. Add pumpkin puree, dry cocoa mix and 1/2 teaspoon pumpkin pie spice.
Cook over medium heat, whisking until smooth, and milk is hot. Do not boil. Remove from heat.
Pour in to mugs and top with whipped cream. Drizzle chocolate syrup and sprinkle with additional pumpkin pie spice.
Serve immediately.
2 servings

Alton Brown's Hot Cocoa
1 cup powdered sugar
1/2 cup Dutch Process cocoa*
1 1/4 cup powdered milk
1/2 teaspoon salt
1 teaspoon cornstarch

Mix all of the ingredients together and store in a container with a lid in a cool, dry place.
When ready to use, place about 1/3 to 1/2 cup of mix into a mug, fill cup with hot water or hot milk. Mix and enjoy.

Tips:
-*When buying Dutch Processed Cocoa, buy a good quality chocolate, it will greatly improve the flavors in the finished product.
-If you are in a hurry, or don't want to make your own hot cocoa mix, you may substitute a pre-made powder mix, such as Stephen's Hot Cocoa Mix (I suggest a dark hot chocolate mix).
-When making the hot cocoa, you may use hot water when mixing up to drink, but I like to mix with milk for extra rich flavor.

9/3/13

ABK Green Smoothie and 5 year Blogiversary Blendtec Giveaway!


It's been five years since I started blogging.  Five years and four hundred and sixty seven recipes after I posted  Watermelon Salad,  I still love sharing recipes and the stories behind them. To celebrate the five year mark, I'm having a BLENDTEC BLENDER giveaway!
Oh my.
This is the very best blender.
On the planet.
I know you've seen the "Will it Blend" videos :)
Want to hear the story behind our little connection with Blendtec?
I'll try to make it short.


Remember when the smoothie shops started popping up everywhere? There was a Zuka Juice shop (now Jamba) around the corner from Grant's office.  One day, while we were waiting in line to get a smoothie, I told Grant (my in-house patent attorney)  he should get the name of the company that makes the smoothie blender and see if they had a patent attorney. He wrote down the name of the blender, contacted Tom Dickson, owner and inventor at Blendtec. The rest is history. Eventually, Grant helped Blendtec get a patent for the 5-sided "Wild Side" jar. You've seen it, right?  The Wild Side jar was so successful at blending "twice the work in half the time" that the biggest name in the blending industry, Vita-Mix, copied Dickson's  5-sided jar.
Oops. Bad idea.
Grant, his brother Brett, and the Holland & Hart team sued Vita-Mix for patent infringement. After six years, they won the largest patent infringement award in the history of the state of Utah. Hooray for Tom and Blendtec. Love it when the system works.
So there you have it, the short version of why it's not a good idea to copy your neighbors work.

Want to know how to win the Designer Series Blendtec with Wildside Jar  ?


The giveaway will be a little different this time because it's all on Pinterest!
If you don't have a Pinterest account, read this post for step-by-step instructions on set up. Thank you again to Corrine at Mint Arrow for guest blogging with Pinterest tips!


A Bountiful Kitchen's Pinterest giveaway rules: 

2. Pin the giveaway post.  
3. For extra entries, pin up to 5 recipes from A Bountiful Kitchen per day. (please make sure they are ABK recipes, pin directly from the ABK site. 


the not so small print:
Winner will be chosen at random and MUST follow A Bountiful Kitchen on Pinterest, and have pinned the original contest post (this post) to be eligible. The giveaway will run from Tuesday, September 3, 2013 to Thursday, September 5, 2013 at midnight, Pacific Time.  The winner will be announced Friday morning September 6, 2013 and will be chosen by Random Number Generator. U.S. residents only. 
I was not paid or received products for this post. The opinions shared are my own. The giveaway item was purchased by me, for you.


Hello. Cooking blog.
Here's a recipe for my favorite smoothie. I came up with this back in January, and have been making one almost every morning since. It's not a beautiful green smoothie, because I always add blueberries. Mine is kind of a purple-brown smoothie. Appetizing, right? But it tastes good and it's  simple, and gets a few fruits and veggies into my system each day. After I make this, I pour two glasses and in a bit of a falsetto do "cheers" with Grant and say "to our health". I know. Not normal behavior.
Have a great week!


ABK's Favorite Green Breakfast Smoothie
A Bountiful Kitchen
print recipe

16 oz cold water
2-3 cups fresh spinach
6 frozen strawberries
1 medium carrot or a handful of baby carrots
1 cup blueberries fresh or frozen
1 apple, cored
1 ripe banana

Pour water into pitcher. Add spinach, strawberries, carrot, blueberries, apple and banana.
Place lid on blender and blend until smooth. I use the #5 setting on my blender which is a 40 second blend.

Tips:
-I like to use frozen strawberries, even when fresh are available, because it makes the smoothie a bit thicker and serves also to make it cold.
-to easily core the apple I set it on a cutting board and make four slices around the core. No peeling needed.
-Melinda taught me this trick, if you purchase spinach and you think it may spoil before you use it up, place the leaves in a Ziplock in the freezer and use the spinach frozen. Same goes for any fruits or veggies you want to use in the smoothie.

8/9/13

Tessa's Mini-Melts with Poppyseed Drizzle


Almost five months have gone by since this day...


Two years is a long time! My oldest son, Stephen left home to serve an LDS mission in Puebla, Mexico on February 16, 2011 (if you've been reading ABK for a while, you'll remember this post).  He returned two years, one month and three days later. That afternoon we dashed off to the airport with ballons and signs in hand. Our immediate and extended family gathered there, along with families of other missionaries who were returning that day. So much excitement. So much joy. So glad to have him  home!
In honor of Stephen serving for two years we celebrated his return with (what else?) food. We made  lots of salads, treats and some fun little sandwiches. It was nice to have something hot with the salads that didn't require too much time in the kitchen when we wanted to enjoy spending time with our newly returned missionary. Tessa gave me this recipe after she made dinner for a large group of sorority girls at the U. She said the girls loved them, and I thought, if they're good enough for the Chi-Omega's they're good enough for us! They take just a few minutes to put together, and are perfect for parties of any sort.
Grateful to have Stephen home.
So proud of his willingness to sacrifice and share the good word of God with the sweet people of Mexico.
Two years is a long time.
Yes, it is.


Mini-Melts with Poppy Seed Drizzle
Tessa Reinemer

3 dozen soft dinner rolls 
2 pounds deli meat (or have the deli slice up the exact amount of slices you need)*
1 pound sliced deli cheese, or approx 18 slices, cut in half

Topping
2 tablespoons poppy seeds
2 tablespoons yellow mustard
1/2 cup butter
1 tablespooon minced dehydrated onion (optional)
1 teaspoon Worcestershire sauce

Slice rolls and put small amount of turkey or ham with one slice of cheese.  Place sandwiches in 2- 9x13 baking dishes or one large jelly roll pan.  
Heat ingredients for topping in a saucepan until butter is melted. Brush or spoon topping onto sandwiches right before cooking.  Cover with foil.  Bake at 350 degrees for 15 minutes or until cheese melts.
Serves about 15-20.

Tips (aka more than you ever wanted or needed to know about making baked sandwiches):
-These sandwiches may be assembled in advance.  A day before is fine, but don't brush with drizzle until right before cooking.  Store in fridge covered tightly with foil.
-*Deli meat- Slice the meat in half with a sharp knife (I cut the meat all at once). If you have 36 rolls, order 18 slices of deli meat, cut in half. 
-We used a combo of ham/swiss and turkey/havarti. Both were delicious.
-For a gathering at the school, and Anibelle's baby blessing, I used Costco large croissants and cut them in half after stuffing with meat and cheese. We used:
3 doz  large croissants
4 lbs ham or turkey
2 lbs sliced cheese
Served approx 75. 

-I use the Walmart Brand rolls, found near their deli when making these for a large (100+) crowd. I pinned the rolls here, so you can see what they look like. The rolls come 16 to a package. I like these for a crowd, because they are inexpensive and they stack well, without smashing if you need to buy a large quantity. I have also used a roll that looks similar to a Granny Sycamore cluster roll from Costco. They only sell these in the fall and winter months. This roll is much thicker than the Walmart brand roll,  and I add more meat to the sandwich when using the Granny roll, so the meat is not lost in the roll!
-Cooking for 100:
plan on about 1 1/2 rolls per person if you are serving other buffet items such as salads, appetizers, sweets.
10 packages of "The Bakery" rolls from Walmart, (Potato or Sweet Hawaiian) 16 per pkg =160 rolls
Deli meat sliced, approx 80 slices, cut in half to yield 160 slices
cheese slices, approx 80 slices, cut in half to yield 160
topping:
1 1/4 lb butter, melted (5 sticks)
8 tablespoons poppy seeds
6 tablespoons mustard
3-4 tablespoons dehydrated onion (optional)
2 tablespoons Worcestershire
Follow directions above for baking.


7/11/13

Cooler Corn for 350


How do you cook corn on the cob for 350?
Here's the recipe/method we used at Girl's Camp last month. 
Best way to cook corn for a crowd. Ever. 


Cooler Corn (for 350)
A Bountiful Kitchen

175 ears of corn, husked and broken in half to yield 350 pieces
boiling water
coolers (we used two 165 Quart coolers they were about 1/2 full of corn, you may use smaller coolers)
About 2 1/2 to 3 hours before serving, start boiling water. We boiled about 40-50 quarts of water per cooler. 
Split the cobs evenly between coolers. 
Pour boiling water into coolers with corn. 
Close lid and don't open for at least 30 minutes, or until time to serve. 

Tips:
-Corn takes about 30 minutes to cook.  Will stay warm in cooler for up to three hours, unless the lid is opened :) 
-Don't worry, the corn will not over cook. 
-We assigned a couple of people to sit on chairs and serve the corn with tongs. We had the servers open the small "door" on the lid of the cooler instead of the large lid; this allowed the water to stay warm until everyone was served. Place a bowl of melted butter with brushes on a table for those who want butter. 
-You may use any amount of corn, follow directions above. Don't fill the cooler more than 3/4 with corn to allow for an adequate amount of hot water to cook the corn. 
-We used most of the corn we cooked, the extra cobs were cut up and used in a Southwest Salad the next evening.


7/9/13

Kash's Red Raspberry Dutch Oven Cobbler


If you are looking for a simple treat for camping, and you're willing to step outside the S'more box, you've come to the right place.
Are you in charge of dessert for your Lake Powell trip or your family reunion?  The possibilities are endless with this basic recipe (see suggestions below).  If it were any more simple it would be take out.
This treat is perfect paired with fresh raspberries and cream, or stacked (Dutch oven talk) with Kash's Black Cherry Chocolate Dutch Oven Cobbler, for your favorite chocoholic.


Red Raspberry Dutch Oven Cobbler
Kash Castleberry
print recipe

one 12-14 inch Dutch Oven
2 cans raspberry pie filling
1 yellow cake mix
oil for cake mix*
fresh raspberries and mint for garnish (optional)

Line the Dutch oven with foil for easy clean up.
Heat briquettes in chimney for 15-30 minutes
While briquettes are heating, place raspberry filling in Dutch oven.
Mix cake according to package directions, omitting eggs and adding extra 1/4 cup water instead. (eggs make the cobbler puff up too much while baking).
Pour cake mix on top of fruit. Place lid on Dutch oven.
Place 7-10 coals below oven, and 16 coals on top of oven lid in a circular fashion.
Bake for about 30-35 minutes for 14 inch or about 35-40 minutes for a 12 inch Dutch oven, checking after about 15 minutes. If desired, rotate lid 1/4 turn to left and Dutch oven 1/4 turn to the right for more even heating.
Serve with cream or ice cream, garnish with fresh raspberries and mint if desired.

Tips:
See this post for more on Dutch oven cooking and heating up briquettes, etc.
*-We were at our cabin when I made this and I forgot to buy oil. So we melted a cube of butter instead of using vegetable oil. It baked up perfectly. Just in case you are worried about not getting enough sat fat in your diet. 
-If baking in an oven at home, I suggest baking in a large cast iron skillet or two 9 inch round cake pans at 350 for about 35-45 minutes, or until cake is done.
-Alternatives to the raspberry/yellow cake combo:
use a chocolate cake mix and raspberries.
lemon cake and lemon filling.
Strawberry cake and cherry filling.
Mix a few mini chocolate chips into the yellow cake mix.
Lay a few broken up Hershey bars on top of the cake after baking and let melt slightly.
Top with fresh raspberries, blueberries and serve with whipped cream for a red, white and blue dessert.
Use a spice cake mix and apple pie filling on the bottom layer.

7/6/13

Kash's Black Cherry Chocolate Dutch Oven Cobbler


We purchased our Dutch ovens about twenty years ago, with the thought in mind we would use the Dutch ovens for cooking in the wilderness.
Grant is a big time: camper/hiker/backpacker/bowhunter/all around guy's guy. Whatever that means. He loves anything that has to do with the out-of-doors. Me, on the other hand...
Well.
Let's just say a couple of days at our cabin fills my quota for getting in touch with nature. That said, once every three or four years, I dust off the Dutch ovens and channel my inner pioneer.

While I was at Stake Girl's Camp last week, my new friend Kash (who I was privileged to work with in the kitchen) provided this recipe and all of the ingredients (right down to the briquettes) for all the Young Women and their leaders at camp. Yikes. That was a lot of work. Thanks Kash.
The recipe was a winner! Everyone loved the gooey, rich, chocolaty-cherry dessert. It takes about two minutes to throw in the Dutch oven and cooks in about 30-40 mins. We made this at our cabin for the Fourth, and everyone loved it. I also made Kash's Red Raspberry Dutch Oven Cobbler, which I'll post next.
Get on your pioneer. You'll love this dessert.


Kash's Black Cherry Chocolate Dutch Oven Cobbler
Kash Castleberry
print recipe

one 12-14 inch dutch oven
2 cans cherry pie filling
1 box Devils Food Cake
1-12 oz can Black Cherry Soda ( I used Shasta)
1-12 oz bag chocolate chips, semi sweet or milk
heavy duty foil (optional)

About 1/2 hour before cooking:
Heat briquettes in chimney for 15-30 minutes until briquettes turn white. Directions here.
Line the dutch oven with heavy duty foil*. Spray foil lightly with cooking spray.
Spoon cherry pie filling into foil lined pan. Sprinkle dry cake mix evenly on top of fruit.
Pour Black Cherry Soda over dry cake mix. Mix gently with fork so the soda doesn't mix too deep into the cherry layer. Don't worry about mixing too much, the moisture will even out during baking.
Place the dutch oven lid on.
Place 7-10 coals below the oven, and 16 coals on top of the oven in a circular fashion.
Bake 25-35 minutes for a 14 inch oven and 30-40 for a 12 inch oven.
Check after about 15 minutes. When cake is done, remove from heat and sprinkle with chocolate chips. Place lid back on and allow chocolate to melt.  Serve warm with cream or ice cream.
Serves 15-18.

Tips:
-Dutch Oven purists will probably frown upon the use of foil to line the pan. I say easier is better while camping. You may make this dessert without lining the pan, but be prepared to clean up a sticky mess off the bottom of the pan :)
-I suggest preparing this dish before dinner. After the cobbler is done cooking, remove from heat.  It will keep warm for at least a couple of hours with the lid on.
-When we first started Dutch oven cooking, we (I use the term "we" loosely) thought if 10 coals on the bottom were good, 20 were better. Not so. If the recipe calls for 10 on the bottom and 16 on the top, follow the recipe suggestion. Or you'll have blackened cobbler.
-When baking in a Dutch oven, more of the coals should be on top (or on the lid) of the oven to prevent burning the bottom of the dish.
-Briquettes vs other brands-  Kash only likes to use Kingsford. I agree. We have experimented with other brands, Kingsford is best.

7/2/13

Baked Ziti (new and improved) and Girl's Camp 2013


Last week I joined 300+ young women and their leaders in the mountains above Heber City. Depending on the day, we had between 330-350 girls and leaders in attendance.
With a crew of 7 joyful, hardworking women, we planned, cooked, and served about 3300 meals in 5 days. Did you just go back and re read that? Me too. Our meals included some ABK favorites: Teriyaki Spinach Pasta Salad,  Southwest Salad with Cilantro Honey Lime Dressing, Sweet Baked Beans (click on links for recipes) , and our favorite pasta- Baked Ziti. Ziti for camp? You know how they say food always tastes better when you're camping? I never fell for that line, but it's true if you are eating Baked Ziti.
We also made some new favorites I'll post in the next few weeks:  Kash's Black Cherry Chocolate Dutch Oven Cobbler, Janis' Hot Fudge Sauce, Slow Cooked Roast for French Dip and Cooler Corn for 350.  
Here are a few pics of our adventures in the mountains  kitchen...
The kitchen crew: Janis,Jenny,Brenda, me, Michelle, Mims, Stephanie, Kash.
Amazing women. 

Remember when I first posted Cook's Illustrated Baked Ziti  back in 2009? After making the Cook's recipe several times, I decided it needed a little tweaking. The biggest issues I had with their recipe were:
1. It was a bit on the dry side, especially when heating up for leftovers. 
2.There were too many steps (dishes to pour in and out of and other unnecessary complications). The recipe needed to be streamlined. 
I set out to make a dish with more sauce and easy to create in about 30 minutes. 
The result-we love this dish. 
The girls loved this dish. 
All 300 of them. 


Baked Ziti
A Bountiful Kitchen, adapted from Cook's Illustrated

1 pound Ziti or other short, tubular pasta (it is usually easier for me to find Rigatoni)
2 tablespoons extra virgin olive oil
2 medium garlic cloves , minced
2-15 oz can tomato sauce
1-8 oz can tomato sauce
1 (14.5-ounce) can diced tomatoes
1 teaspoon dried oregano
salt and pepper, about 1 teaspoon each
1/2 cup plus 2 tablespoons chopped fresh basil leaves, divided
1 teaspoon sugar
Ground black pepper
1 teaspoon cornstarch
1 cup heavy cream
1 pound whole milk cottage cheese or low fat  cottage cheese
2 large eggs, lightly beaten
3 ounces grated Parmesan cheese (about 1 1/2 cups)
8 ounces low-moisture whole-milk mozzarella cheese , cut into 1/4-inch pieces (about 1 1/2 cups)

Cook pasta for about 9 minutes. Drain and set aside. 
Place oil and garlic in large pan and sauté over medium heat just until fragrant. Add all of the tomato sauce, chopped tomatoes, sugar, oregano, salt and pepper and cook for about 10 minutes until thickened a bit. Turn off heat and add 1/2 cup of chopped basil. 
Pour heavy cream into a second large saucepan. While cream is cold, whisk in 1 teaspoon of cornstarch.  Simmer over medium heat for about 3-5 minutes. Remove from heat and add 1lb of cottage cheese, 2 beaten eggs, 1 cup of the tomato sauce mixture, and half of the Parmesan and cubed mozzarella (reserving the remaining Parmesan and mozzarella for top of dish). Stir until combined (this mixture will now be a light red/pinkish color). 
Add the cooked pasta to the cream mixture. Stir until all of the pasta is coated. 
Pour into a greased 9x13 pan. Pour remaining tomato mixture over the top and sprinkle the remaining cubed mozzarella and Parmesan cheese on top of the pasta in dish. Top dish with remaining chopped fresh basil ( I like to save a few leaves for after baking as well for color). 
Cover dish tightly with foil. Bake at 350 degrees on middle rack of oven for 30 minutes with foil, then remove foil for last 30 minutes. Let sit for about 10 minutes before serving. 

Tips (longer than the recipe):
-We made 17x this recipe for the girls and divided it into 8 large (20 3/4 x 12 3/4x 3 inches deep-disposable foil steam table pans) The pans served about 35-40 each.
-We prepared the Ziti and covered each pan with foil until baking. The dish was prepared Saturday morning, and was baked Monday late afternoon. It was as good as if it were prepared on the same day.
-This dish may also be frozen after ingredients are poured into the pan.  About two hours before baking, remove from freezer and set on counter. When ready to bake, place in oven at 325 for 1 1/2 hours on middle rack.  After 1 1/2 hours, turn oven to 375, remove foil,  and bake an additional 15 minutes. Allow more time if multiple pans are being baked in the same oven (about 15  minutes per pan, while covered).
-If you don't have a basil plant, or enough basil to make this dish, I suggest a trip to Trader Joes, where you can buy (the biggest basil plant you have ever seen in your life) for $2.99 . That's right $2.99.  We used three trees plants to make 17 times this recipe, it was more than enough fresh basil for our Ziti-a-thon.
-When I first started making this dish as a child (jk) , I thought fresh mozzarella was always the best choice when following a recipe that called for mozzarella. Not so. It has way too much moisture for this dish. A firm mozzarella, that can easily be cut into cubes works best. It melts into the pasta dish without leaving water in the bottom of the dish.
-If you are making this recipe in large quantity, I found that the #10 cans found at Costco and other restaurant suppliers will cover 3x this recipe for the tomato sauce. So instead of: 2-15 oz cans and 1-8 oz can of tomato sauce for every three times this recipe, I used 1 #10 can of tomato sauce (approx 96 oz), and one additional 15 oz can of tomato sauce. If you 6x the recipe, use 2 #10 cans of tomato sauce and one #10 can of diced tomatoes.


5/30/13

(Almost) Swig Sugar Cookies and one long story behind them...


If you live in St George, Utah, or have visited St. George over the past few months you've heard about the buzz surrounding SWIG. It's a little cookie shack (two locations) rumored to be hauling in thousands of dollars each day. They sell cookies, ice cream, donuts, shaved ice and get this- "Dirty Diet Coke".  The Mormons in St. George are a pretty tame bunch ( I know this, bc they're my peeps). Slap the name "dirty" on a soda and you have a small stampede outside your place of business. This is about as wild as it gets if you're a Mormon :) The "dirty" in the soda, btw is a free add-in flavoring such as coconut, cherry, lime, etc.
Here's a pic of a famous St. George landmark, in case you haven't ever been there. It's a beautiful town located about 2 hours north of Las Vegas.


St George Temple


The skinny :
The big deal at Swig is the sugar cookie (which is actually baked by the folks at Dutchman's Market/Cravings Bakery in Santa Clara). Dutchman's has a FB page, if you scroll down their page, they show a pic of the cookies sold in their store, along with what they call "muddy" sodas. Maybe they call it a muddy soda after mud filled their shop? Dutchman's went under (literally) last year when there was a devastating flood in Santa Clara. They recently re-opened and are selling cookies in their bakery. It looks like they sell their cookies at room temperature, prefrosted. The Swig cookie is served cold and frosted with room temp frosting after you place your order. St George is a hot, dry place, so a cool cookie and Coke are a perfect combo.


My opinion:
I Pinned a recipe posted online that was supposed to be a knock off recipe of the Swig Sugar Cookie. After looking at the recipe, I knew it would not produce a cookie like the Swig cookie. It looks beautiful in the post, but doesn't have the Swig cookie texture. A few years ago, I posted this recipe, which is almost identical to the knock off recipe posted. It has a lighter, more shortbread-like texture than the Swig cookie. I've baked sugar cookies with cream cheese or sour cream in the dough, and thought the sour cream gave the cookie a (heavier) texture, similar to the Swig cookie.  Have I totally lost you yet?  I tried an entirely different recipe, altered a bit to create a heavier cookie. Still not quite right. I pulled up recipes and compared and decided the Swig cookie is so dense, it is likely to not have any egg in the dough. I altered the cookie again, and swapped the baking soda for baking powder. I also tried cream of tarter (see my note below about that experiment).  Yes, I feel like I should be auditioning for a job at America's Test Kitchen.  My final result is a cookie very similar to the Swig cookie. If you strip away the frosting on the Swig cookie, it is a very bland tasting treat. The cookie is so bland, that I added vanilla and sugar to make the cookie more flavorful. I couldn't help myself. 


The End. Almost:
For what it's worth, I've had better sugar cookies. This is coming from a person who has eaten hundreds of sugar cookies in my life, thus far. Not a proud moment. Anyway. I prefer a softer, lighter and more moist sugar cookie than the Swig cookie. After extensive taste testing on several of the Swig Sugar cookies, I've decided the cookie is more like a cross between a shortbread slash flattened out sweet biscuit than a cookie. It is not very flavorful and quite dry- which may be a good thing, since it is often served with a Coke or Dr. Pepper. And don't forget about the flavor shot in the drink. A bland cookie goes well with a sweet drink and/or a flavor-spiked soda. 
I'm standing by my theory that all the fuss is about a cold cookie, served in a hot climate, with a fun drink.
That said, I gave samples to lots of friends, fam, etc. Almost everyone loved this cookie. They all raved about how good it is. Was. Whatever.


Are you still reading? Wow. You get a prize. 
I'm going to bring you some cookies. Yes, some of the one hundred and twelve dozen test cookies I've made over the past few days. I'm not joking. 
Here it is, my version of the Swig Cookie, for your baking pleasure.
Oh, don't forget the Dirty Dr. Pepper. 
You'll need it. 


Update** October 2013
After making dozens of batches of this recipe for the last five months, I've altered the recipe again.
I will enter the updates in RED below. Tricia, a reader suggested (after trying to eat dairy-free for a month) to try substituting shortening instead of butter to get the desired crunch, and crumbly fall apart texture in the original Swig cookie. I tried and she is absolutely right! I still liked the flavor of half butter and half shortening, so I still use part butter in my cookies. Thanks for leaving a comment Tricia!

(Almost) Swig Sugar Cookies
A Bountiful Kitchen
print recipe

dough:
1/2 cup butter or  (1/4 cup butter and 1/4 cup Butter Flavor or Regular Crisco)
1/2 cup sour cream
3/4 cup granulated sugar
1 teaspoon vanilla (optional) or 1/2 teaspoon almond extract
2 1/4 cups all purpose flour
1/2 teaspoon baking powder
1/2 teaspoon salt
sugar 

frosting:
1/4 cup butter, room temperature
1 tablespoon sour cream
2 cups powdered sugar
1 teaspoons vanilla
dash of salt
1 drop red food coloring
1-2 tablespoons milk**

Preheat oven to 325 convection or 350 regular bake.
Take butter out of refrigerator and microwave for about 15 seconds. Place butter, shortening and cold sour cream in a mixing bowl. Mix for about one minute. Add sugar and vanilla, mix until smooth. Add all dry ingredients at once. Mix just until flour disappears and the mixture comes together in a ball of dough, about 1-2 minutes on very low speed. 
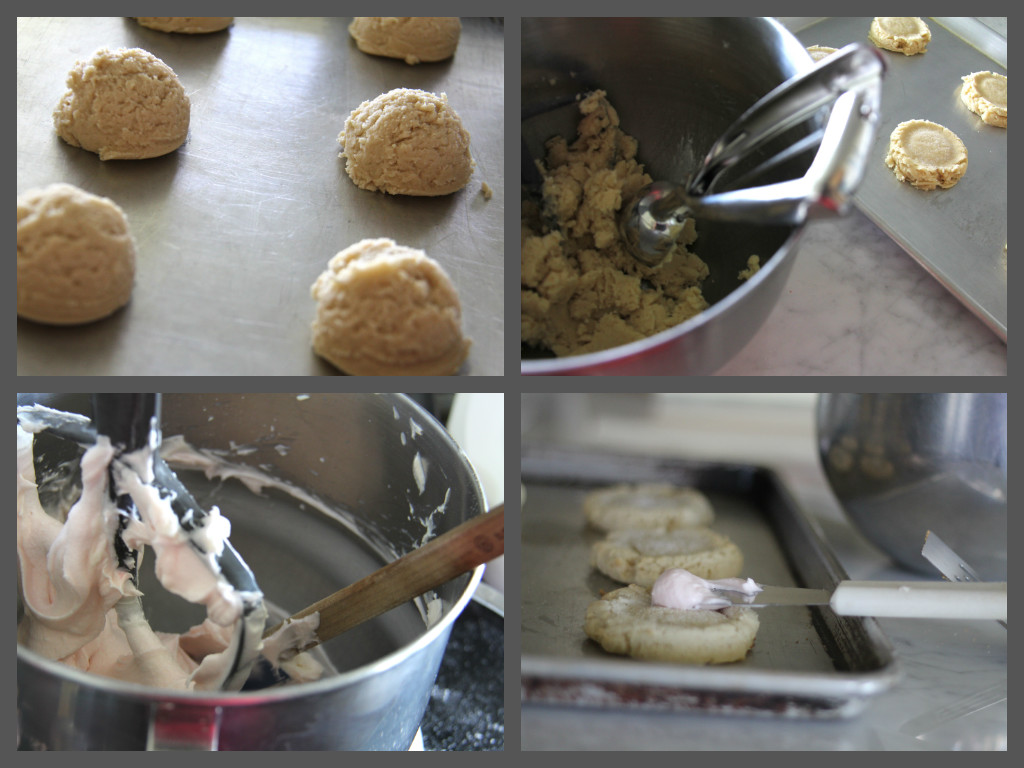
Spray the cookie scoop with a little cooking spray. Scoop the dough onto a  lightly greased cookie sheet. I use either a 1 3/4 inch or a 2 inch scoop. A two inch scoop will produce a cookie similar in size to the Swig cookie. If you don't have a cookie scoop, use an ice cream scoop or roll the dough into a ball about the size of a golf ball. It is best to use a scoop and overfill it a bit to get the desired jagged edge. 
Place about 1/4 cup sugar into a small bowl.
Spray the bottom of a flat glass with cooking spray. Flatten one cookie a bit then dip the glass in sugar Press the bottom of the glass against the cookie.  Press the cookies so they are flattened a bit, twisting the glass as you press to produce a jagged edge.  I bake 8 cookies per tray. Continue until all cookies are flattened. 
Bake in oven for about 10-12 minutes or until edges are lightly golden and cookies are slightly firm to the touch. Remove from oven, let cool. Place the cookies in the fridge and chill. 
Prepare the frosting:
Beat together the butter, sour cream, powdered sugar, vanilla and salt. When all ingredients are incorporated, add the drop of food coloring and milk if the frosting needs to be thinned. 
Frost after the cookies are completely chilled. 
Makes about 14 small or 8-10 large cookies. I almost always double this recipe. 

Tips and (surprise) a few more comments:
-*If you want the cookies to taste more like the Swig cookies make this adjustment to the dough:
 omit the vanilla and reduce the sugar to 1/2 cup. I prefer the cookies to be a bit sweeter, so I liked 3/4 cup of sugar in the dough.
-I like the cookies made with about 1/2 to 1 teaspoon of almond extract in the dough, along with the 1 teaspoon of vanilla.
-**The Swig cookie is frosted with quite a thin layer of frosting. I prefer my frosting to be a bit thicker. If you want to frost the cookie with a thinner frosting, add about 3-4 tablespoons of milk to the frosting.
 -The bit of crunch on the edge of the Swig cookie could be from the baking method, or from cream of tarter substituted for the baking powder. Cream of tarter adds a bit of a crunch, but also a hint of tang, which I didn't detect in the Swig cookie. In one of my test batches, I tried 1/2 teaspoon cream of tarter along with 1/2 teaspoon of baking powder, and thought the cookie was too tangy, not at all like the Swig cookie. ** See update above recipe on 10/2013
-This cookie stays quite well in the fridge for about a week if kept in an air tight container.

Disclaimer!
I read some of the comments left by readers on another knockoff recipe. Some of the comments left were (to put it mildly) not very nice. What's up with that? People. Relax. It's just a recipe. 
I posted this recipe because several people have asked me about the Swig recipe.
This is not the Swig recipe. It's a recipe similar in texture and flavor. If you want to try another knockoff recipe, which I mention in this post, you can check it out here.


My work is done. On to the dishes...


5/28/13

BBQ Chicken Salad with Creamy BBQ Cilantro Lime Dressing


Memorial Day weekend kicks off the start to Summer. Summer. Summer.
It's been a long Spring here in Utah. One of those keep 4 blankets,boots,hat,gloves,scarf and portable heater at all times in your car for the baseball game seasons. So glad it is finally warming up.
Summer means salads. I've been looking for an excuse to try out this recipe I Pinned a while back.
Verdict? Loved it. My new favorite.
I think there is a similar salad at CPK? This salad comes from the blog Erin's Food Files. She adapted the recipe from Mel at Mel's Kitchen Cafe, but added her own twist, by throwing in some roasted sweet potatoes and succotash (a dish consisting of corn and any type of beans cooked together).
Hello Summer. So glad you're almost here.


BBQ Chicken Salad with Creamy BBQ Cilantro Lime Dressing
Adapted from Erins Food Files and Mel's Kitchen

Chicken* early in the day, or day before prepare chicken in marinade:
4 chicken breast halves, any fat trimmed off
3/4 cup of barbecue sauce to marinate chicken

Salad:
1 large head romaine
12 cups lettuce Spring Mix or Spinach (about 1/2 of a Costco box of Spring Mix)
2 sweet potatoes, baked or grilled on bbq  just until soft
olive oil for brushing on sweet potatoes

Succotash:
2 tablespoons extra virgin olive oil
juice of 2 limes
1-2 cloves of garlic, minced
2 teaspoons cumin
2 teaspoons chili powder
2-15 oz cans black beans, drained & rinsed ( I like S&W brand regular or organic)
3 cups corn, frozen
1 teaspoon each sea salt & pepper

Dressing:
1 1/3 cup mayonnaise, light or regular, I used light Best Foods
2/3 cup buttermilk, sour cream, or nonfat greek yogurt, I used light sour cream
1/2 cup fresh cilantro, chopped
4 tablespoons lime juice
1 tablespoon white vinegar
1 garlic clove, finely minced
1 teaspoon salt
1/4 teaspoon cayenne pepper
few generous dashes fresh ground black pepper
1/2 teaspoon ground cumin
1/2 cup BBQ sauce (you may use either home made or bottled) and additional for drizzling on salad
2-3 tablespoons milk, if needed for thinning dressing

The day before serving salad or early in the day:

Chicken:
Marinate chicken in BBQ sauce at least 6 hours. I like to use a large Ziplock bag. After marinating, preheat grill, and cook chicken until done.  Barbecue the chicken on low heat for about 8-9 minutes per side, depending on thickness of meat. Remove from heat, check for doneness. If cooked through, let rest for about 5-10 minutes. Slice after cooled.

Succotash:
Combine first 5 ingredients in a small bowl and whisk to combine. Add beans & corn, season with salt & pepper. Store in refrigerator until ready to use.

Dressing:
Combine all the ingredients together and whisk (or shake, if using a jar) vigorously to combine. I used a blender and pulsed the ingredients.

Assembly:
Place lettuce on platter or large bowl. Layer on top of lettuce with black bean & corn succotash, sweet potatoes, and chicken. Drizzle with additional BBQ sauce, followed by the Creamy BBQ Cilantro Lime Dressing.

Tips:
-Great dish for make-ahead. I made the entire salad the night before and bagged all of the ingredients separately. Then in the afternoon, took to a luncheon and assembled it in just a few minutes.
-You may use any combo of ingredients for the succotash. It would be delicious with red or yellow peppers, chopped onion (red, yellow or white) or tomatoes. I added  small grape tomatoes and loved the color and flavor.
-This serves about 20 as a side dish, and is easily halved.
-I like to make my own bbq sauce (recipe found here), but didn't have any on hand, so I used 'Sweet Baby Rays" bottled sauce in this dressing, and for the marinade.
-For the sweet potatoes, I wrapped the potatoes in foil and grilled them on my bbq (350 degrees) for about an hour. After they were softened, I cut them into about 3/4 inch slices, brushed both sides with olive oil and grilled them just until they were cooked a bit more and had grill marks on the outside of the potatoes.
You can eliminate the step of wrapping in foil and baking the potatoes. Simply place the peeled, sliced potato onto a greased baking sheet and bake or broil until softened. Or grill pieces on the bbq grill.
After the potatoes are cooked, gently chop.
-If you are a cheese lover, grate some cheese on top - Monterrey Jack would work well. I don't think this salad needs cheese, there are lots of flavors in the salad, and with the creamy dressing, I think cheese is a little overkill. Just my two cents :)

5/6/13

Cape Cod Chopped Salad and promises


Promises, promises. I know. I told you days ago I would post two more salads and an appetizer for your Mother's Day menu, which is THIS WEEK. It's been a little hectic around here.

For one, Stephen returned home from his mission to Puebla in March. That deserves its own post (later). Here's a little glimpse of the "most wonderful day, ever" .


That was the most anticipated hug, ever. Two years is a long time.


And then, there is/was baseball, baseball, and more baseball. 


My cute mom came to visit...


Cuddling with my favorite 6 month old grand baby. 


Brookie graduated from the U. Two college graduates. Check. 


All good stuff. Just not a lot of blogging time.
Alrightly. The Mother's Day Menu 2013:
Salad number one. Loved this recipe. All of the main ingredients are my favorites alone, but this combo is one of those "match made in heaven" deals. Creamy Roquefort cheese, soft butter lettuce, toasted sweetened walnuts, dried cranberries, a crunchy apple, and bacon.
Your mom is going to love this.


Cape Cod Salad
adapted from Barefoot Contessa
print recipe

8 ounces thick-cut bacon
12 ounces baby arugula, or butter lettuce
1 large apple, I like Gala or Granny Smith, skin on, sliced thin
1 cup toasted walnut halves, 1 tablespoons sugar if desired
1/2 cup dried cranberries
6 ounces blue cheese, such as Roquefort, crumbled
Dressing:
3 tablespoons apple cider vinegar
1 teaspoon grated orange zest
2 tablespoons freshly squeezed orange juice
2 teaspoons Dijon mustard
2 tablespoons pure maple syrup
Kosher salt
1/2 teaspoon freshly ground black pepper
2/3 cup olive oil

Preheat oven to 350 degrees.
Place walnut halves on lined baking sheet. Bake for about 10 minutes or until fragrant. If desired, sprinkle with about 1 tablespoon of sugar right after removing from oven. 

Remove bacon from package, keeping bacon in one slab, lay on cutting board and slice into 1 inch thick slices. Fry in non stick pan over medium high heat, separating pieces as you cook. When bacon is cooked and crispy , remove from heat. Remove bacon from pan with slotted spoon onto a paper towel lined plate. Set aside.

For the dressing, whisk together the vinegar, orange zest, orange juice, mustard, maple syrup, 1 teaspoon salt, and the pepper in a bowl. Slowly whisk in the olive oil.

In a large bowl, toss together the greens, apple, walnuts, cranberries, bacon and blue cheese.

When ready to serve, toss all salad ingredients with just enough dressing to lightly coat leaves of lettuce. 

Toss the salad with just enough dressing to moisten. Serve immediately.

Serves approximately  6 as a side salad.