Showing posts with label breakfast. Show all posts

6/13/11

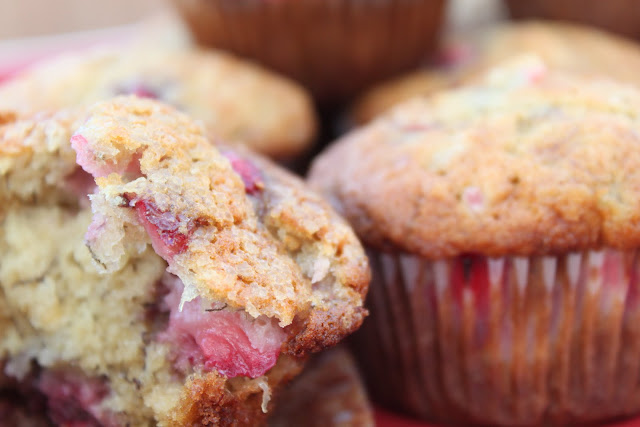
Fresh Strawberry Banana Muffins


I've always wanted to be a member of a secret club.  Last month I signed up to join a Secret Recipe Club.  Here's how it works:
-Every month, I'm assigned a random blog.
-I keep it a secret (hence the name) until the designated post time and date, given to me by the organizer of the "Secret Recipe Club".
-I get to pick a recipe, any recipe from my assigned blog.
-I can make any adjustments to suit my needs (gluten free, fat free, kosher, additions, substitutions etc.)
-Someone else out there in bloggerland, does the same, using a recipe from A Bountiful Kitchen.


This month's post comes from Heather at "Join us, Pull up a Chair".
It's like summer in a muffin.
Loved it.


Fresh Strawberry Banana Muffins
Print recipe

2/3 cup sugar
1/2 cup oil
2 eggs
2/3 cup mashed ripe bananas
1 tsp vanilla
1 2/3 cup flour
1 tsp baking soda
1/2 tsp salt
3/4 cup finely chopped strawberries


Preheat an oven to 375 degrees. Line a muffin pan with paper baking cups. In a medium bowl, combine sugar, oil and eggs; blend well. Stir in bananas and vanilla.
Add flour, baking soda and salt to the sugar mixture, stir just until combined. Gently fold in strawberries.
Spoon batter evenly into muffin tins. Bake for 17-21 minutes or until a toothpick inserted in the center comes out clean.
Yields 12 muffins.


5/23/11

Skillet Biscuits


You all know how I love a good biscuit. Seriously, l could live on biscuits alone. Well, not totally alone. Butter and jam. And biscuits. Maybe in that order.
I've never owned a cast iron skillet- until now. My mom had one when I was a kid. My dad thought he was a cook. And he thought everything should be cooked in that cast iron pan. Bacon. Spam. Hash browns. Eggs. I absolutely hated my eggs cooked in the cast iron pan. Especially if the pan wasn't wiped out after the meat was cooked. I hate specks on my eggs. I like them to be clean.
White.
And yellow.
Maybe a bit of salt and pepper.
I didn't want residual specks of- whatever was left in the cast iron skillet after cooking the rest of the meal on my eggs. I know, I have issues. 


Somehow, I associated my less than perfectly (in my opinion, as a 7 year old)  cooked eggs with a cast iron pan.  Bad feelings/cast iron skillet.  I need therapy. Years later, as a grown up (that's me, now)  I have heard,  you can't be taken seriously as a cook if you don't own a cast iron pan. Pfshhhh. Whatever.
Then I saw a recipe or two showing biscuits cooked in the oven, using a cast iron skillet. And the benefits of using one. The nice all around golden color.


I loved that way the cooked biscuits looked in the pan. So cozy. I imagined their bottoms, sides and tops browning perfectly.  Next thing I know, I bought one (at my favorite, TJMaxx) $11.99 for a Lodge brand pan. Love it.
This recipe is a bit different from my tried and true buttermilk biscuit recipe. The difference- sugar.  I've tried lots of biscuit recipes. The best ones are made with shortening, in my opinion. The combo of sugar, shortening, buttermilk, along with my new cast iron pan?
Tender, flaky, slightly sweet, golden browned perfection.


Skillet Biscuits
adapted from Paula Deen
print recipe

2 1/2 cups flour
2 tablespoons sugar
2 1/2 teaspoons baking powder
1/2 teaspoon baking soda
1/2 teaspoon salt
1/2 cup shortening (Butter Flavor Crisco)
1 cup buttermilk
1/4 cup melted butter

Preheat oven to 450 degrees
In a medium bowl, combine flour, sugar, baking powder, baking soda and salt. Cut in the shortening with a fork or pastry cutter, until it looks like cornmeal. Add the milk, a little at a time, Just until all dry ingredients are incorporated.
Turn the dough out onto a lightly floured surface. Knead lightly two or three times. Roll out the dough with a floured rolling pin to about 1 inch thickness.  Cut with a two inch cutter.
Place the biscuits in a greased iron skillet. Biscuits will be touching each other  in pan.
Brush tops of biscuits with melted butter. Bake for 12-14 minutes or until golden browned.
After the biscuits are done cooking, remove from oven and brush with remaining butter.

Tips:
-Don't get all worked up if you can't fit the biscuits in the pan perfectly. I cut one biscuit into two and formed two little biscuits.
-Don't over handle the biscuits, this will make them tough.
-Keep the ingredients cold.
-Keep the oven HOT. This allows for a high rise on the biscuits.
-I bake these on the lower third of the oven so the tops won't over brown.
-You may use regular Crisco, I prefer Butter Flavor Crisco. I've found TARGET has the best price on the Crisco sticks. So easy to use when making biscuits or pies.

4/11/11

Eggs Benedict 101


Spring. It's coming. Easter brunch. Just around the corner.
Grant's favorite dish for breakfast/brunch? Eggs Benedict. A few weeks ago, I decided to give it a try. How complicated could this be? Eggs, ham, a few English muffins and some sauce. 
Oh, helloooo,  sauce. 
Hollandaise. Turns out, this is the crux of the dish. 
I like this word. 
crux  (krks)
n.  crux  The basic, central, or critical point or feature


Here's what I learned while making Eggs Benedict, or Si's EB 101:

1. Rich, rich, rich. The two essential ingredients for making a great smooth Hollandaise are egg yolks and BUTTER. Eight ounces. Yes.  One.  Full . Cup.
2. The butter must be cold.
3. You don't need an instant read thermometer.  The key is whisk, whisk, whisk.  I whisked my arm off and my sauce was perfecto
4. There are about 1001 ways to make EB. And 1001 varieties such as California Benedict, Veggie lovers Benedict, Seafood Benedict, Curry Benedict,  etc. most available on the www.
5. Not a dish to make when you are in a hurry. Definitely a Saturday or Sunday venture. 
6. I didn't keep my sauce in a thermos as suggested, just turned the heat off, and warmed the sauce up at a low heat again when plating the last few servings (about 30 minutes from the first serving to the last... yes I'm a short order cook).
7. You may make either the eggs or the sauce first, and keep one heated, while preparing the rest of the dish.  I preferred making the sauce first. 
8.  If you want to watch simple tutorials about EB  for poached eggs, Hollandaise and overall assembly, look up any of these on YouTube.  Amazing how many folks are willing to share their knowledge. 
9. Hardly anyone makes their own Hollandaise anymore. Most restaurants and home cooks use mixes and/or the blender method.  
10. This is worth the time. And calories. About once a year. Promise.


Eggs Benedict
A Bountiful Kitchen

8 slices Canadian Bacon, warmed 
8 eggs, poached
4 English muffins, sliced in half, toasted and lightly buttered, if desired ( I thought 1 cup of butter in the sauce was enough)
Hollandaise Sauce

Assembly:
Prepare Hollandaise Sauce and set aside to keep warm.  
Place a two slices of toasted English muffin on a plate.  Place Canadian Bacon on top of English muffin halves. Spoon a poached egg on top of the meat slice. Top with about 2 tablespoons of Hollandaise Sauce.  Serve immediately, or if serving family style, lay all bread slices on platter and follow directions for assembly. Cover pan with foil and keep in oven on low until ready to serve, not more than an hour before serving. 


Alton Brown's Hollandaise Sauce
Food Network

3 large egg yolks
1 tablespoon water
1/4 teaspoon kosher salt
1/2 teaspoon ground cayenne, divided
3 to 4 tablespoons fresh squeezed lemon juice, strained, divided
8 oz cold unsalted butter, cut into tablespoon size pieces
1/4 teaspoon sugar

Whisk together the egg yolks, water, salt and 1/4 teaspoon of salt in a 2 quart pan (preferably a saucier) for  1 minute.
Put the saucier over low heat and whisk vigorously, moving the pan on and off the heat every 10 to 15 seconds, bringing the mixture to 140 to 145 degrees F, on an instant read thermometer, approximately 3 minutes.  Add 1 piece of butter at a time, every 30 seconds, while continually whisking and moving the pan on and off the heat. Maintain temperature around 120 to 130 degrees F throughout the remainder of the cooking process.  Once half of the butter, or 8 pieces have been added, add 1 tablespoon of lemon juice.  Add the remaining 8 pieces of butter, 1 at a time, every 30 seconds while continuing to move the pan on and off the heat maintaining 120 to 130 degrees F. After the last piece of butter has been added, add the remaining 1 tablespoon of lemon juice and the remaining 1/4 teaspoon cayenne.  Add the sugar and whisk for 1 to 2 minutes.  
Taste and add more lemon juice, as desired.  Move immediately to a short, wide mouthed thermos to hold sauce for up to 2 hours.  Reheat over low heat for 45 seconds. 


Perfect Poached Eggs
Cook's Illustrated

1 teaspoon salt, plus more to taste
2 tablespoons white vinegar
8 large eggs, each cracked into a small cup
ground black pepper

Fill an 8-10 inch skillet nearly to rim with water, add 1 teaspoon salt and the vinegar and bring mixture to boil over high heat. (I filled to within about an inch of the top of pan)
Working in two batches, cooking 4 eggs at a time, lower the lip of each cup into water at once, tip eggs into boiling water, cover and remove from heat.  Poach until yolks are medium firm, exactly four minutes, or for extra large or jumbo eggs, about 4 1/2 minutes. For looser egg yolks, poach 3 minutes. 
With slotted spoon, carefully lift and drain each egg over skillet. Set on warmed plate or platter and cover  with foil until ready to use. Keep in a warm place or in oven set to 275 degrees.

Tips:
-I did not remove the pan from the heat off and on as Alton suggests. I simply placed the butter in the pan one tablespoon at a time, when the butter melted, I would add another pat of butter, and so on. 
-Did not use a thermometer. Just whisked until all of the butter was melted and incorporated as the recipe suggests. 
-If you are preparing the eggs first, cook the eggs for 3 instead of four minutes, properly poached eggs will still have a bit of a runny yolk.  If you are keeping the eggs warm for later use, the egg will continue to cook a bit in the oven. 
-The sauce in this recipe will be enough for 8 English muffin halves. 

2/21/11

Mexican Breakfast Tortillas


Last Wednesday, we dropped our son, Stephen off at the Missionary Training Center, in Provo, Utah. Stephen will be serving a two year mission for our church-The Church of Jesus Christ of Latter Day Saints, aka the Mormon church.
It was a day filled with mixed emotions. For almost 5 months, since he opened his mission call to Puebla, Mexico, we have planned and prepared. Almost every day, there was some type of mission prep.  Appointments with docs, removing tonsils, filling teeth, securing a passport, getting vaccinations, renewing drivers license, purchasing clothing, supplies, etc.  Bought everything from a raincoat to a sewing kit. Stuffed two-2 pant suits, 6 pairs of dress pants, 14 white shirts, 7 ties, 2 belts, 12 pair of socks, workout clothing, pj's underwear, bedding, towels, 3 pairs of shoes, medication, first aid supplies, toiletries, books, scriptures (along with a lot of other garb) into three suit cases for two years.
Is this foreign to you? If you want to read more about the whowhatwhenwherewhyandhow, click here.  The Mormon church has over 53,000 missionaries serving full time missions in 162 Nations around the world, and now, my son is one of them.


Last week went like this:
Me asking myself, where did 19 years go?
Lots of  "last _____(lunch, dinner, movies, fill in the blank)".
Lots of excitement.
Lots of prayers.
Lots of friends and family stopping by to say goodbye.
Lots of tears.
Lots of hugs.
And of course, lots of food.


The Sunday before Stephen left, we gathered at our home for a farewell brunch. Stephen wanted food with a Mexican flair, so we served up Mexican Breakfast Enchiladas   I busied myself with food prep and cleaning for days, so I wouldn't have to think about saying goodbye. If I kept busy enough, the lump in my throat went away, for a while. The actual goodbye?  Goodness. That's another post.
The food was great.  The company even better.


How do you celebrate your child's life and their decision to serve the Lord for two years? How do you ever begin to thank all those who have loved your kid, practically from the time they were born, through their teenage years? How do you thank them for the many lessons they have taught and hours they have given up with their own kids, to teach yours? How do you thank them for the profound influence they have had on your family? In our home, two words: 
Good Food.
Lots of it.


Mexican Breakfast
If you love breakfast casseroles and Mexican food, you'll love this. You can make it the night before and bake in the morning. It's hearty enough to eat for dinner too. 
Adapted from: A Pinch of Salt Lake

1  cup low fat sour cream
1  10 3/4 oz can cream of chicken soup
1  4 oz can chopped green chilies
1/4 teaspoon cumin
1/4 teaspoon coriander
12 oz spicy ground sausage (I use Jimmy Dean)
2 tablespoons butter
7 large eggs
1/4 cup cottage cheese
1/4 cup chopped parsley, fresh
1/4 cup chopped green onions, green stems only
8-10  12 inch flour tortillas, buttered lightly
2 cups grated Cheddar cheese, divided
2 cups grated Monterey Jack cheese, divided
8-10 oz salsa, red or green

Whisk sour cream, soup, green chilies, cumin and coriander together in a mixing bowl.  Saute sausage, drain off grease.  Melt butter in Teflon skillet over medium heat, add eggs and cottage cheese and blend.  Cook until eggs are at soft scramble stage. Remove from heat and add green onions and fresh parsley. Add 2 tablespoons of the sour cream mixture and all of the sausage to the eggs. Lightly fold in 1 cup of the cheddar and one cup of the Jack cheese into the egg mixture.
Preheat oven to 325 degrees.
Grease a 9x13 pan.
Place about 1 cup of the sour cream mixture into the baking dish. Spread to cover bottom of pan.  Divide filling into the eight or ten tortillas. Roll up the individual tortillas. Place filled tortillas into prepared dish. Top with remaining sauce mixture, 8 oz. of salsa and finally 2 cups remaining grated cheese.
Bake for 30-45 minutes or until cheeses are melted and eggs are heated and bubbly.

Tips:
-This dish has many variations.  Sheri always makes it without the sausage, and adds fresh spinach instead.
-The original recipe calls for a 7 oz can of green chili salsa, added to the sour cream mixture. We like the way it looks when the salsa is reserved to top the tortillas.
-You may use Chorizo instead of Jimmy Dean sausage.
-Even though this is rolled as individual tortillas, after baking, it is easily cut into squares and served as more of a casserole. You may cut a 9x13 dish into 16-20 servings .
-For make ahead, prepare the recipe up to the point of placing the filled tortillas in the dish. Cover and refrigerate overnight. Refrigerate remaining sauce as well.  In the morning, remove the tortillas and top the dish with sauce and remaining salsa and cheese. Loosely cover and bake for 30-45 minutes at 325 . Remove foil and bake for an additional 10 minutes or until cheese is melted and dish is heated thoroughly. 

1/24/11

Basic Fruit Muffins with Streusel Topping


Questions I get almost weekly from young'ins (as Jake, age 14, likes to call them)  are: "Can you give me some recipes I can make when I move out? Easy recipes for college students, missionaries or newly married peeps? Low cost, quick and easy recipes?  I'm posting a new category, starting today called
"New Beginnings"-college and mish meals, for all of the above.  Hello. Yes, there is life beyond Del Taco or your mom's kitchen.
This is a great basic muffin recipe. If you don't have blueberries, try canned. Drain the fruit well and chop it up. No fruit at all? (did you spend all of your money on ice cream?)  Leave it out. No butter for the topping? Leave the topping off, and sprinkle with a little sugar. Most of the ingredients should be in your pantry. If not, and you're a student, load up next time you are home. Your mom won't mind.
I like this recipe, because the batter doesn't require butter.
Don't tell me you don't cook. I'm not listening. lalalalalalallalalalalalala.
Still not listening.
Get busy. Start cooking. Let me know how it goes.


Basic Fruit Muffins with Streusel Topping
A Bountiful Kitchen
print recipe


1 1/2 cups flour
3/4 cup white sugar
1/2 teaspoon salt
2 teaspoons baking powder
1/3 cup vegetable oil
1 egg, beaten
1/3 cup milk
1 cup blueberries or other fruit (blackberries, strawberries, raspberries)

Topping:
1/2 cup sugar
1/3 cup flour
4 tablespoons butter
1 teaspoon cinnamon

Preheat oven to 400 degrees.
Grease muffin cups with cooking spray or line with paper liners.
Combine 1 1/2 cup flour, 3/4 cup sugar, salt and baking powder in a large bowl.  Make a well in the center of the dry ingredients.  Pour oil, beaten egg and milk into center of dry ingredients.  Mix with large spoon or fork just until wet and dry ingredients are incorporated. Fold in fruit.  Spoon batter into muffin cups. Fill to top of cup.
Make topping- cut butter into all dry topping ingredients. Spoon topping on top of unbaked batter.
Bake for 20-25 minutes on middle rack of oven until tops are golden and toothpick inserted in center comes out clean.

1/14/11

Cinnamon Swirl Bread with Sweet Cinnamon Butter


Two and a half years ago, I started blogging about my fifth child, Cooking.  I started because I was a little sad that my kids were growing up. A little sad that, although I love my boys, I was now the only girl left at home. It seemed like I was facing a never ending camping trip of sorts (non stop burping, smelly socks, flatulence (sick, I know), etc). Instead of meals where the girls loved my creations, the dinner conversations now sound like this: "Why is there fruit on my meat?!"   Or after whipping up a honey Balsamic dressing for a salad-"Where's the Ranch??"  
They don't get it. 
Corrine (my oldest daughter) took pity on me and set up  A Bountiful Kitchen.  
It has been a great little outlet for me. I love to cook. I love taking pictures of food.  I love to discuss recipes through convo and emails I get from friends near and far.  This past week, I made two new blogger friends. My new friend, Robin, who lives back East, asked me about a recipe for cinnamon bread. I've had this basic white bread recipe for about 100 years. It's one of those tried and true, old but good.  I added some cinnamon sugar and passed the recipe on to Robin.  
Yesterday, while we were experiencing our 20th day of temperatures below 20 ( or something like that)  I mixed up a batch of Cinnamon Swirl Bread.  There's nothing like the smell of bread baking in a warm home when it's cold outside. Nothing like it. 
Oh, the Sweet Cinnamon Butter. Let's just say I could have eaten it alone, as an appetizer. 


Cinnamon Swirl Bread with Sweet Cinnamon Butter
(Famous White Bread)
adapted from Salt Lake Jr. League Heritage Cookbook, 1975
print recipe

2 packages dry yeast
2 cups warm water
4 tablespoons sugar, divided
2 cups milk
5 tablespoons shortening or butter
4 teaspoons salt
8-12 cups flour, approximately*
beaten egg for top of loaves (optional)

Filling for cinnamon swirl bread and cinnamon butter:
1 cup sugar
1/2 cup brown sugar
3 Tablespoons cinnamon

Sprinkle yeast over warm water. Add 1 tablespoon sugar. Set aside for 10 minutes.
Warm milk in small saucepan. Stir in shortening or butter, remaining 3 tablespoons sugar and salt. Cool to lukewarm.
Stir dissolved yeast into milk mixture.
Thoroughly mix in half of the flour. Add remaining flour, 1 cup at a time until dough is no longer sticky.  Knead, until smooth and satiny. Place dough in an oiled bowl and cover with small towel. Place bowl in warm spot. Let rise until doubled in bulk (about 1 hour).
Punch down and let rise again until doubled in bulk (about 30-60 minutes).
Grease three 4 1/2 by 8 1/2 inch pans generously with butter.
Divide dough into three pieces. Roll out into 3 rectangles, approximately 8x10 inches. Spread each rectangle with cinnamon sugar mixture (about 1/3 cup of sugar mixture per loaf). You should have about 1/2 cup of the sugar mixture left over to make the cinnamon butter.  Roll each piece of dough starting at short end, tucking end under when placing in pan.
Brush the loaves with a beaten egg (optional) and sprinkle with sugar.
Let rise again until doubled (or about 30-45 minutes) .
Bake at 350 degrees for 45 minutes.
Remove from pans immediately, and sprinkle with additional sugar.

Sweet Cinnamon Butter
1 cup softened butter
1/2 cup leftover filling from cinnamon bread

Soften butter in microwave, or leave sitting out on counter while preparing dough.
Mix butter and 1/2 cup cinnamon sugar mixture together in medium size bowl. Spoon into crock and serve at room temperature with bread.

Tips:
- *I like the texture of this bread when using bread flour  instead of regular white flour. I prefer
"Gold Medal Better for Bread Flour".  Found in most grocery stores.  If using a bread flour, you will only need about 8-9 cups of flour.
-This bread is wonderful sliced thick, toasted or used for French toast the next day.
-yes, this also makes awesome cinnamon rolls.


12/29/10

Mel's Kitchen Vanilla Pudding Cinnamon Rolls with Cream Cheese Frosting


Blustery. Perfect word to describe our weather.
Listened to the wind howl.
All.
Night.
Long.
Hello, hot cocoa and warm cinnamon roll morning.
I found these rolls on Mel's Kitchen Cafe. Wonderful blog. Melanie describes herself as:

"...very, very average when it comes to cooking."
Hello. Mel. Have you looked at your blog? Average is not a word I would use to describe your cooking skills. She started her blog as many of us do- to keep recipes, pictures, etc. in one place. Mel writes, "Several years later, this blog still houses my favorite tried-and-true recipes as well as the new, dishes and desserts I’ve made and loved.
I was browsing around her site the other day, and found lots of recipes that were tempting. I was curious when I saw her "best" category, and found Vanilla Pudding Cinnamon Rolls with Cream Cheese Frosting.
There's a reason this recipe is on her "best" page.
Oh, P.S. Remember waaay back, when you wanted to print out a recipe from ABK and had to cut and paste the text into Word, then print? Being the computer genius I am, I couldn't figure out the process. I asked Mel for help. She responded immediately and tutored me step-by-step. Now it's as easy as hitting "print" to get your fave recipe on paper. Thanks Melanie!


Vanilla Pudding Cinnamon Rolls with Cream Cheese Frosting
Mel's Kitchen Cafe
print recipe

Rolls:
½ cup warm water
2 tablespoons active dry yeast
2 tablespoons sugar
3 ½ ounce package instant vanilla pudding
½ cup butter, melted
2 eggs
1 teaspoon salt
6+ cups flour

Filling:
1 cup butter, softened to room temperature
2 cups brown sugar
4 teaspoons cinnamon

Frosting:
8 ounces cream cheese
½ cup butter, softened to room temperature
1 teaspoon vanilla
3 cups confectioner’s sugar
2-3 tablespoons milk

In a small bowl combine water, yeast and sugar. Stir until dissolved. Set aside. In large bowl, take pudding mix and prepare according to package directions. Add butter, eggs and salt. Mix well. Then add yeast mixture. Blend. Gradually add flour; knead until smooth. Do not over flour the dough! It should be very soft but not sticky. Place in a greased bowl. Cover and let rise until doubled. Then roll out on floured board to 34 X 21 inches in size. Take 1 cup soft butter and spread over surface. In bowl, mix 2 cups brown sugar and 4 teaspoons cinnamon. Sprinkle over the top. Roll up very tightly. With knife put a notch every 1 1/2 inches. Cut with thread or serrated knife. Place on lightly greased cookie sheet 1 inch apart. Cover and let rise until double again. Bake at 350 degrees for 15-20 minutes. Remove when they start to turn golden (don’t over bake). Frost warm rolls with cream cheese frosting (combine butter and cream cheese and mix well, then add vanilla and sugar and mix again, then add milk for desired consistency). Makes about 24 very large rolls.

*Freezable Recipe: After shaping the rolls and placing them on the baking sheet, cover with lightly greased saran wrap and a layer of tin foil. Store in the freezer. The night before you want to serve them take out the rolls and put them in the refrigerator. Let thaw in the refrigerator. Take out of fridge the next morning and let rise until doubled. Bake according to the recipe.
If you have less time, you can take the rolls out of the freezer and let them come to room temperature on the counter – about 4 hours, then let rise until doubled.

12/22/10

Cheddar, Bacon and Chive Scones


A few days ago, one of my favorite peeps in the world, Lauren B. asked me to post about Christmas breakfast. Usually for Christmas breakfast we have this or something similar. I like to make breakfast casseroles, because the work is done the day before, which leaves Christmas morning free to enjoy the fam. My favorite Christmas breakfast menu consists of: an egg dish, something sweet( muffins, cinnamon rolls etc), fruit, CANDY, hot cocoa and/or juice. Just noticed that "something sweet" was everything, with the exception of one item.
I haven't had time to make this yet, so I can't post a pic, but this or this is on the brunch menu for Saturday the 25th. I'm making modifications, and will get back with a review.
You can make these scones for breakfast, lunch or dinner. They mix up in less than 10 minutes. Similar to a buttermilk biscuit. Tender and light. Not like a traditional (heavy) baked scone. I think they would be yummy with some soft scrambled eggs and fruit for an easy Christmas breakfast.
PS - side note-Just finished watching our UTES get beat by Boise State. I'm worn out.
I know I have a hard life. Seriously. It was the weirdest, most exhausting, frustrating game.
Oh well.
Merry Christmas.

loves,
Si


Cheddar, Bacon and Chive Scones
A Bountiful Kitchen

2 cups flour
1 tablespoon baking powder
1/2 teaspoon salt
1/2 cup unsalted butter
1/2 cup buttermilk
1 egg
1/2 cup bacon, cooked and chopped
1/2 cup grated cheddar or other cheese
1/4 cup chopped chives or green onions

Preheat oven to 375 degrees. Line baking pan with parchment paper or lightly grease pan with cooking spray.
Whisk together flour, baking powder and salt. Cut in butter with a pastry cutter or blend into flour mixture with fingers until mixture resembles coarse meal. Pour buttermilk into measuring cup and add egg, then beat together. Pour wet ingredients into dry ingredients in bowl. Mix just until incorporated. Add 1-2 tablespoons of milk or buttermilk if necessary to make dough that is easy to handle but not sticky. Fold in bacon, cheese and chives.
Pat the dough into a 10 inch circle on a floured surface. Cut into half, then quarters. Cut each quarter into 2- 3 pieces, to make 8-12 total slices (depending on the size of scone you desire). Brush with butter if desired.
Place on prepared baking sheet and bake in 375 degree oven for 25 minutes or until light golden brown.
Remove from oven and serve immediately or follow directions below for make ahead.

Tips:
-For make ahead-Bake these the day before serving for 20 minutes and place in a Ziploc bag after they are cooled. When ready to eat, place on cookie sheet in oven for about 5 minutes at 325 degrees.
-These will not raise a lot or "grow" in size after baking (as compared to a yeast scone).

5/11/10

My Favorite Cinnamon Rolls with Cream Cheese Frosting


Cinnamon Rolls. Love them. Can't begin to count the number of recipes I have tried. Still on the quest to find the perfect one. A while back I tried Pioneer Woman's. Did I love them because of the maple frosting (really really really yummy) or bc they were the best ever cinnamon rolls, or bc they are baked in a pan coated with melted butter? Not sure. They were exceptional, but (in my weird, food obsessed opinion) still not perfection. They were more of a sticky maple bun, and a little bit of a lighter dough than I prefer. To date, this recipe has been my favorite. The claim is, they taste "just like Cinnabons"... I'm not sure about that. But they are pretty darn delish.
If you have a recipe you love, bring a pan on over, or (lame 2nd option) email me the recipe.


Cinnamon Rolls with Cream Cheese Frosting

dough:
1 (1/4 ounce) package dry yeast
1 cup warm milk, I used whole
1/2 cup granulated sugar
1/3 cup butter
1 teaspoon salt
2 eggs
4 cups flour

filling:
1 cup packed brown sugar
2 1/2 tablespoons cinnamon
1/3 cup butter, softened
1 tablespoon flour

frosting:
4 tablespoons butter
1 1/4-1 1/2 cups powdered sugar
1/4 cup cream cheese
1 teaspoon vanilla
dash salt

For the rolls, dissolve the yeast in the warm milk in a large bowl. Add sugar, butter, salt, eggs, and flour, mix well. Using a mixer fitted with a paddle attachment or a dough hook, knead the dough into a large ball. Place the dough in a clean lightly greased bowl, cover and let rise in a warm place about 1 hour or until the dough has almost doubled in size. Roll the dough out on a lightly floured surface, until it is approximately 15 inches long by 10 inches wide. Preheat oven to 400 degrees.
To make filling, combine the brown sugar, cinnamon, melted butter and flour in a bowl.
Spread the filling mixture evenly over the surface of the dough.
Working carefully, from the long edge, roll the dough down to the bottom edge. Cut the dough into 1 3/4 inch slices, and place in a lightly greased baking pan. I use a 9 x 13 pan. Let rise for about 30-45 minutes in a warm, draft free place. Bake for 10-15 minutes or until light golden brown. While the rolls are baking combine the frosting ingredients. Beat well with an mixer until combined. When the rolls are cooled a bit, spread generously with icing.

Tips:
-Be careful about adding too much flour to the dough. The dough should not be sticky when ready to raise. It should be barely coated with flour. When making rolls or bread- I usually add about 1/2 of the amount of flour the recipe calls for- add the remaining flour and then any additional flour the dough may need 1/4 cup at a time.
-I like to frost the rolls with icing a few minutes after removing from the oven, then let the rolls cool almost completely and top with the remaining frosting. If you frost too soon after removing from the oven, the frosting will melt into the pan and rolls. See third pic above, taken after the first frosting layer, first pic was taken after rolls were completely cooled and 2nd frosting layer applied.
-This dough does not raise a lot, compared to most dough recipes.

4/2/10

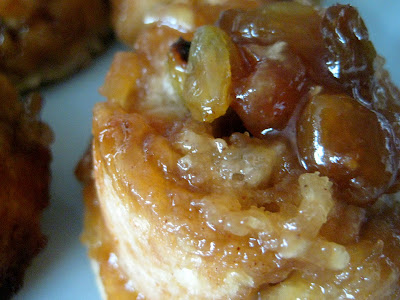
Sticky Apple Butter Biscuits


Know how you read a recipe and think I HAVE TO MAKE THIS.
Soon.
I waited for several months until I finally got around to trying Sticky Apple Butter Biscuits. I've never been a huge apple butter fan. But last summer my cute friend Melanie made some home made apple butter with her bumper crop of apples. And Brookie came home from working in Yellowstone, raving about her new found love, apple butter. Then I found this recipe. It was a sign.
I knew this would be the perfect brunch recipe. A little bready. A little fruity, sweet, sticky, buttery. Oh my deliciousness. Absolutely perfect for Easter Brunch.


Sticky Apple Butter Biscuits
adapted from Cookingbread.com

Topping:
1/4 cup honey
1/4 cup packed brown sugar
2 tablespoons melted butter
1/3 cup golden raisins

Biscuits:
2 cups all purpose flour
1 tablespoon baking powder
1/2 teaspoon salt
1/2 teaspoon cinnamon
3 tablespoons shortening
3 tablespoons cold butter
1 medium grated apple
2/3 cup whole milk

Filling:
2 tablespoons melted butter
4 tablespoons apple butter
1/4 cup brown sugar
1/4 cup golden raisins


Grease muffin tins with a little shortening and set aside. Preheat oven to 400 degrees.

In a small bowl combine topping ingredients. Mix together. Place an equal amount into the bottom of each muffin tin (about 2 teaspoons each). Sprinkle the 1/3 cup of raisins equally into each muffin tin; set aside.

Make filling for the biscuits in a small bowl and mix together; set aside.
In another bowl combine the flour, baking powder, salt and cinnamon together and stir. Using a pastry cutter, cut in the shortening and butter till they become small pea size chunks. Grate the apple. Squeeze out the juice and add the apple to the mixture. Add in the milk. Mix together till the dough comes to a ball. Add a tablespoon of milk if needed to allow dough to cling together. Turn dough out onto a lightly floured surface and knead until dough forms a ball. On a well floured surface, roll dough out to a 10 x 8 inch rectangle.

Spread filling on top of rolled out dough (same method used when making cinnamon rolls). After filling is spread over all of the dough, roll the dough, starting on the long side- like a jelly roll. Cut into 12 pieces. Place the slices into muffin tins. Bake in a 400 degree oven for 20-25 minutes, or till golden brown. Allow to cool for 1 minute then remove from tin. Serve warm.

Tips:
-Don't let the biscuits sit in the pan for too long, or they will stick.
-Rolls look best when turned upside down to serve.
-You may use any type of raisin, I prefer golden.
-I used Crisco Butter Flavor shortening.
-If you want to see a great step by step tutorial, click here.