Showing posts with label breakfast. Show all posts

1/19/15

Banana Bread with Coconut Oil


A while back, a reader suggested I try using coconut oil instead of butter in my favorite banana bread recipe. I was a bit hesitant, but so glad I switched out coconut oil for butter because the result was
W O W! Sometimes a fat substitution = less flavor, or inferior flavor, or a less than desirable texture. Not so with coconut oil.


Opinions differ on the benefits of coconut oil, but most critics agree coconut oil is better for your body than butter.  If it's better for you, and taste is not compromised, I'm in.
I also experimented a bit with a pineapple banana bread and a chocolate loaf variation.
Loved all three, recipes below.
Give it a try.
I think you'll love it too.


Banana Bread with Coconut Oil 
A Bountiful Kitchen
print recipe

1/2 cup coconut oil
1 cup granulated sugar
1/2 cup brown sugar
1 teaspoon vanilla
2 eggs
1/2 cup buttermilk
2 1/4 cups flour
1 teaspoon baking soda
1 teaspoon salt
2 very ripe, mashed bananas

Grease and line (with parchment paper) one large or two medium loaf pans.
Preheat oven to 350 degrees, place rack in middle of oven.
Place the coconut oil, sugars and vanilla in a bowl. Mix on medium speed until oil and sugars are combined and smooth. Add eggs. Beat for an additional minute on medium speed, add buttermilk until combined.
Add all dry ingredients. Mix on low speed just until wet and dry ingredients are combined, about 20 seconds. Add mashed bananas and mix on low for about 1-2 minutes, scraping down sides and bottom of bowl one time to make sure the ingredients are all incorporated. Blend until bananas are mixed in well with other ingredients. Do not over mix, do not mix on high speed.
Spoon batter into prepared pans.
Bake at 350 degrees for 40 minutes (for two medium pans) 50-55 minutes for one large loaf pan, or until toothpick inserted in middle of loaf comes out with a few moist crumbs attached. When the loaf is touched in the middle, the loaf should spring back.

Pineapple-Coconut Bread
1/2 cup coconut oil
1 cup white sugar
1/4 cup brown sugar
2 eggs
1/2 cup buttermilk
1/2 cup crushed pineapple, drained
1/2 cup sweetened flake coconut
2 1/4 cups flour
1 teaspoon baking soda
1 teaspoon salt
2 ripe bananas, mashed

Chocolate Banana Bread
same ingredients as original banana bread with the addition of:
1/3 cup unsweetened cocoa powder
1 cup semi sweet chocolate chips
Add the cocoa powder and chocolate chips at the same time the flour is added to the bowl. Mix as directed.

Tips:
-To line the pans with parchment, I place the paper on a counter, then place the pan on top of the paper. Trace around the bottom of the pan with a pen, then cut out the shape and place in the bottom of the pan. I usually double or triple the paper and cut several out at one time. You may also purchase pre cut liners in a baking supply store. I always recommend using a liner so the bread does not stick to the bottom of the pan. I also always grease with spray oil the bottom and sides of the pan to insure the bread does not stick.
-For the best banana bread, the bananas should be very ripe. I use bananas that have black skins and are so soft, they can easily be mashed with a fork in a small bowl. If the bananas are extremely ripe, and you are using a stand mixer, the bananas may be added whole and will easily break up with the use of a paddle attachment.
-Remember, do not over mix the bread. If the mixer is set on a high setting, air will be mixed into the batter and the bread will have a light texture, instead of a dense texture, which is desired in a quick bread.
-If you have an abundance of bananas and no time to make banana bread:
Peel the whole, ripe bananas.
Place the whole bananas in a ziplock bag. Freeze until ready to use.
When ready to use, thaw on counter, or place in microwave for a few minutes or until softened and thawed. Drain any water off of thawed bananas before using.


12/18/14

Berry Merry Coffeecake


Coffeecake is always on our list for Christmas breakfast. I love it because it's easy to make and can be made either Christmas morning or the day before. It's a one bowl, mix and bake type of dish. Perfect for when you're in a hurry, but want something special for your Christmas table.
One more week!


Berry Merry Coffeecake
A Bountiful Kitchen
print recipe

Cake:
1/2 cup butter, softened
3/4 cup light brown sugar
2 large eggs
1 cup vanilla or plain yogurt
1 3/4 cups flour
1 teaspoon baking powder
1 teaspoon baking soda
1 teaspoon salt
1/2 teaspoon cinnamon
1 1/2 cup berries fresh or frozen (in the winter, I use a frozen tri-berry mix)

Topping- 3 choices (using all three looks extra festive) :

Streusel (optional) or sprinkle with powdered sugar, or drizzle, listed below
1/2 cup sugar
1/2 cup flour
1/2 teaspoon cinnamon
1/4 teaspoon nutmeg
1/4 cup melted butter
1 cup chopped pecans

and/or

drizzle:
1 cup powdered sugar
1-2 tablespoons cream
dash of salt
1 teaspoon almond or vanilla extract

and/or
powdered sugar, in a shaker

Grease the bottom and sides of a 10-inch Spring form pan. Preheat oven to 350 and set the rack in the middle of the oven.
Cream the butter and sugar. Beat in the eggs. Add yogurt and blend well. Add all of the dry ingredients to the bowl. Mix just until the wet and dry ingredients are incorporated. Fold in the berries. Spread the batter into the prepared pan (it will be thick).
Prepare the streusel topping by mixing all of the ingredients together in a bowl. Sprinkle over the top of the cake, if making with streusel, otherwise, just bake the cake without a topping.
Bake for 25-35 minutes, or until a toothpick inserted in the center of the cake comes out clean. Let cool for about 10 minutes, and run a knife around the sides of the Spring form before detaching the side form.
When cake is completely cool, whisk powdered sugar in a bowl, add cream, salt and flavoring. Drizzle with a spoon over the cake. Let sit for about 30 minutes before cutting. Sprinkle with powdered sugar just before serving. 

Tips:
-This may be made the day before serving. After the cake is cooled, remove the springform side and cover with foil. 
-If the powdered sugar "melts" into the cake, simple sprinkle again. I often sprinkle the pieces on a serving plate as well. 
-You may use all three toppings if you like! 
-If you don't have vanilla or plain yogurt, you may use fruit on the bottom style yogurt, simply scoop the yogurt off the top of the fruit and add to the cake, discard fruit layer. Sour cream may also be substituted.

12/15/14

Overnight Croissant Breakfast Bake


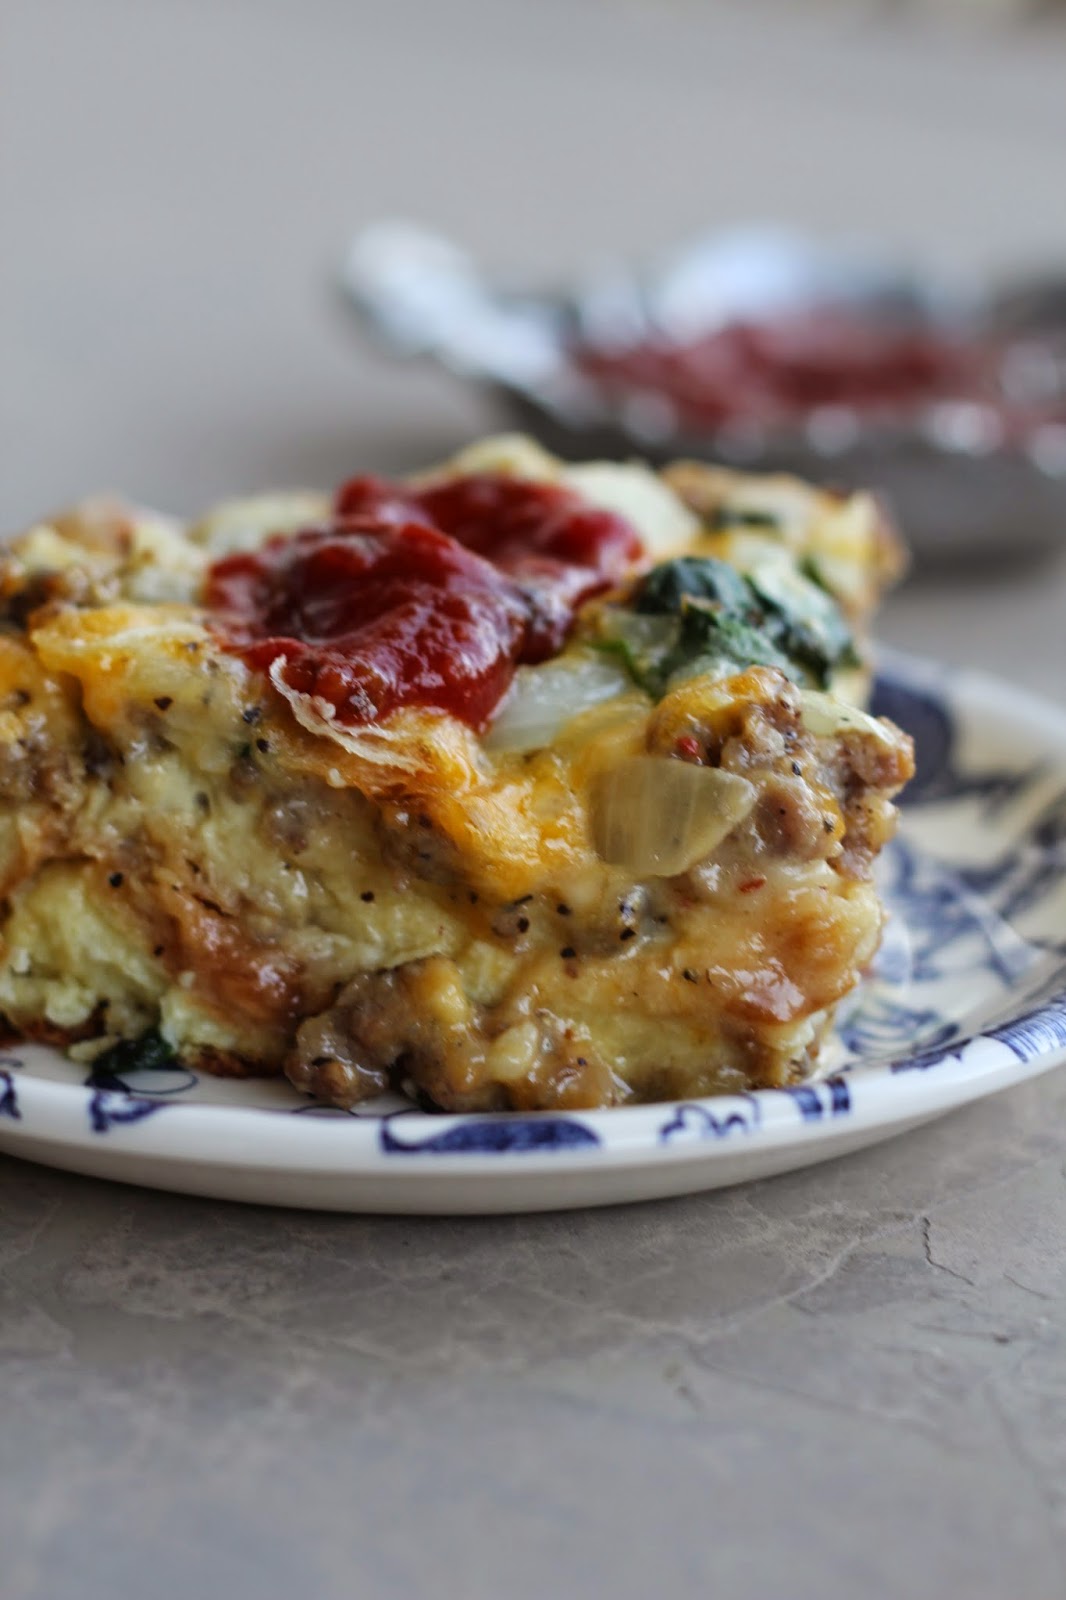
What are you planning for Christmas breakfast? Hopefully not some ho-hum breakfast casserole! My Overnight Croissant Breakfast Bake will take your Christmas celebration to a new level. Instead of using flat, ordinary pieces of bread try using croissants to create a bread pudding-type texture for your special holiday breakfast.
The beauty of this dish is, it can be made ahead and tucked away in your fridge for Christmas morning. All you have to do on the 25th is pull it out of the fridge and bake. I love to serve it with a simple berry coffee cake, fresh fruit, hot cocoa and juices.
It's so good, my kids have been known to forget about opening presents until noon.
Serious.
Up next, Berry Christmas (make ahead) Coffee Cake.


Overnight Croissant Breakfast Bake
A Bountiful Kitchen
print recipe

4-6 large croissants (day old are best)
1 lb Italian or spicy sausage (you may use more if desired)
2 cups chopped onion
1-2 cups fresh spinach
2 cups grated Cheddar, Monterey Jack, Pepper Jack, Mozzarella, or a combo
12 large eggs
1 1/2 cups half and half
1 teaspoon dry mustard
1 teaspoon salt
1 teaspoon pepper ground pepper

Grease a 9x13 or large casserole dish.
Tear the croissants into large chunks and lay in pan close together. The rolls should cover the bottom of the pan.
Brown the sausage in a Teflon frying pan, drain grease and place cooked sausage in a dish lined with paper towels to collect any extra grease. Press the paper towels around the sausage to squeeze out any remaining grease. Pour the meat on top of the croissants in dish, distribute evenly.
Using the pan the meat was cooked in, wipe out pan with a paper towel and place the pan back on the stove at medium high heat.  Cook the chopped onion for about 5 minutes or until softened, add one tablespoon oil or butter if needed.  Add spinach to pan and cook just until the spinach is wilted. Pour cooked onions and spinach over top of sausage. Top with grated cheese.
Beat the eggs and half and half together in a blender or bowl. Add the dry mustard, salt and pepper.
Pour this mixture over the rolls in the pan. Cover with foil that has been greased (on side facing eggs) and store overnight in refrigerator.
The next morning, remove casserole from fridge, preheat oven to 375 and place rack in middle of oven.
Bake covered for 30 minutes, then carefully remove foil and bake until top is slightly puffed and custard is set in center, about 30 minutes more.
Let cool for about 10 minutes, cut into 12 squares and serve immediately with chili sauce and or salsa.
Serves 10-12

Tips:
-The meat may be cooked and kept in fridge for up to three days before assembling. Or you may cook meat and freeze ahead of time.


10/5/14

Creme Brulee French Toast with Creamy Maple Syrup (Cheesecake Factory Copycat)


I've been to Cheesecake Factory for lunch and dinner, but this summer was my first time eating breakfast at the popular restaurant. Our server recommended his favorite dish- Creme Brulee French Toast. It was bite-after-bite of melt in your mouth deliciousness. I knew it had to be filled with butter and cream to taste this good. After a lengthy discussion with our server about the dish he shared this:

1. They soak the bread overnight in the egg mixture. (which I found is not necessary)
2. A lot of cream is involved.
3. The bread is a brioche loaf. Perfect bread for making decadent french toast.  At our local Harmons, the brioche is made with flour, eggs and butter. Top three ingredients, in that order.


Brioche loaf from Harmons. 


The texture of this french toast is like a very moist bread pudding, with a little bit of caramelization on top due to the sugar sprinkled on while cooking.
The french toast was amazing.  But the syrup. Oh. My. 
I could not stop tasting it. I wanted to take a gallon home so I could figure out what was in the buttery, ever so slight maple, creamy mixture. I looked online, but nothing for CF's syrup.  I finally came up with this recipe that is a perfect topping for the Creme Brulee French toast.
If you're out for breakfast, try this at Cheesecake Factory, if you're at home this weekend, cooking for your peeps, try my version.
Have a great weekend :)


Creme Brulee French Toast with Creamy Maple Syrup
A Bountiful Kitchen
print recipe

1- 1.5 lb loaf Brioche sliced thick (about 8- one inch slices) day old is best
5 large eggs
1 egg yolk
1 1/4 cups half and half
1 tablespoon vanilla
2 tablespoon sugar
butter for cooking

Beat eggs, egg yolk, half and half, vanilla and sugar together in a 9x13 pan. 
Place the bread in the pan and let the bread soak up the egg on one side for about 5 minutes, then turn and let soak on other side. If the bread does not fit all at once in the pan, let the bread soak, then remove to plate to allow other pieces to fit in pan. Let any excess egg mixture drip off into pan.
Heat frying pan or griddle up to 350 degrees. Melt a small amount of butter in pan. Place french toast pieces in pan and fry until golden on first side. While cooking the first side, sprinkle a small amount of sugar on the uncooked side. Flip and cook other side until golden and sugar is caramelized.
Serve with Maple Cream Syrup.
Serves 4-6


Maple Cream Syrup
1 cup heavy cream
1/2 cup butter
1/2 cup brown sugar
1/4 teaspoon maple extract
dash salt
1/2 teaspoon vanilla

Place cream, butter and brown sugar in a pan over medium heat. Bring to a boil. Cook for one minute. Remove from heat and add maple extract, dash of salt and vanilla.

Tips:
-The cooking time will vary according to the pan/heat source you are using. I use a built in griddle, which gets hotter than the typical griddle (plug in type). I've also used a Teflon pan over a flame. I believe the best crust is formed on the french toast when using a cast iron or other non Teflon type coated pan. This allows the sugar to form a bit of a caramelized layer on the outside of the french toast. That said, this recipe tastes delicious when using an electric griddle with a Teflon coating. If you are cooking several batches you may need to wipe out the pan to prevent the bread from sticking to the melted sugar. Remember to butter the pan after each batch.
-Remember the bread is thick, and time needs to be allowed to cook the inside of the french toast as well as the outside of the bread. Don't turn the heat up too high, or the outside will burn and you'll be left with a soggy inside. We're looking for tender and creamy, not soggy.
-You can find Brioche in many specialty bakeries. I have also used a Challah loaf.
-Store any leftover syrup in refrigerator, covered. It will keep for a month or so. Just heat up when ready to use.


4/28/14

Mary's Honey Nut Granola


My friend Mary makes the best granola.  It's crunchy, nutty, slightly sweet and a bit salty.  And the best part, aside from the taste, is the simplicity of the recipe. Granola is so easy to make. You can mix up a batch and put it in the oven while you're folding laundry, or balancing the checkbook, or reading cooking blogs :) A few minutes of stirring and baking and you'll have breakfast for days (or weeks) to come.
I love a bit of granola on my yogurt in the morning, or just a handful or two with some fruit. You can substitute different nuts and add whatever you like, but I loved the walnut and almond combo.


This makes quite  a bit of granola, so if you want to package some up and give it away as a gift, I guarantee the recipient will love it. Mother's Day, is just around the corner. How about ditching the usual candle and lotion and try making Mom some granola instead?
She'll  love it.
Promise.


Mary's Honey Nut Granola
Mary Primos
print recipe

6 cups thick-cut old fashioned oats
2 cups slivered almonds
2 cups chopped walnuts
1/2 cup canola oil
1/3 cup honey
2 teaspoons vanilla
1/2 teaspoon cinnamon
1 teaspoon salt (I like sea salt)

Preheat oven to 325 degrees. Line a large rimmed baking sheet with parchment paper.
Place dry oats, almonds and walnuts in a large bowl. Mix together.
In a separate small bowl, whisk together oil, honey, vanilla, cinnamon and salt.
Pour  wet ingredients over mixed oats and nuts and toss until mixed well.
Spread mixture on prepared baking sheet. Bake for 20 minutes or until golden brown, stirring every 5 minutes.
Let cool completely, then store.

Tips:
-This is a great gift to send in the mail, for mom or missionaries, college students or loved ones in the military. Let the granola cool completely, then scoop into Ziplock bags. Press all of the air out of the bag, seal and send. It keeps for two to three months if sealed properly.


4/16/14

ABK's Classic Deviled Eggs


What's an Easter feast without a deviled egg?
Everyone loves deviled eggs, especially on Easter Sunday.
Here are a few secrets I've gathered from trial and error about making classic deviled eggs.
Rule #1 Don't overcook the egg. Follow the method below for perfect boiled eggs.
Grate, instead of smash the yolks with a fork. You'll get a smoother filling overall.
Don't add too much mayo, or the filling won't set up and the end result will be a not-so-pretty egg.


Fill the egg with a bag. Use a decorating tip, the same as if decorating a cake. Your eggs will look like they were filled by a professional, vs a 3 year old.

This photo sequence was taken by Grant, who is currently working on his
food photography skills. Bless his heart.

Even though this recipe looks complicated, it's not. I added lots of tips to make it easier for you. Because I love you.
And I want your deviled eggs to stand up to the scrutiny of your mother in law.
It doesn't get more simple than this:
One bowl.
One beater.
One bag.
One tip for the bag.
Get busy.


ABK's Classic Deviled Eggs
A Bountiful Kitchen
print recipe

one dozen large eggs, preferably a few days old
1/2 to 3/4 cup mayo ( not low fat) I like Best Foods or Hellman's
2 teaspoons yellow mustard
salt and white pepper to taste
paprika, for top of eggs, optional
pastry or plastic bag and 1 large star tip

Carefully place the eggs in a pan large enough to hold all of the eggs. Cover with cold water about 2 inches above the eggs. Heat over medium high heat until the water boils. Boil for about 1 minute. Remove pan from heat, cover and let sit for 10-12 minutes. Rinse eggs with cold water, until eggs are cool enough to handle.  Drain water, crack the eggs and remove all shells. Discard shells. Unless you are Martha, and are making a craft for a centerpiece out of egg shells.
After peeling, cut the eggs in half with a sharp knife.
Gently scoop out the yolk into a deep bowl. You will want a large, deep bowl so when the yolks are beaten, they don't spill over the edge of the bowl.
Place the whites on a platter, or dish to transport the eggs (see below).
After all of the yolks have been removed, gently grate the egg yolks against the grate on a box grater. Add 1/2 cup of mayo, 2 teaspoons mustard, salt and pepper to the yolks. On low speed, beat the yolks just until smooth. If the yolks are not creamy enough, add additional mayo a little at a time, until the mixture will adhere to a spoon, but not fall off the spoon if turned upside down. If the mixture is too runny, it will not sit up well in the egg white. Taste the filling and add more salt and pepper if necessary.
Fit the end of the plastic bag with a star tip. Cut the end of the plastic bag off, so the end of the tip is exposed. Roll the end of the bag to the outside, so the inside of the bag is exposed as much as possible, making the bag easier to fill. Use a large spoon and fill the bag with the egg yolk mixture, Spooning the filling into the bottom of the bag. When finished, unroll the edges of the bag and fold the bag down and let any extra air out of the bag, so the filling is ready to be squeezed out of the bottom of the bag.
Using a swirling motion, fill the eggs with the yolk mixture. Repeat until all of the filling is gone. Sometimes, I have an extra white, or two.
Sprinkle with paprika if you like.
Serve or refrigerate up to 24 hours before serving.

Tips, aka everything you ever wanted to know about deviled eggs, but were afraid to ask:
-For easiest peeling, it is best to use eggs that are a few days old.
-The size of the egg will determine if you use 1/2 or 3/4 cup of mayo, or possibly a tablespoon or two more than 3/4 cup. If you are purchasing extra large Costco type eggs, the eggs (and yolks) are usually much bigger than the extra large eggs purchased at the corner grocery.
-Grating the yolks, instead of smashing with a fork will give your deviled eggs a very smooth filling. I also used a beater to mix the ingredients after grating. Don't over mix, just enough to incorporate and get an even filling.
-Filling options. The options are endless. I'm into simplicity. My favorite egg salad sandwich has just mayo, egg and salt. So I love this recipe. You can add hot pepper sauce, vinegar, flavored mustard, sweet relish, chopped up anything, and lots of garnishes to top the egg. Just make sure it doesn't get too wet, or it won't sit up pretty when you go to fill the whites. And be sure the filling (chunks of desired filling) will still squeeze out of your pastry bag and tip .
-Where's the vinegar? Most recipes call for vinegar. I'm not a fan, so I leave it out. The mustard gives the filling a nice little bit of tart flavor, and I like the simplicity of yolk and mayo.
-Do not use a serrated edge knife to cut the eggs in half, or your eggs will not have a smooth edge when filled.
-White pepper is recommended, but black pepper is fine as well.
-When filling, use a disposable plastic pastry bag fitted with a decorative tip. I used a large star tip. Slide the tip into the bottom of the bag before filling, then snip off the end of the plastic bag. A Ziploc bag
works if you don't have or want to purchase pastry bags. Pastry bags and tips can be purchased at grocery, craft or kitchen specialty stores. I like the disposables, because they are easily tossed after using. They usually come in packages of 12. The tips are $1-2 each and may be used over and over.
-When transporting the eggs, use a sheet of parchment paper on the bottom of a dish. It will keep your eggs from sliding around. I put mine in a 9x13 plastic ware dish and snapped the lid on. See photo below.
-You can make this recipe the day before serving and hold them in the fridge. Just remove from fridge and serve when ready. They will look and taste the same the day after preparing.
-You've now earned one credit toward your Master Deviled Egg Chef degree. Congrats.

Eggs ready to transport without the slippery slide problem...


4/11/14

Blueberry Cream Cheese Stuffed French Toast


Easter is just around the corner. In our home, we love to celebrate with a family gathering. No matter the time of day when the meal is served, we make brunch dishes, along with the traditional ham, rolls, salads and of course, desserts. 
I love this recipe for Blueberry Stuffed French Toast.  It can be made for two, or twenty. Most stuffed french toast recipes are made the night before, layered in a dish,  set in the fridge, and baked the following morning.  I wanted to create a dish that mimics an overnight french toast, but takes only a few minutes to create before serving. Most of the overnight stuffed french toast dishes serve 8-10, this one is perfect if it's just you and your sweetie, or great for a crowd as well. Everyone can join in and help assemble, and the bread can be cooked to order. I used blueberries, but strawberries, blackberries and/or raspberries would be delicious as well. 
Come back soon, I'll be posting dishes for Easter for the next several days! 


Blueberry Cream Cheese Stuffed French Toast
A Bountiful Kitchen
print recipe

6 Thick Slices bread, preferably Texas Toast or French Bread about ¾ inch thick
4 large eggs
⅓ cup milk
1 teaspoon vanilla

for filling:
4 oz cream cheese, softened (room temperature)
3 tablespoons powdered sugar
1 teaspoon vanilla
2 cups fresh blueberries

2 tablespoons butter, for cooking

Mix the softened cream cheese, powdered sugar and vanilla in a medium bowl with whisk until smooth.

Beat the eggs, milk and vanilla in a bowl until mixed well. Pour into a shallow dish that will allow for dipping of bread completely ( a square pan works well).

Spread about 1 tablespoon of cream cheese mixture on one side of each piece of bread. Make sure to spread evenly and all the way to the edge of the bread. Sprinkle a few blueberries on top of the cream cheese mixture on three of the slices of bread. Make a sandwich with the bread slices. The “sandwich” should have the following:

one slice of bread with cream cheese mixture
one slice of bread with cream cheese mixture and a few blueberries sprinkled on top
Melt some butter in a pan, preferably a non-stick pan over medium high heat.
Dip the sandwich into the egg mixture.

Place the sandwich into the pan with the melted butter and fry for about 3 minutes on each side or until golden browned. Flip and repeat on the other side. Remove and serve immediately or keep on plate in oven until all pieces are cooked and ready to serve.

Place on plates and sprinkle with additional remaining berries. Sprinkle generously with powdered sugar and serve with jam or syrup. Serves 2-3

4/5/14

Sour Cream Pancakes


Have you ever eaten a pancake made with sour cream? There's a little breakfast/lunch spot in Salt Lake called Penny Ann's Cafe, and they serve the most delicious sour cream cakes! Sometimes, I daydream about those pancakes. They're that good.


This morning, I was thinking about those light, slightly tangy, melt in your mouth cakes. I was getting ready to watch General Conference on TV, and didn't have time to run in to SLC and wait in line for pancakes, so instead, I dug up a recipe in a cookbook I've had for years. A few minutes later, we were flipping cakes and smothering them with butter, syrup and fresh strawberries.
I know you're going to love these too.
Happy cooking!


Sour Cream Pancakes
adapted from the Jr League Centennial Cookbook
print recipe

1 egg
1 cup buttermilk
1/2 cup sour cream
1 tablespoon melted butter
1 1/4 cups all purpose flour
1 1/2 teaspoons baking powder
1 teaspoon baking soda
1/2 teaspoon salt
1 tablespoon sugar

Combine all wet ingredients in a medium size bowl. Mix with whisk until blended.
Add all of the dry ingredients to the bowl. Mix once with a large spoon or whisk, do not over mix, mix just until the ingredients are incorporated, there should be a few lumps in the batter.
Heat the griddle to about 350 degrees. Melt butter onto griddle.
Using a 1/3 cup measure, scoop out batter and spread a bit with the edge of the cup. The pancake should be approximately 4-5 inches across.
Let the pancake cook until several bubbles appear and then pop. Turn the pancake gently, and let cook for an additional 3 minutes on opposite side. Do not pat down. Do not flip more than once.
The pancake is done when poked gently in the middle and the cake springs back.
Serve immediately with fresh fruit, syrup, butter and (or) powdered sugar.


4/2/14

Pineapple Mango Breakfast Muffins


I've been making this recipe forever. With twist here and there. Sometimes I use pineapple and mashed banana, other times pineapple and applesauce. Last week, I had a few mangoes sitting on my counter, getting close to the too-ripe stage.
The ripe mangoes were perfect for baking, and for my newest combo- Pineapple-Mango Breakfast Muffins. A great fit for breakfast because of the fruit and yogurt, and not too much sugar... so you can eat a muffin without the guilt.
Because none of us need a helping of guilt to start the day, do we?
Have a great day :)


Pineapple Mango Breakfast Muffins
A Bountiful Kitchen
print recipe

1 cup white flour
3/4 cup wheat flour
1/3 cup sugar ( if you like your muffins sweeter, increase this to 1/2 cup)
1 1/2 teaspoons baking soda
1/2 teaspoon salt

1-8 oz can crushed pineapple, drained
1 large ripe mango (important that it is ripe and sweet), pitted, peeled and diced
7-8 oz plain or vanilla yogurt ( I used Greek yogurt)
2 eggs
1/2 cup canola oil

additional sugar (about one tablespoon) for top of muffin, if desired

Preheat oven to 400 with rack in center of oven.
Combine all dry ingredients in a bowl.
Make a well in the center of the dry ingredients, place drained pineapple, diced mango, yogurt, eggs and oil in the well. Or just mix the wet ingredients in a separate bowl, then pour all at once into the dry ingredients. Fold the wet ingredients into the dry, just until the flour disappears. Do not over mix.
Scoop the batter into a muffin tin that has been greased or lined with cupcake liners. Fill muffin tins about 3/4 full. Sprinkle with sugar if desired.
Bake for about 15-18 minutes or until tops are golden and muffin springs back when touched lightly.
Makes approximately 10-12 muffins.


3/5/14

Cracker Barrel Biscuits (copycat recipe)


You know how I love a good biscuit.
This recipe is a Southern classic. It's rumored to be the Cracker Barrel recipe.  It calls for ingredients all self-respecting Southern cooks have in their kitchen: self rising flour, shortening, and buttermilk. If you're a Yankee, (like me) you probably don't have self rising flour on hand at all times. No worries. You can make your own in a minute with three simple ingredients.


Oh, one more tip, My dear friend Miss Mary (what the kids love to call her) was visiting from Mississippi a few weeks ago. I made a big batch of biscuits for breakfast one morning, and we ended up having quite a few left over. I'm kind of a biscuit snob, so I'm not one to eat a leftover biscuit. I was about to throw them away when she told me the secret to re-heating leftover biscuits.  Listen up. Split them in half. Butter both of the insides. Lay them on a cookie sheet and broil just until lightly browned and heated through. Careful not to burn. They taste fresh and almost better than the first baking. We ate up every last crumb.
The rumor about these being the Cracker Barrel recipe? I've eaten a Cracker Barrel biscuit and I can tell you this.  This recipe makes a biscuit that's tender and flaky, like CB's. A bit of crunch from being baked at 450, a bit salty, which is perfect with the jam you're going to put inside. If we're comparing, I have to say no restaurant I've ever dined in serves a biscuit this good. It's hard to beat a home made biscuit.
Get baking.


Cracker Barrel Biscuits
adapted from cdkitchen.com found on Pinterest
print recipe

2 cups self rising flour (or  you may make your own, recipe below)
1/3 cup solid shortening, I prefer Crisco
2/3 cup plus 2 tablespoons buttermilk, shaken
melted butter

Pre heat oven to 450 degrees, and set rack in middle of oven.
Place the self rising flour into a medium size bowl. Cut the shortening in , using a pastry cutter, or two knives. Add the buttermilk all at once. Gently fold the buttermilk into the flour and shortening, until the
dough gathers together, and the flour is mixed in. I use a large wood spoon for this.
Turn the dough onto a lightly floured surface and pat gently into a disc about one inch thick. Do not over handle the biscuits, this will make them tough, and not tender.
Gently cut the biscuits, using a biscuit cutter or glass. Place onto a cookie sheet.
Brush the tops of biscuits with melted butter.
Make sure the oven is completely pre heated  and up to 450 when the biscuits are placed in to bake.
Bake for about 15 minutes, or until golden brown on top and bottom.
Makes 9- 2 1/2 inch biscuits. Biscuit yield will depend on size of cutter.

Self Rising Flour :
1 cup flour
1 1/2 teaspoons baking powder
1/2 teaspoon salt
Mix together in a bowl with a fork. Store in a container or Ziploc bag until ready to use.
I double this for the Cracker Barrel recipe, and have a little leftover for the next time I make biscuits.
Measure out 2 cups for the recipe above.


10/8/13

Cream Biscuits


Biscuit experts say that using a sharp biscuit cutter and not twisting the cutter is one of the secrets to a perfect biscuit.  Here's my little graduated biscuit/cookie cutter set. 
  

If you've never tried a biscuit made with cream, you're in for a treat. The next time you have a bit of leftover cream in your fridge, give these a try. This biscuit has a slight crunch on the outside, and a pillowy-soft center. The cream gives them a melt-in-your-mouth quality.
Butter and jam?
Not optional.


Cream Biscuits
A Bountiful Kitchen, adapted from Diary of a Glad Housewife
print recipe

2 cups all purpose flour
1 teaspoon salt
2 teaspoons baking powder
1/2 cup shortening ( I like butter flavor shortening)
1/2 cup heavy cream
1/3 to 1/2 cup cold water

Place the flour, salt and baking powder in a medium size bowl. Cut the shortening into the dry ingredients.  Stir in the heavy cream and enough water for the dough to pull together when stirring, about 1/3 to 1/2 cup of water. Let the dough rest for about 5-10 minutes.  If the dough is sticking to your hands, before cutting, sprinkle with a little flour. Turn the dough in the bowl until the dough is no longer sticky. You may need to add up to 1/4 cup of flour in this process.
Gently pat out the dough 3/4 inch thick on a floured surface. Cut the biscuits with sharp cutter, pressing straight down, not twisting the cutter.  Place the biscuits on parchment paper and bake at 425 degrees for approximately 12-15 minutes, until golden brown on top.
Serve immediately with butter and jam. 

10/2/13

Pumpkin Buttermilk Chocolate Chip Coffee Cake


Last Sunday, we had a flop in the kitchen. Notice me, using the term "we" loosely.
Here's the scene  (in case you care). It's ten minutes before church starts. I realize I haven't placed the meat into the oven so we can eat when we get home. It's a 6 lb pork roast, frozen solid. I throw it into a pan, pour some liquid and other ingredients over it, cover and place in the oven at 350 degrees. A little too high to slow cook meat, especially frozen meat. But that's what the directions said. Or so I thought...
The result? You know that scene on Christmas Vacation where they all sit down to eat Christmas dinner and the turkey is so so dry it lets out a huge puff of air/steam/smoke when Clark cuts into it?? The family's all chomping on it, trying to chew it up, and can hardly choke it down. Yes.  That was our Sunday dinner.  Luckily, I had broiled a piece of salmon, Corrine made a great salad, and of course, we had my friend over: Dessert.
DESSERT TO THE RESCUE!!


 I say, if all else fails, have a big helping of dessert. Or two.
Which reminds me. At one point in our marriage, very early on, Grant tried to tell me we didn't need to have dessert after every dinner.
Hello.
Have you lost your mind??? That was years ago.  He saw the light and here we are (still married). Thirty-one years and counting. Um, yes, there's hope for your marriage.
Dessert to the rescue:  This cake may be served as a cake or coffee cake.  Serve it warm out of the oven with a scoop of ice cream or some whipped cream for dessert. Or in the morning as coffee cake.  It's a one bowl, throw it all in the mixer type of cake. Get out your bowl. This could be in your oven in ten minutes.
Have a great day!


Pumpkin Buttermilk Chocolate Chip Coffeecake
A Bountiful Kitchen original recipe
print recipe

cake:
1 cup pumpkin puree
1 cup buttermilk, shaken
2 eggs
3/4 cup vegetable or canola oil
1 cup granulated sugar
1 teaspoon vanilla
2 1/4 cup all purpose flour
1 teaspoon baking soda
1 teaspoon baking powder
1 teaspoon salt
2 teaspoons pumpkin pie spice*
1 cup semi sweet chocolate chips

Spiced nut topping:
2 tablespoons butter, cold
1/2 cup brown sugar
1 teaspoon cinnamon
2 tablespoons flour
1/2 cup pecans*
two dashes salt

Preheat oven to 350 degrees and set the rack in center of oven.

To make topping:
Place all of the topping ingredients into a food processor and pulse until nuts are chopped and ingredients are mixed well. If you don't have a food processor, soften the butter to room temperature and chop the nuts. Mix all of the ingredients in a bowl. Set aside.


To make cake:
Place all cake ingredients into a large mixing bowl. Mix with electric mixer or stand mixer for about 1 minute or until all ingredients are incorporated.
I like to place the chocolate chips on top of all the dry ingredients so the chips will be coated with the flour and prevent sinking to the bottom of the pan. One bowl-one-mix cakes work best when all of the wet ingredients are placed in the bowl first, then the dry ingredients on top of wet ingredients.

Line the bottom of two 8-inch round cake pans with parchment paper and grease the pans, or use one 10-inch Springform pan.
Mix together cake ingredients as directed.
Mix together topping ingredients in separate bowl.
Pour the cake ingredients evenly into the prepared pan(s). Sprinkle the topping evenly over the cakes.
Bake at 350 for about 35 minutes for 8-inch pans, or about 45 minutes for 10-inch pan.
Remove from oven and let cool. Invert onto a plate, then turn over again onto a platter to serve.

Tips:
-*For the pumpkin pie spice I used my simple, inexpensive, home made recipe for Pumpkin Pie Spice.
-**If not using nuts in topping, add 2-3 more tablespoons of flour to topping.
-If you want to give away a cake and keep one for yourself, use two 8 inch cake pans. You may also use disposable pans, then there is no need to turn the cake out of the pan before serving or giving away.