Are you ready for this week? The week of thanks, family, friends, food, football, and P I E .
If you've never tackled pie, but want to try, I have a little tutorial for you. A step-by-step with photos to help you along (printable recipe at bottom of photos). I taught two pie classes in the last couple of weeks and have had people who have never made a pie in their lives
report back and tell me they went home and baked a pie that their family LOVED. Two teenage girls in my neighborhood came to a class, and then had their mother take them to the store to buy apples so they could bake a pie. Yes, two teenage girls baked an apple pie. Successfully. Without using store bought crust. Hooray for home cooking!
You can do this.
The best apple pie in the world.
You know you want it.
Let's get started.
 |
| Not my oven, but don't you just love a turquoise oven? |
Step one.
Get your oven ready:
Move the rack to the bottom third of the oven (usually the second to bottom shelf) and turn the oven on to 375 degrees. I have been baking pies on the bottom shelf, or close to it, for years now. It insures the bottom crust is nicely browned and the top crust does not get over browned. The exception to this is if you have an oven like I
now have (Wolf) that has a special setting just for baking pies. In this case, leave the rack in the middle and use the
convection bake (not convection, convection bake)
setting, made especially for pie baking. Don't be jelly. I'm not all that impressed with this oven. I'd trade my old GE's for these in a heartbeat. That's a story for another post.
OK, back to our happy pie making toots.
Oh, and thanks in advance to Robilyn and Angie, who allowed me to photograph their pie making experience :) You'll see their pies and lovely hands in the photos to follow...

First, get yourself an apple-peeler-corer-slicer . Sold at most hardware stores. Also sold at kitchen stores. I've owned a couple. I like the type that suction to your counter top the best. Wet the counter a bit with a slightly damp cloth, then attach the peeler. If you can't get your hands on one of these, peel and core with a paring knife, slice the apples into about 1/4 inch thick slices. Believe me, if you can spare the $25 it's the best money you'll ever spend. OK, maybe not the best money, but it will make you love me every time you make an apple pie. Oh, and buy apples that are uniform in size, it will make the peeling experience quick and easy. And refrigerate your apples. That helps them hold their shape while peeling. Take the peeled, sliced cored apple and cut it in half. Trim off any bits of seed or core that may be left inside of the apple.

Place the apples into a large bowl. Pour all of the dry filling ingredients for the pies on top of the apples but do not mix up yet. If you mix the sugar with the apples and are not immediately ready to pour the filling into the pie crust, the sugar will bring out the juices in the apples and cause the apples to macerate and produce more juice than you may want sitting in your crust. If you are making an apple cranberry pie, add the raw cranberries and make the necessary adjustments in the recipe as well.
For our tutorial, we are making apple cranberry pies.
For the fat, I prefer shortening. I use Crisco, half regular and half butter flavor. I've experimented with butter but not had the result that I'm looking for, which is a light flaky crust. Trust me on this. I like to use the sticks because they are so convenient, and no messy measuring shortening into cups. I do not refrigerate my shortening, but if you feel inclined, chill away.
Measure the flour into a large bowl, plop the shortening in, along with the salt.
Cut the shortening into the flour and salt. I usually use a pastry cutter, but two knives will work just as well. Cut the shortening by placing a table knife in each hand, blades down. Now, place your fists together and pull the knives across the bowl in a cutting motion. This is way more difficult to explain than it is to execute. This step takes about one minute, or less. When you are out buying the apple-peeler-corer-slicer, get yourself a pastry cutter. Look it up. Very inexpensive. I'm sure you can get one at the $1 store.
After you take twenty minutes to figure out what I was trying to tell you in the last paragraph, your dough should look like this. Go back and re-read that last sentence. I didn't say it should take 20 minutes to cut the shortening and flour together, just that figuring out my directions might take that long. Isn't this helpful?
You want to have little pea-like size pieces of dough. The little pieces of shortening in the dough are what creates the air pockets in the crust, therefore producing a flaky crust. Pour the cold water into the dough all at once. Then mix the dough gently with a fork. I fold more than mix. Do not over mix. This should take about 10 seconds. The dough should come together with a few loose bits of flour and dough in the bowl. When you gather all of the dough together, the pieces should stick together. If not, add a tablespoon or so more of cold water. Do not knead. Do not mix. just pat together.
Flour the surface you are using generously. I use about 1/3 to 1/2 cup of flour to prepare the surface.
Divide the dough in half if you are making a two crust fruit filled pie. I place a little more dough in the half that is covering the bottom of the pie plate. Gently shape the dough into a round disc. Start to roll out the dough evenly, not pressing down too hard on the rolling pin. Roll the dough into a circular shape. No worry if the circle is not perfect. Lift the dough occasionally and add more flour to the surface if the dough starts to stick. Also flour the rolling pin if needed. I do not advise flipping the dough, less is more when handling the dough for pie crust. Think tender, flaky. What? You were thinking other words? Shame on you.
Now, take the pie plate you are using and place it upside down on the rolled out dough. You want to have about a two to three inch overhang, so when you place the dough in the plate, there is plenty of dough to fill the plate and hang over to make sure the pie seals properly. Set the plate aside.
Take half of the dough and fold it over onto the other half like this. Some people like to then fold it again in quarters, but I usually just do halfsies.
Gently lift the dough onto the pie plate, so the dough covers half of the plate.
Take the folded portion of the dough and unfold it onto the plate. Don't stress if it tears, just pat it back together.
Ta dah!
Now, remember the apples we prepared earlier? Mix the dry ingredients into the apples and dump the apple filling into the pie plate. See how the crust is not perfectly arranged on the plate, no big deal. We will take care of that when we seal and crimp. See the bits of peel on the apples? Also not a big deal. If this stresses you out, take a paring knife and remove every single last bit of peel. Now, that's better.
The fruit will settle when you bake the pie, so pile the fruit up high.
Dot the fruit with butter, and sprinkle the vanilla and/or almond extract on because everything is better with butter, right?
Roll out the dough for the top crust, same as you did for the bottom layer.
Fold it in half and transfer onto the filled pie, then unfold so the whole top of the pie is covered. Say goodbye to the filling. Go ahead say it. "Bye-bye see you after baking!" I always do this.
not really.
If for some reason, your dough tears, don't worry, just gently pinch it back together, or wait until we make slits in the pie and strategically place your slits by the tear. Or cover them with dough cutouts. I have yet to make a pie with an imperfect crust and have someone point at the pie and say "Sheesh, your crust is imperfect, I don't think I want a piece of this pie.".

Gather the edges (didn't get a good photo of this step). I like to fold the layer of dough underneath upward, so it gathers and folds over onto the top layer of dough. If you are short on dough to fold over, take some dough from another area where there is extra and press it together where you have a shortage. Start to crimp and seal the edge. You can use a fork to press the dough down and make a little crimped edge with the end of the fork tines, or get a little more fancy and pinch the dough between your thumb and forefinger on one hand and forefinger on the other hand to make a nice little pointy edge. I believe this is Robilyn, who btw, was making her first apple pie. She's an expert crimper now.
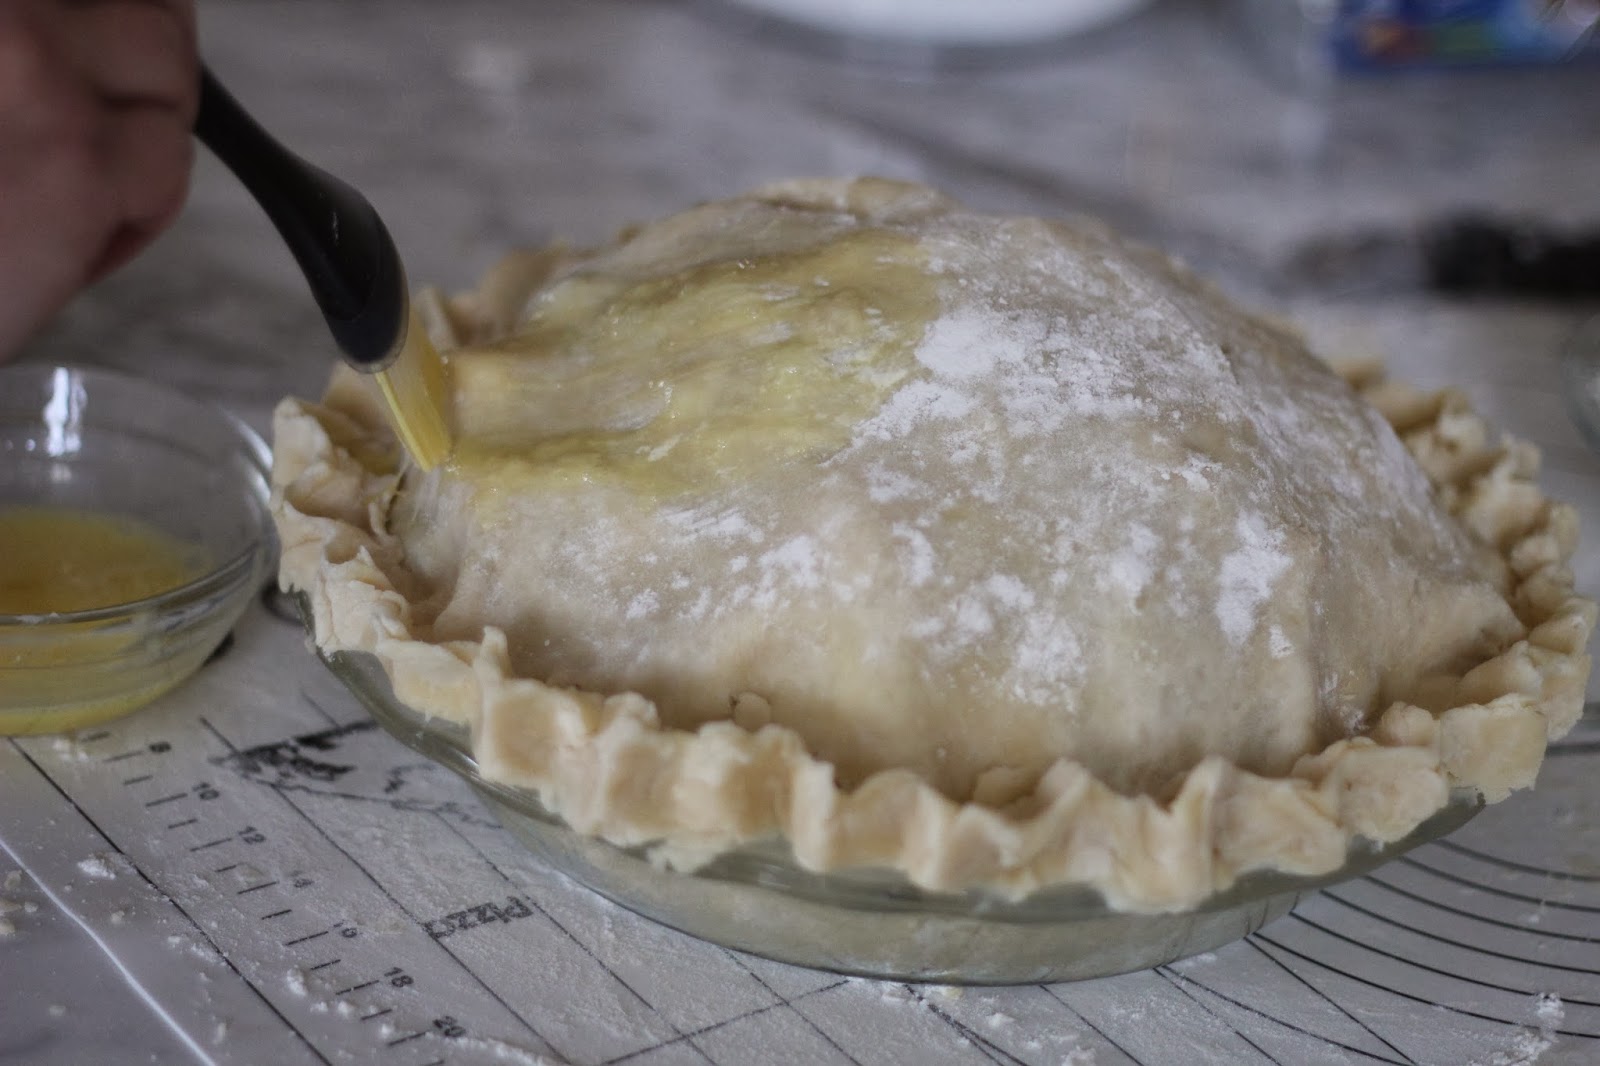
I like to beat an egg and wash the top of the crust. You may use cream, or milk, or just a beaten egg white. Brush the whole top of the crust with the wash.
Sprinkle with granulated sugar.
Make a few slits in the top crust for steam to escape. Any design will do.
Place the pie on a sheet of foil or a thin cookie sheet. I like to use foil so it catches any excess juices from the pie, then I can simply throw away the foil after baking. Place the pie in the hot oven and bake as directed on the recipe. After the pie is about half way through baking place a sheet of foil loosely on top of the pie to prevent over browning. How do you know it's done? People laugh when I say this, but you can smell it. It has a certain aroma when the apples and crust are done. Or just set the timer, It should be done in 1 hour and ten minutes, give or take a few.
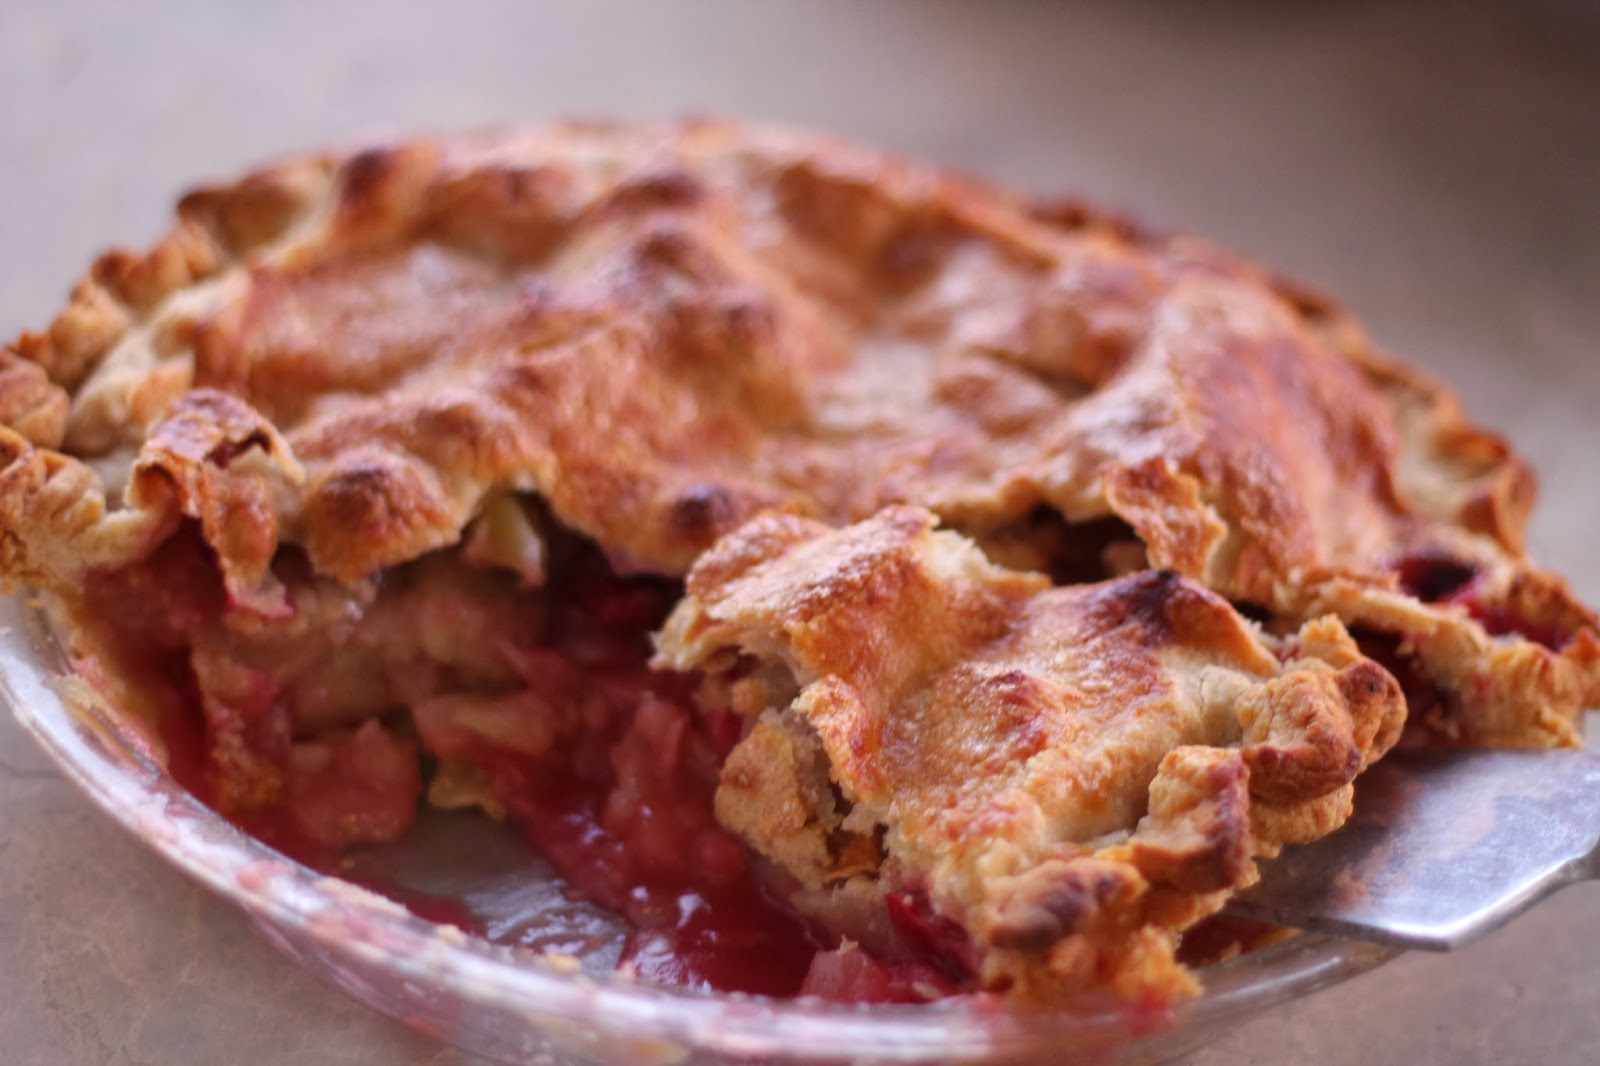
In a short while, you'll be pulling this out of your oven. The crust on the bottom should be golden as well as the crust on top. After removing from oven,
make sure to allow enough time to let the pie cool properly. It took years of baking to realize I wasn't allowing enough cooling time. If you don't allow at least two and even better three to four hours for the juices to set up in the pie, your pie will be runny when you cut into it. After three hours, it will usually still be warm. This pie was cut about four hours after coming out of the oven...
There you have it. Everything you ever wanted to know about making an apple pie. And then some. Hope this inspires you to bake one this holiday season.
Happy baking!
loves,
Si
Print all three recipes here
Best Basic Flaky Pie Crust
A Bountiful Kitchen
2 cups flour
1 teaspoon salt
1 cup shortening
½ cup very cold water
Mix flour and salt. Cut in shortening with pastry blender or knives. Add water.
Fold with fork until flour is absorbed and dough comes together. Flour surface and rolling pin well. Flatten dough gently with hand to make round shape. Roll out from center to about 1/8” thickness. Fold in half, lift onto pie plate. Open and shape to pan.
Tips:
-Dough may be easier to handle if chilled for an hour or so.
-Try rolling the dough around the rolling pin and then unrolling right onto the plate.
-Try ½ regular and ½ butter flavor Crisco.
-Some people like to “cut” the flour in with their fingers.
-Don’t cut the flour and shortening too much, the pieces of shortening are what make the crust flaky, you want to have pebble size pieces of dough before adding the water.
-If your pie is getting too brown on the edges, but not on top, take a piece of foil, fold in half to make a square then cut a half circle out of the middle. Unfold and put over your pie.
-Brush beaten egg white over your pie dough before filling with pumpkin to avoid soggy bottom crust.
-If baking for a single
cooked crust, prick the entire bottom crust with a fork (to allow steam to escape). Set the oven to 500 and bake for about 6-10 minutes on the middle rack, watching carefully to insure the crust doesn't burn. Remove the crust when done and let cool, then fill with custard or other filling.
This is for a single cooked crust only. Do not prick the bottom of the crust when baking a filled single crust pie (such as pumpkin or pecan).
Fresh Apple Cranberry Pie
A Bountiful Kitchen
6-7 apples any type, peeled, cored and sliced ( I like Granny Smith)
1 1/2 cups fresh cranberries, washed
1 1/4 cups sugar
1/2 cup flour
1 teaspoon cinnamon
1-2 teaspoons almond extract
juice from 1/2 of a lemon (about 2 tablespoons) not necessary if using Granny Smith Apples
dash salt
Preheat oven to 375 degrees. Place rack on bottom third of oven.
Prepare crust. Roll out bottom crust, place in pie plate.
Place apples in large bowl and mix with cranberries. Add rest of filling ingredients.
Fill bottom crust with apple cranberry mixture. Place other half of rolled out dough on top of filling in pie plate. Crimp edges. Make slits on top of pie for steam to escape. Brush with egg wash if desired, sprinkle with 2 tablespoons sugar.
Place pie onto foil lined cookie sheet or sheet of foil (important, this usually bubbles over a bit).
Bake for about 60 minutes. Cover loosely with foil if pie is getting too brown.
Continue baking for about 10-15 minutes or until pie is bubbly and golden. Total baking time is usually 1 hour and 10 minutes, but may vary in your oven.
Mom's Favorite Apple Pie
6-8 large apples -I like a mixture of Granny Smith and Jonathan's
¾ cup sugar
1-2 teaspoon cinnamon
1 teaspoon nutmeg
½ teaspoon salt
4 tablespoons flour
1 tablespoon lemon juice
2 teaspoon vanilla extract
Butter
Egg, sugar, cream for top crust
Peel, core and slice apples. Set in large bowl. Mix in sugar, spices, flour, and lemon juice. Place pastry in a 9 inch pie plate. Sprinkle with vanilla . Dot with butter. Top with crust. Crimp edges. Cut steam vents. Brush either beaten egg or egg white, sprinkle with sugar or brush with cream or milk and sprinkle with sugar. Bake at 375 for about 50-60 minutes. May need to cover with foil for half of baking time.


 You probably have all of the ingredients in your pantry to make these little gems. It will take you 5 minutes to mix up the dough. Bake for 30 minutes while you clean up the mess and powder your nose. You don't powder your nose? Neither do I.