Showing posts with label girl food. Show all posts

6/13/15

Cranberry Avocado Salad with Sweet White Balsamic Vinaigrette


Father's Day is always a grilling holiday at our house. We cook up meat and make a few salads and a yummy dessert and Dad is a happy camper (mom too)! I pinned this Cranberry Avocado Salad with Sweet White Balsamic Vinaigrette from the Cafe Sucre Farine on my Salad and Veggies Board a few months ago. It's definitely going to be in our regular salad rotation this summer!
The Sweet White Balsamic Dressing and crunchy sweet nuts are the perfect topping for the creamy avocado and greens. I could eat this salad every single day.


Cranberry Avocado Salad with Sweet White Balsamic Vinaigrette
Found on Pinterest - from Cafe Sucre Farine

for dressing:
⅓ cup sugar
1 ½ tablespoons poppy seeds
1 ½ tablespoons sesame seeds
½ teaspoon paprika
2 teaspoons dried mustard
1 tablespoon minced sweet onion
½ teaspoon sea salt
¼ teaspoon freshly ground black pepper
½ cup white balsamic vinegar
⅓ cup vegetable oil
⅓ cup extra virgin olive oil

for salad:
12-16 ounces baby spinach, arugula, field greens
1 small bunch cilantro, washed and dried, leaves removed whole from stems
2 medium avocados, peeled and halved
¾ cup dried cranberries
¾ cup Candied Spiced Almond
For the dressing, combine all ingredients in a pint sized glass jar and shake well to dissolve sugar.

For the salad, place greens and cilantro leaves in a large bowl. Add avocado and dried cranberries and about ¼ cup of the dressing and toss gently. Scatter candied almonds over salad and sprinkle lightly with sea salt and freshly ground black pepper.
Serve with the extra dressing.

Spiced Almonds
5 cups sliced almonds, or a 1 pound package
½ cup sugar
3 tablespoons butter
2 teaspoons cinnamon
1 teaspoon cumin
1-1 ½ teaspoons smoked paprika* – some smoked paprikas are quite hot, if you don’t like “hot”, just use 1 teaspoon and they will be mildly spiced.
1 teaspoon vanilla
sea salt

1. Place a large sheet of foil on a work surface. Spray with cooking spray or rub a teaspoon of oil over foil with a paper towel.

2. Place sugar in a large non-stick sauté pan and heat over medium heat , occasionally tipping and swirling the sugar until it is all melted into a pale golden syrup.

3. Lower heat immediately and add butter, cinnamon, smoked paprika and vanilla. Stir until well combined and all butter is incorporated into the sugar syrup.

4. Add the nuts and stir gently to coat. Don’t worry if you have some clumps of caramelized sugar – they will melt as you continute to sauté the almonds. Cover and continue to cook on low, stirring every minute or so until almonds are a delicious golden brown. Watch very carefully as they can go from beautiful to burned very quickly! Turn out onto prepared foil and sprinkle liberally with sea salt. Spread out on foil to cool.

5/7/15

Breakfast Croissant Quiche Cups


These little Breakfast Quiche Cups are made with croissants and easy to whip up in just a few minutes. They are perfect for the Mother's Day brunch you're planning.
You've got that covered, right??
If not, here are a few suggestions to help you out...


One-Bowl Berry Coffee Cake, super simple and can be made a day ahead! 


If Mum loves pancakes, try this recipe for Sour Cream Pancakes. Absolutely melt in your mouth delicious. It's my copycat recipe for Penny Ann's Sour Cream Pancakes. Don't forget the home made syrup. 


 For a meal in a salad, try this recipe for Cobb Salad with Creamy French Dressing. Crunchy, salty, creamy all in one bite. 


Does your mom love Panera? You'll be her favorite when you make this copycat version of the Panera Strawberry Poppy seed Chicken Salad.  And who doesn't want to be mom's favorite??


You say you can't cook? Here's a no fail recipe for Fruit-Filled Virgin Sangria. Buy a glass pitcher and a few glasses and give all to mom for her special day, filled with this colorful delicious drink!


Every mom I know LOVES this dish.  If you can't take her to Italy, the least you can do is bring Italy to her.  Magherita Pasta. Takes just a few minutes to make.  Serve it with some bread and a green salad.
Best dinner.
Ever.


Don't forget dessert! Nan's Coconut Cake  is mom's favorite. Made with a cake mix and add-ins, it's simple and can be made a day or two ahead. Store in fridge. Top with fruit just before serving.
If this doesn't make mom love you, nothing will.


If mom is a Swig Cookie fan, make these. The original (Almost) Swig Cookie.
Gift plan: Give her a bottle of coconut flavoring (don't forget the squirt spout) a big glass, some fresh limes and some Diet Coke.
The family inheritance will be all yours.


Past Mother's Day Menus and recipes: 


Breakfast Croissant Quiche Cups
A Bountiful Kitchen

3 large croissants, sliced into 1/4 inch pieces
10 large eggs
1 cup half and half
1 teaspoon salt
1/2 teaspoon pepper
2-3 tablespoons prepared pesto
1-1 1/2 cup chopped fresh spinach
3 green onions, chopped
8 slices bacon, cooked until crisp, chopped
2 cups grated cheese any type (cheddar, Monterey Jack, Swiss)

Generously grease muffin cups. 
Place croissant slice into greased muffin cup. You may need to press down a bit, or tear it in half to fit the slice in the muffin cup. Beat eggs and half and half together (I like to use a blender), add salt and pepper, mix again. Set aside.
Spoon about 1/2 teaspoon pesto over each croissant piece in cup. 
Top with chopped spinach, green onions, bacon and grated cheese. 
Pour the eggs over the croissants in the cups*. Fill the cups about 3/4 full of the egg mixture, or until all of the egg is used up.  
Let sit overnight in refrigerator (see tips below), covered with plastic wrap or bake in 350 oven for about 20-25 minutes until puffed and golden. 
Let sit for 5 minutes, then run a knife around the edge of the muffin cup and remove to a platter. Serve immediately or at room temperature. 

Tips:
-Make sure to generously grease the cups both sides and bottom or the egg will stick. 
-*The amount of quiche cups will depend on the size of the muffin cup, this recipe generally makes about 15-18 medium size cups. 
-It is best, but not necessary, to let the prepared quiche cups sit in the fridge for at least an hour before baking. This allows the egg mixture to completely soak into the croissant and creates a yummy bread pudding type texture. If preparing the quiche cups the day before serving, remove from fridge and let sit on counter for 30 minutes before baking. Bake uncovered. 
-The baked cups freeze well. After baking, place any leftovers in a Ziploc bag after completely cooled. Freeze. When ready to use, place on a paper towel and heat in microwave for about 1 minute. 
-We love this dish served with Chili Sauce or Sheri's Simple Salsa

5/9/13

Strawberry and Goat Cheese Bruschetta


Getting your grocery list ready for Sunday? If you want to be the favorite child, make this for Mom. It takes about 20-30 minutes to throw together and will make you look like a pro in the kitchen. Not that you need help in that area.
I made this appetizer a few weeks ago with Cape Cod Chopped Salad,  Lobster Shells and some Baked Lemon Chicken. It's a  delicious, simple and beautiful meal fit for a queen, or in this case, your Mother.
Have a wonderful weekend :)
loves,
Si


Strawberry and Goat Cheese Bruschetta
adapted from Allrecipes.com
print recipe

1/2 cup balsamic vinegar
1 baguette, sliced into 3/4 inch slices
2 tablespoons olive oil
1 pint strawberries, washed and diced
2 teaspoons fresh thyme leaves
1/4 cup fresh basil, chopped
5 oz goat cheese, room temperature
salt and freshly ground pepper to taste


Heat vinegar in a small pan over medium heat. Simmer until reduced by about half, 8 to 10 minutes. Remove from heat and allow to cool to room temperature.

Prepare a grill for high heat. Place bread slices on baking sheet and brush with olive oil.
Combine strawberries thyme and basil in a small bowl and set aside.

Grill bread on the preheated grill until browned, about 3 minutes per side. Alternately, you may toast the bread under a broiler until light golden.

Spread goat cheese on toasted bread. Add black pepper, salt, and reduced vinegar to the strawberry mixture. Spoon over the goat cheese topped bruschetta. Garnish with additional basil and thyme.
Serves approximately 12 as an appetizer.


3/17/13

Warm Caramelized Pear and Asparagus Salad


Brookie called me a couple of weeks ago and told me she made the most wonderful salad for dinner. I knew the boys would not be thrilled about a spinach, warm pear and asparagus salad, so I threw it together one night when it was just me and the doggie at home. Since Jack is not generally interested in greens, I was able to have the entire salad to myself.
Oh my goodness.
So simple. So delicious. Sweet, savory. You know how I feel about that combo.
Incredible.
You have to try this.


Warm Caramelized Pear and Asparagus Salad
adapted from Season with Spice
print recipe

2 Bosc pears – cored and cut into 1/2 inch wedges
1 lb of asparagus,  tough ends snapped off
A handful of pecans or walnuts
1 tablespoon sugar (optional)
2 tablespoons olive oil
Fresh spinach
Crumbled feta cheese or goat cheese, optional

Vinaigrette:
1/4 cup olive oil
2 tsp balsamic vinegar
Dash of cayenne pepper
Salt and fresh ground black pepper to taste

In a small bowl, mix all the ingredients for the vinaigrette and set aside.
In a large skillet or frying pan, heat olive oil over medium heat. Add pear wedges and cook for a minute over medium heat (turn wedges over once). Using tongs, move the pears to one side of pan. Add asparagus to pan and continue cooking for 2-3 minutes. Add nuts and cook for another minute until the asparagus is just tender and pear is softened and browned on the edges. Remove from heat and place on top of spinach on serving platter or individual salad plates. If you would like the nuts to be sweetened, sprinkle a little sugar on top of the walnuts or pecans.
Crumble cheese on top if using. Drizzle a small amount of dressing on top of each salad.
Serve warm.
Serves about 4-6

Tips:
-Prepare all of the ingredients before starting to cook. This recipe comes together quickly and it is best to have everything ready so the salad may be served warm.
- Depending on the firmness of the pears and asparagus, cooking time may vary. You may need to turn the heat up a bit to medium-high heat to get the pear to caramelize.
-I left the cheese off and loved this salad. I think goat cheese would be best and add a little creamy tang to the salad.
-Adding sugar to the nuts is optional- I added about a teaspoon at the end of cooking.
-This salad took me less than 15 minutes to make.
-This salad is best served warm, but is also good served at room temperature.


8/20/12

Fresh Strawberry-Jello Cake with Strawberry Cream Cheese Frosting & Giveaway!


Guess what this week is? A Bountiful Kitchen's four year blogiversary.  Whoohoo.
Time to celebrate!  What says celebration better than cake, ice cream and presents?
Let's have a little giveaway. How about a couple of cookbooks -one from me, one from Tilly (mook) and gift certificates for ice cream and yogurt, also from our favorite, Tillamook! Here's the deal...


Two cookbooks:

 This one's from me. 


Guess who donated this one? 


Three of these, any flavor...


Twelve of these, any flavor and variety (light, regular)


The recipe- I made this yummy Strawberry cake a few weeks ago, by request for a family wedding celebration. It's really simple, and uses fresh strawberries in the cake and the frosting. Great for a summer celebration or a girl birthday. Or a Blogiversary ;)

The giveaway- Leave a comment, let me know- what's your favorite cake? Check back on Friday. I'll post the winner (one winner, chosen by Random Counter) and another celebration cake, made with Tillamook ice cream.  You're going to love it.


PS- I was not paid for this post, or given free products. The opinions stated are my own.


Fresh Strawberry-Jello Cake with Strawberry Cream Cheese Frosting
A Bountiful Kitchen, adapted (quite a bit)  from Paula Deen

1 (18.25-ounce) box white cake mix*
1/4 cup flour
1  small (3-ounce) box strawberry-flavored instant gelatin
8-9 oz fresh strawberries (weight after trimming tops off) about 1 small basket, crushed or blended
4 large eggs
1/2 cup vegetable oil
1/4 cup water 
1 teaspoon vanilla
Strawberry cream cheese frosting, recipe follows

Strawberry Cream Cheese Frosting
1/4 cup butter, softened
1 (8-ounce) package cream cheese, softened (make sure this is room temperature)
about 2-3 fresh strawberries, cleaned and trimmed, chopped
5 cups powdered sugar 
dash of salt
small amount of milk or cream to thin the frosting if needed
sliced or whole strawberries, for garnish, optional


Preheat oven to 350 degrees F. Line 2 (9-inch) round cake pans with parchment paper, grease pans.

In a large bowl, combine cake mix, flour and gelatin. Add pureed strawberries, eggs, oil, water and vanilla; beat at medium speed with an electric mixer until smooth. Pour into prepared pans, and bake for 30-35 minutes, or until a wooden pick inserted in the center comes out clean.

Let cool in pans for 10 minutes. Remove from pans, cool completely on wire racks.

Fresh Strawberry Cream Cheese Frosting:
In a large bowl, beat butter and cream cheese at medium speed with an electric mixer until creamy. Beat in chopped strawberries.  Gradually add powdered sugar and dash of salt, beating until smooth. Thin with milk or cream if needed.

Spread frosting in between layers and on top and sides of cake. Garnish with fresh strawberries, if desired.
Tips:
-This recipe was tweaked according to several suggestions by reviewers on the Food Network site. 
-*I used a Betty Crocker Cake mix. The suggested cake mix weight in the original recipe is 18.25 oz. However, I found only generic (store) brands in this size of cake mix. I opted to use a popular name brand instead. I also used Jello brand gelatin. 
-The cake will have a bright pink/red color. 

8/9/12

Southern Lady Brownies


Last week, my nephew Brandon, and his bride Ashley celebrated their new life together. We hosted a wedding shower and served:  Yogurt with fresh fruit and Peanut Butter and Cashew Granola; Veggie Tea Sandwiches;  Turkey, Irish Cheese and Apples on Pita Triangles with Cranberry Mayo;  Quinoa Salad;  Limeade Slush and for dessert- Southern Lady Brownies.
Sheri gave me this recipe years ago, when she married Scott.  Someone brought them to a dinner before their wedding. I loved the way they looked, kind of like a brownie Petit Four. I'm not sure what the original name was? But after enjoying them in the South, I named them Southern Lady Brownies. They are perfect for a ladies luncheon,when you want to serve something special and a little on the dainty side.
Congratulations Brandon and Ashley! Love you.


This is the "trim around edges to make even" step. I bagged all of the trimmings and placed into the bag above, they lasted till about 9 the same evening. Grant and Jake used them to make hot fudge brownie sundaes.


After trimming, set the brownies on a cooling rack or a tray. 
Frost and top with a pecan.  


Southern Lady Brownies
A Bountiful Kitchen
print recipe

1 1/2 cups butter ( I prefer unsalted)
4 oz unsweetened chocolate
2 cups sugar
4 eggs
2 teaspoons vanilla
1 1/4 cups all purpose flour
1 teaspoon soda
1/2 teaspoon salt

Preheat oven to 350 degrees and place rack in center of oven.
Using a double boiler or very low heat on stovetop, melt the butter and chocolate together in a saucepan. Mix with whisk. Remove from heat and let cool.
Meanwhile, beat the eggs in a medium bowl. Add sugar and vanilla and mix until all ingredients are combined. Pour the cooled chocolate mixture into the egg mixture. Mix again until all ingredients are combined.
Pour the flour, soda and salt into the bowl with the other ingredients and mix just until wet and dry ingredients are combined.
Line a 9x13 pan with foil, and spray the foil with non stick cooking spray. Spread the batter into the prepared pan. Bake for 30-35 minutes. Cook just until brownies are done, and a toothpick inserted in center of pan comes out with a few moist crumbs attached.
Remove from oven.  Use a spatula and press the edges of the brownies down while still warm.
Lifting foil, remove brownies out of pan when cooled. Use a knife or spatula and trim around edges of brownies to make even.
Cut into about 30 small pieces.
Prepare Frosting.

Icing:
1/2 cup butter
2 squares or 2 oz unsweetened chocolate, melted
2 cups sifted powdered sugar
3-4 tablespoons milk or half and half
dash of salt
pecan halves for top of brownie

Soften the butter for 30 seconds in the microwave.  Add the melted chocolate and mix. Add the powdered sugar a little at a time and beat until smooth. Add milk or cream and salt until the frosting is desired consistency. If you want the icing to cover the brownie and drip down the sides of the brownie, thin the icing with additional milk (about 2 additional tablespoons).
Spoons the icing onto each brownie. Top immediately with pecan half.


Tips:
- I altered the original recipe so the brownies would be a bit thicker and slightly more cake like. The original recipe also called for a beaten egg in the icing, which I omitted and added a bit of milk instead achieve a spreading consistency.
-Use an electric beater to make the icing, it will help eliminate any lumps in the icing, and give a smooth, silky consistency. 

5/2/11

Roasted Pepper and Goat Cheese appetizer and Mother's Day Giveaway!


When we stayed at River's Run last fall, Miss Lisa served up these delicious appetizers before dinner one evening.  My boys (including Grant) usually steer clear of anything involving a red pepper. They loved this dish.  I made these last week and loved the soft red pepper, creamy goat cheese, crunchy pine nuts and sweet, soft golden raisins.  One of the best appetizers I have ever eaten.


This would make a perfect appetizer for Mom on Sunday.  To start Mother's Day/Cinco de Mayo week off right, we're having a little giveaway.  Ina Garten's cookbook " How Easy is That?",  a $25 gift certificate to Mrs. Cavanaugh's chocolates (wonderful chocolates, local to Utah, but you can use the certificate as mail order),  and some darling cloth napkins from "Stack'd, by SisterMade" .


Leave a comment about what you love about your mom, or being a mom.  As always, followers get two entries. I'll announce the winner on Wednesday.  One winner, three gifts.  Keep them for yourself, or share with mom!


Roasted Peppers Stuffed with Goat Cheese
adapted from Bottega Restaurant and Cafe,  Birmingham, AL
print recipe

4 large red or yellow peppers, roasted (see below) peeled, slit open, seeded, and sliced into three inch strips
Sea salt, fresh ground pepper
1/4-1/2 pound mild soft goat cheese
6 basil leaves, 4 leaves chopped, 2 leaves reserved or garnish
1/4 cup pine nuts, toasted
1/4 cup golden raisins
bread crumbs, optional
2 tablespoons olive oil
pinch of cayenne

Roast the peppers using either a barbecue grill, gas cook top or broiler in your oven.  Complete tutorials here.

Position a rack in the upper third of oven and preheat to 475 degrees.
Place the peppers peeled side down on a cutting board and slightly flatten. Sprinkle with sea salt and pepper. Spread with about a tablespoon of goat cheese down the center of each pepper strip. Scatter the cut basil, pine nuts, and golden raisins on top of each pepper. Fold each pepper over to create a package (like a canoe on its side). Press down gently to flatten slightly
Place the peppers on a baking sheet (I prepared the peppers directly on the baking sheet). Sprinkle with breadcrumbs and drizzle with a little olive oil over each one. Sprinkle with cayenne.
Bake for about 10 minutes, until breadcrumbs turn golden and the goat cheese is bubbly.
Using a spatula, arrange the peppers on a small plate and tear the remaining basil leaves over for garnish. Drizzle with a bit more olive oil if desired.

Tips:
-I didn't fold the red peppers over after topping.  They were a little difficult to eat unless you have a plate and fork. If you want to make this into a "finger food" place each cooked pepper onto a toasted baguette and serve as  bruschetta.
-This is an easy make-ahead appetizer. Completely prepare, leave on baking sheet. Before serving, place under broiler for 1 minute, to warm up.

4/25/11

Blueberry Cupcakes with Maple Brown Butter Icing


Cupcakes. They're everywhere.  I kind of thought they were on the way out, but every time I turn around, it seems like a new cupcake shop pops up. Last week my friend Karen taught a fun class on cupcake making.  She had several types of cupcakes available to try.  This one was my favorite.  A few days later, my friend Melanie made these for a wedding shower we were having.  I ended up with a few extra at my house.  I could not stop eating them.  Here's the crazy convo in my head the morning after the shower:
I'll have one for breakfast, cause they are just like muffins. At least they kind of look like muffins.  Well, since they are so small, (about 1/2 the size of a regular cupcake) I can eat two, and it will be like one.  OK, three. In reality, it's only like one and one half. Shoot. There's only one left. I'll just treat this like Halloween candy and get it over with.  Now.
It was the Maple Brown Butter Icing that hooked me.  You have to try these.


Blueberry Cupcakes with Maple Brown Butter Frosting
Ming Makes Cupcakes 
print recipe

1 1/2 cups flour
3/4 cup sugar
1/4 tsp baking soda
1 1/2 tsp baking powder
1/4 tsp salt
1/2 stick butter, melted
1 egg
3/4 cup buttermilk
1/4 cup milk
1 cup blueberries

Mix flour, sugar, baking soda, baking powder, and salt. In a separate bowl, mix butter and egg lightly. Add buttermilk and milk.  Add milk mixture to flour and mix until just blended.  Toss blueberries in a tablespoon of flour and fold into batter.  Bake at 350 for 20 minutes, or until toothpick comes out clean.

Icing
1 stick butter
3 cups confectioner’s sugar
1/4 cup milk
3 T maple syrup
In a saucepan, melt butter at medium temperature until golden brown.  In a bowl, add butter to sugar, then add milk and syrup.  Beat until smooth.  Top with a fresh blueberry immediately after frosting.


Tips:
- I doubled this and it made about 30 small cupcakes.
-One recipe of icing was enough for a double batch.

4/2/11

Chicken Salad with Apples and Dill


One of my favorite things to eat this time of year is chicken salad. For some odd reason,  I never make it in the fall or winter. It makes me think SPRING is on the way!!  Maybe it's tied to baby chicks. Wobbling around on their little spindly legs. Saying, "hey wait for me to grow up, and then you'll be able to make me into chicken salad!!:   Now, you are for sure going Vegan on me.
Chicken salad:  Love it on a slice of bread. Or a piece of lettuce. Or a croissant. Or just by itself, right out of the bowl in the fridge.
This is a dish I've been making forever. Without a recipe.  It changes a little every time.  The basics ingredients are always the same: chicken, mayo, celery,  and the last necessity-fruit.  Love it with pineapple, or grapes, or apples. Anything sweet. If I can't get any of those, craisins will do. Just a little sweet to go with the savory. You know how much I love my fruit and meat/poultry together.  I know there are peeps who hate fruit, nuts, spices, etc. in their chicken salad. I'm not sure we can be friends...


Chicken Salad with Apples and Dill
A Bountiful Kitchen
print recipe

1 small Gala or other sweet apple*
1 tablespoon lemon juice
1/4 cup cold water
2 cups cooked, chopped white chicken meat
1/2 to 1 cup chopped celery ( I use about 2 stalks)
1/2 to 3/4 cup mayonnaise
1/2 cup golden raisins or Craisins, optional
1 teaspoon, dried dill weed*
nuts, if desired (I like cashews or almonds)
Salt, pepper

Core the apple and chop into cubes, leaving the skin on.  Place chopped apple in small bowl with cold water and lemon juice, set aside.
Place chopped chicken and celery in bowl.  Season with salt and pepper. Add the mayo, dill and nuts  if desired.  Drain apples well and add to chicken mixture.
Serve on top of a big beautiful piece of leaf lettuce, or on bread of your choice.
Keeps for about 3 days in fridge.

Tips: (sit down, this is longer than the recipe)

-Best tip for fab chicken salad - Use good mayonnaise. Not store brand, not- low or no fat. Don't go there. I use Best Foods or Hellman's. Or if you are an over-achiever, make your own.
-If you are using an apple for a filling in a salad, make sure the apple is cold, or at least room temperature before slicing.  If the fruit is warm, the fruit will brown much faster.
-* You may sub a handful of seedless grapes (I like red for color) cut the in half if they are really big grapes, a chopped (skinned) mango, a half can of pineapple tidbits, (drained well -for at least 30 minutes), the possibilities are endless. Try to choose fruit without a lot of water content, and fruit that is firm.  Raspberries- not be a good choice. They break up too easily in the salad.  Sliced strawberries are ok, as long as they are not too juicy, if so they will turn the mayo pink.  When using fruit in this salad, after washing,and draining place the fruit on a paper towel on the counter before adding to the salad to make sure the  excess water is drained off. You don't need to do this with apples. Just chop, soak in lemon juice and drain for a couple of minutes.
-*In the summer when dill is plentiful, use fresh dill, and increase the amount  to about 2-3 tablespoons chopped fresh dill.
-I also really like a bit of curry in my chicken salad. Instead of the dill, use about 1/2 teaspoon of curry, add another 1/2 teaspoon after tasting, if you like a stronger curry flavor.
-Oh, last thing. If you are making this for a quaint little ladies luncheon, and don't want the black pepper flakes to get stuck in your teeth, or you just aren't pleased with the look of pepper on your otherwise Celestial looking salad, buy some white pepper, sold in the spice section of your grocery, and use that instead.

9/8/10

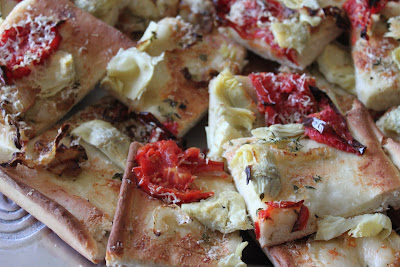
Artichoke and Oven Dried Tomato Foccacia


Fall is in the air and I love it. Fall=more baking and cooking. Love that.
This Foccacia is a delish side for a salad or main dish. You can top it with as little or much as you want. I had a can of artichokes in my pantry and some fresh tomatoes sitting on my counter. Add a few fresh herbs, a wedge of Parmesan and a little leftover Asiago sitting in the fridge. The possibilities are endless. This was yummy hot out of the oven, and equally good at room temp. Ridicu-licious. Just heard that word on a commercial. Not to be confused with my friend KD's fave word - ridonkulous.
Come back this weekend for a gift certificate giveaway from the nice peeps at CSN online stores (who sell everything from bistro sets to ice cream makers) and another fab cookbook from yours truly.


Artichoke and Oven Dried Tomato Foccacia
Adapted from Food Nework
print recipe

2 teaspoons rapid-rising dry yeast
1 cup warm water
2 tablespoons sugar
3 1/2 cups flour (start with 3)
1 tablespoon coarse salt, dissolved in 2 tablespoons of warm water
1/4 cup olive oil
Cornmeal, for dusting (optional)

Toppings:

2 tablespoons olive oil
1 sweet onion (Walla Walla, Vidalia) sliced thin
1 garlic cloves, minced
3 Roma or other small tomatoes, sliced 1/4 inch thick
1 can artichoke quarters, drained, not marinated
1/4 cup shredded Parmesan
1/4 cup Asiago cheese, grated
1 tablespoon coarse salt
Freshly ground black pepper
fresh Oregano, Thyme, Basil, chopped

In the bowl of a standing mixer fitted with a dough hook, proof the yeast by combining it with the warm water and sugar. Stir gently to dissolve. Let stand 3 minutes until foam appears. Turn mixer on low and slowly add 3 cups flour to the bowl. Dissolve salt in 2 tablespoons of water and add it to the mixture. Pour in 1/4 cup olive oil. When the dough starts to come together, increase the speed to medium. Stop the machine periodically to scrape the dough off the hook. Mix until the dough is smooth and elastic, about 10 minutes, adding flour as necessary.

Turn the dough out onto a work surface and fold over itself a few times. Form the dough into a round and place in an oiled bowl, turn to coat the entire ball with oil so it doesn't form a skin. Cover with plastic wrap or damp towel and let rise over a gas pilot light on the stove top or other warm place until doubled in size, about 45 minutes.

Coat a 18 x 12 sheet pan with a little olive oil and corn meal. Once the dough is doubled and domed, turn it out onto the counter. Roll and stretch the dough out to an oblong shape about 1/4 to 1/2-inch thick. Lay the flattened dough on the pan and cover with plastic wrap. Let rest for 15 minutes.
Preheat the oven to 450 degrees. While preheating, lightly coat a pan with cooking spray or Olive oil and lay sliced tomatoes on pan. Place in oven and bake until tomatoes shrivel and lose shape, about 15 minutes. Remove tomatoes from oven and let cool. Reduce oven temperature to 425.

In the meantime, coat a small saute pan with olive oil, add the onion, and cook over low heat for 15 minutes until the onions caramelize. Uncover the dough and dimple with fingertips. Brush the surface with more olive oil and then add caramelized onions, garlic, artichokes, oven roasted tomatoes, cheeses, salt, pepper, and herbs. Bake on the bottom rack for 15 to 20 minutes. If top is not browned enough, transfer to upper part of oven for another 5 minutes.
Remove from oven, let cool slightly, slice and serve.

Tips:
-I used a 14 oz. can of artichoke hearts, Reeses brand. Mine were not marinated, but marinated would work too.
-You may use any topping you love: fresh spinach, any cheeses, Kalamata Olives...
-I made two, because I knew the kids wouldn't be thrilled about eating artichokes, so a plain cheese foccacia bread for them. The only issue with not using (heavier) items that weighed down the dough was- the bread bubbled when baked. So best to use a few veggie items or pierce the dough before baking.

9/3/10

Cook's Illustrated Gazpacho


I still remember the first time I had Gazpacho. I was a senior in high school ( um, yes THIRTY years ago). I was with my friend Victoria, who was a waitress at Ericksen's restaurant. Unless I am imagining this, I believe the whole name of the restaurant was" Ericksen's on the Fiord". Funny that stuck in my mind. It was a mostly brownish restaurant in Poulsbo,WA ... not in the cool, waterfront part of Poulsbo (cute little Scandinavian town), but out on the main highway, before entering into town. I know you care. Anyway. Loved my first taste of Gazpacho then, still love it now.

You've never had Gazpacho? It's a soup, served cold. Best in the late summer, when tomatoes and cuces are in season.


Perfect dish for a warm summer afternoon. Love it with a dollop of sour cream and chopped avocado on top. If you are looking for a way to make a healthy, refreshing dish without too much work, and without turning on the stove or oven...you are going to love this soup.
Promise.


Cook's Illustrated Gazpacho
adapted from Cook's Illustrated
print recipe

3 ripe medium beefsteak tomatoes (about 1 1/2 pounds),
cored and cut into 1/4-inch cubes (about 4 cups)
2 small red bell peppers (about 1 pound)cored and seeded, cubed (about 2 cups)*
2 small cucumbers (about 1 pound), one peeled and the other with skin on, both seeded and cut into 1/4-inch cubes (about 2 cups)
1/2 small sweet onion (such as Vidalia, Maui, or Walla Walla) minced or chopped (about 1/2 cup)
1 medium garlic cloves , minced or pressed through a garlic press (about 1 teaspoon)
2 teaspoons table salt
1/3 cup sherry vinegar ( I subbed balsamic: 1/2 white 1/2 red)
Ground black pepper
5 cups tomato juice Cook's recommends Welch's
1 teaspoon hot pepper sauce (optional)
8 ice cubes

Garnish with:
chopped avocado
sour cream
Extra-virgin olive oil
chopped olives
croutons


Combine the tomatoes, bell peppers, cucumbers, onions, garlic, salt, vinegar, and pepper in a large (at least 4-quart) nonreactive bowl. Let stand until the vegetables just begin to release their juices, about 5 minutes. Stir in the tomato juice, hot pepper sauce, if using, and ice cubes. Cover and refrigerate to blend flavors, at least 4 hours and up to 2 days.

Adjust the seasonings with salt and pepper and remove and discard any unmelted ice cubes. Serve cold, drizzling each portion with about 1 teaspoon extra-virgin olive oil and topping with the desired garnishes.

Tips:

-Cook's recommends serving in chilled bowls.

-*I used one red pepper, and one yellow zucchini. Love the color of the zucchini. I'm sure a yellow pepper would work nicely in this recipe as well.

Bought these at my fave fruit and veggie stand in Brigham City.


Love this olive oil. Perfect for drizzling a little on before serving...