Showing posts with label kid favorite. Show all posts

10/30/15

Loaded Baked Potato Soup in Bread Bowls


This Loaded Baked Potato Soup in Bread Bowls is the perfect meal for your trick or treat night! It's always easier to get your kids to eat on Halloween night if you have a tradition of making something fun to eat. I love this Loaded Baked Potato Soup because it's a quick, easy, filling and delicious. You can load it up with extra toppings, or serve it straight out of the pot.


I found these cute bread bowls at Harmons Grocery in Farmington, if you don't live close to Harmons, you can pick up any type of small loaf artisan or french bread and carve out the middle. I loved the Harmons loaf, it was a bit more dense than other bread bowls I have purchased, which was perfect for holding a thick rich bowl of soup. We used the carved out pieces for dunking in the soup. Mmmmmm. So good.


Don't you love the little stem made out of pretzel?
Happy Halloween!


ABK's Loaded Baked Potato Soup
A Bountiful Kitchen

1/4 cup butter
1/4 cup flour
1/2 teaspoon salt
1/2 teaspoon pepper
1 cup chicken or vegetable broth
2 cups milk, plus additional for thinning soup
1 cup cheese
2 cups baked potato, scooped out or in chunks
1/4 cup sour cream

crumbled cooked bacon
additional grated cheese
sour cream
chopped chives or green onion

Melt butter in a stockpot over medium to medium high heat. Add flour, whisk and continue to cook for about two minutes, add salt and pepper. Whisk in broth. Stir until smooth. Turn heat to medium.
Slowly add milk, continue to whisk. Add grated cheese and whisk. Fold in cooked potato. Cook until bubbly and smooth. Just before serving, add sour cream. Heat until bubbly. Turn heat to simmer.
Scoop out bread bowls. Serve soup in bowls, add milk if the soup gets too thick.
Top with crumbled bacon, grated cheese, chives, and a spoonful of sour cream.
Serves 2-4, about 1 1/2 cup servings.

Tips:
-I used potato that had been baked a few days earlier. I scooped the potato into a bowl and used the skins for baked potato skins. If you are baking the potatoes for this recipe, scrub the skins, bake the potatoes to use in this recipe. It is not necessary to peel the potato before chopping for the soup.
-This recipe may require more salt and or pepper depending on the amount of flavor in the broth.
-This recipe is easily doubled.

9/21/15

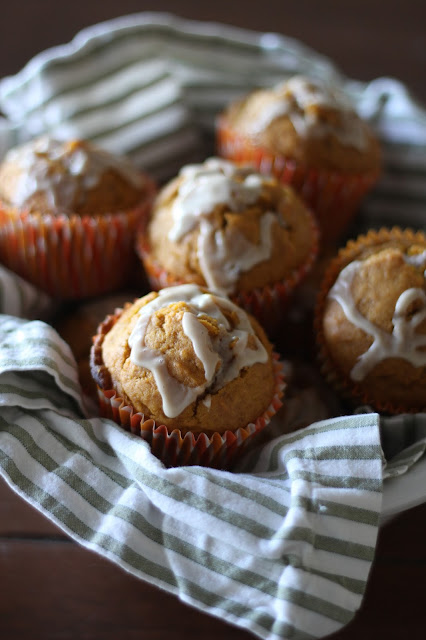
Pumpkin Applesauce Muffins with Maple Cream Glaze


Celebrating the first week of FALL calls for something baked. And pumpkin. And apple. And spice. Combining all of those flavors into a muffin seemed like the perfect way to start the season off!  And if quick and easy is front and center in your mind when we talk baking, this is your recipe. Thirty minutes, including bake and glaze start to finish. I almost forgot, one bowl. You can't beat that for simple and homemade. Remember kids, I'm over 50 now and try now and then to cut fat when it doesn't mean I have to compromise taste.


I used my reserve of homemade Pumpkin Pie Spice (make some now and put it away so you'll have it on hand for holiday baking) in this recipe, but you can also use store bought pp spice. I had homemade applesauce on hand as well, which I used in this recipe. I'll be doing a tutorial on homemade applesauce soon. So simple and fresh and a perfect addition to my pumpkin muffins. Using 1/2 cup of applesauce allowed me to only use 1/2 cup of oil and eliminate solid fat (butter) without giving up flavor.


I know you are going to love ABK's Pumpkin Applesauce Muffins with Maple Cream Glaze. They are so simple to make and are the perfect start to a fall brunch or a kid approved after school snack.
Happy baking!


Pumpkin Applesauce Muffins with Maple Cream Glaze
A Bountiful Kitchen

3 eggs
15 oz can of pumpkin (not pumpkin pie filling) I like Libby's brand
1/2 cup canola or vegetable oil
1/2 cup applesauce, any type I used homemade
1 cup sugar
2 1/2 cups flour
1 teaspoon pumpkin pie spice (add an additional teaspoon if you like more spice)
1 teaspoon baking soda
1/2 teaspoon baking powder
1/2 teaspoon salt

Maple Cream Glaze
1 cup powdered sugar
2 tablespoons heavy cream (half and half or milk will also work)
pinch of salt
1/2 teaspoon maple flavoring or Mapeline or 1 teaspoon maple syrup and 1/2 teaspoon maple flavoring

Set rack in middle of oven and heat oven to 400 degrees.
Beat the eggs, oil, applesauce together in the bowl of a mixer. Add the sugar and blend well.
Add the flour, pumpkin pie spice, baking soda and powder, salt. Mix gently or on low speed just until the flour disappears.
Line a muffin pan with paper liners or grease with cooking spray.
Scoop the batter (it will be thick) into each muffin cup until the cup is almost full (about 1/4 inch to the top) I use a 2 1/2 inch scoop filled. I get about 20 muffins total.
Bake at 400 for about 15-17 minutes or until toothpick inserted in center of muffin comes out with a few moist crumbs attached, or the muffin springs back when touched lightly.
Remove and let cool.
Meanwhile, combine all glaze ingredients in a medium size bowl and whisk until smooth. Add a tablespoon of cream or milk until smooth and able to drizzle. I scoop the glaze into a small Ziplock sandwich bag and snip off a tiny bit of the end of the bag and drizzle over the top of the muffins after they are cooled a few minutes.

Tips:
-If you like chocolate chips in your muffins, add the chocolate chips about 1 1/2 cups to the flour (dry) mixture. Coating the chocolate with flour and other dry ingredients will help prevent the chocolate chips from sinking to the bottom of the muffins!
-I like the cupcake liners shown above. They are very sturdy and do not let grease bleed through when baking. I find mine at cooking stores, Harmons, and also sometimes at discount stores such as TJ Maxx or Homegoods. You may also use standard baking liners found at all grocery stores in the baking aisle.


7/11/15

World's Best Cinnamon Rolls


I have a serious weakness for cinnamon rolls.  A few of my favorite cinnamon roll recipes are Mel's Kitchen Cinnamon Rolls,  Cutler's Cinnamon Rolls,  and Pioneer Woman's Cinnamon Roll .  When I saw this recipe on Pinterest for the World's Best Cinnamon Rolls I knew it was a must-try recipe.


I Pinned this recipe while drooling over pages of cinnamon roll photos on Instagram one evening. The author of this recipe is Carrian, from Oh, Sweet Basil. Carrian worked on this recipe for SIX YEARS before posting it on her blog. Wow. That's a serious obsession with perfecting the cinnamon roll! I met Carrian a few years ago, and watched her teach a cooking class. She is a darling young mom who loves to cook and workout. Good combo. I just love to cook.
If you're looking for a quick recipe, this is not going to be a good fit. But if you've got several hours at home, and have time to tend a batch of rolls (while doing laundry, cleaning bathrooms, etc), this recipe will not let you down! It is one of the best recipes I have tried.
Maybe even the World's Best  :)


World's Best Cinnamon Rolls
adapted slightly from Oh, Sweet Basil
Prep time: 4 hours
Cook time: 20 mins
Serves: 20-24

Dough:
1 cup warm water
½ cup heavy cream *may substitute whole milk*
4½ teaspoons instant yeast
1 cup plus 2 teaspoons sugar, divided
½ cup buttermilk, at room temperature
2 teaspoons fine grain sea salt salt
2 large eggs, lightly whisked
⅓ cup canola oil
⅓ cup melted butter
7-8 cups all purpose flour
2 dime sized circles (NO MORE) Soy Lecithin
Filling:
12 tablespoons softened butter, unsalted
2 cups plus 2 tablespoons packed light brown sugar
½ cup white sugar
5 tablespoons cinnamon
4 tablespoons cornstarch
Frosting:
4 oz. cream cheese, at room temperature
4 tablespoons softened butter, unsalted
1½ teaspoon vanilla extract
1½ tablespoon corn syrup (light Karo syrup)
2- 2½ cups powdered sugar

In a glass measuring cup, add the water and cream. Heat in the microwave until warm, about 30 seconds to 1 minute. Make sure it's warm and not hot. Add the yeast and 2 teaspoons of sugar. Allow to foam for 5-10 minutes. In another measuring cup, add the buttermilk and warm as well. Making sure it's lukewarm, add it to the yeast mixture.
In another measuring cup, add the remaining sugar, salt, oil, butter and eggs, whisking to combine. Add to the yeast mixture in a standing mixer. Stir with a dough hook to combine. Add the flour over the top and the soy lecithin. Mix until the dough begins to form a ball then mix for 3 minutes, adding an additional ¼ cup flour if you were too light handed with the first measurement and it needs more. I never do, but everyone measures differently. Remove the dough hook and place a towel over the bowl to rise for 1-2 hours in a warm spot.
Very lightly flour the counter and roll the dough into a large, even rectangle. Spread the soft butter all the way to the edges.
In a small bowl, mix the brown sugar, sugar and cinnamon with the corn starch. Sprinkle liberally over the butter, all the way to the edges. Roll into a tight log and using floss, slice the rolls by sliding it under the dough, bring it up and make an "x", pull it tight to cut through and set it in the lightly greased cookie sheet.
Repeat until all of the rolls are in the pan and then drape with a towel to rise for 1-2 hours.
Heat the oven to 350 degrees and bake for 20-22 minutes, watching the tops because as soon as they are golden the rolls are done and you DO NOT want to over bake. Remove from the oven, cool for 2 minutes and top with frosting while hot. Sneak into another room to enjoy one all alone before the husband and kids find you.
Frosting:
Whip the cream cheese and butter together until softened. Add the corn syrup (Karo syrup) and vanilla . Slowly beat in the powdered sugar until desired consistency.


6/30/15

Cheese and Garlic Twisted Breadsticks


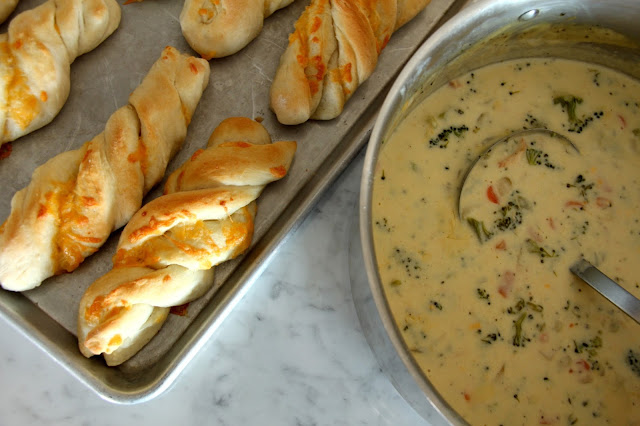
I've been making these Quick Cheese and Garlic Twisted Breadsticks for years. They take less than an hour start to finish and paired with a salad or soup make a meal complete! They are simple enough to make with your kids this summer, they'll love to cut the dough into strips, sprinkle with cheese and then twist.
I love them paired with these main dish salads:


Panera's Strawberry Poppy Seed and Chicken Salad Copycat recipe

BLT Pasta Salad with Buttermilk Ranch Dressing


Here's a little step by step to help you out:


Roll out on a floured surface. Doesn't need to be a perfect rectangle...

Spread with butter and garlic mixture (optional).
I skip this step if I'm in a hurry, sprinkle with cheese, cut into strips. 
Fold the strips back to meet the top of the dough. 


Gently twist one end of the dough.
It's okay if the cheese spills out the side of the breadstick!


Place the breadstick on the greased baking sheet.
Brush with egg and sprinkle with poppy or sesame seeds.
Or skip this step if you're in a hurry.


Shown with Panera Copycat Broccoli Cheddar Soup Recipe


Cheese and Garlic Twisted Breadsticks
A Bountiful Kitchen

1 1/2 cups warm water
1 package active dry yeast or 2 1/2 teaspoons dry yeast
1 tablespoon honey
1 teaspoon salt
3 1/2 to 4 1/2 cups flour
1 egg, beaten (optional)
1 clove crushed garlic mixed with 2 teaspoons salt, or 1 tablespoon garlic salt
2-3 tablespoons butter, softened or melted
1 1/2 cup grated cheese (Cheddar, Co-jack, Parmesan)
poppy seeds, sesame seeds optional

Place the warm water in a large bowl. Sprinkle the yeast over top of the water. Let sit for about five minutes or until bubbly. Stir in honey. Add the flour and salt, a cup at a time, until dough pulls away from sides of bowl and is no longer sticky. Remember, it is easier to work with dough that has not had too much flour added.
Let the dough sit for about 15 minutes. This step is not necessary, if you are in a hurry, go ahead and proceed to next step.
Mix the butter and garlic or garlic salt in a small bowl.
Roll the dough out on a floured surface into about a 10x15 rectangle. Spread or drizzle the surface of the dough with melted butter and garlic mixture. This step is optional, you may simply sprinkle the dough with grated cheese, but the flavor is much better with the garlic butter mixture spread on top first.
Grease a jelly roll pan with cooking spray. Pre heat oven to 400 degrees. Place rack in middle of oven.
Using a pizza cutter, cut the bread sticks in to 8-12 pieces (width wise), depending on the desired size. Take one end of the dough strip and fold upward to meet the top of the other end of the strip (see photo). Continue until all of the strips are folded. Pick up one dough strip and gently twist in one direction, holding the other end while twisting. Place the twisted dough strip on the greased baking sheet. Repeat until all of the dough has been twisted and placed on baking sheet. Dough may be brushed with beaten egg and sprinkled with poppy or sesame seeds.
Let the dough sit in a warm place for about 20 minutes.
Place in oven and let bake for about 15-20 minutes or until golden brown.
Serve immediately.

Tips:
-When making any type of bread, the kitchen should be warm and draft free. The microwave oven is a great place to put a bowl of rising bread dough. Place a cup of water in the microwave on high for one minute. Remove the water and place the bowl of bread in the microwave oven with the door shut. The temperature inside of the oven is perfect!
-While this recipe is supposed to be a thirty minute recipe, the texture of the bread is better if you let it raise a bit before baking. If you have lots of time, let it raise for 30-40 minutes after making the dough, then another 30-40 minutes after shaping into breadsticks and before baking.

4/14/15

Coconut Raisin Oatmeal Chewies


It's always a good time when my brother brings his cute family down for a visit. In the evenings, we usually gather around the kitchen counter, eat dinner and I make some sort of treat. The first night it was Tried and True Chocolate Chip Cookies. The second night, I was about to make the Salted Caramel version, but my niece Kaiden said her favorite cookie was an oatmeal raisin. Funny, but lots of kids are not fans of oatmeal raisin cookies! I was happy to oblige and come up with this recipe for Coconut Raisin Oatmeal Chewies. They are a little crispy, super chewy and made with a yummy blend of golden raisins, coconut and oats.
They were a hit. The cookies that didn't get eaten up that evening turned into breakfast cookies early the next day :)


That's me.
And my little brother, and a perfectly beautiful spring day.
 
The flowers on Temple Square this time of year are absolutely breathtaking!


Coconut Raisin Oatmeal Chewies
A Bountiful Kitchen

2 cups old-fashioned  oats
1 1/2 cups flour
1/2 teaspoon cinnamon
1 teaspoon baking soda
1 teaspoon salt
1 cup unsalted butter, softened
1 cup packed light brown sugar
1/2 cup granulated sugar
2 large eggs
1 tablespoon vanilla
3/4 to 1 cup raisins, I used golden
1/2 cup sweetened coconut flakes


Preheat oven to 375°F or if using convection, 350 degrees. Lightly grease cookie sheets or use parchment paper.
Beat together butter, brown sugar, and granulated sugar in a large bowl with an electric mixer until smooth. Add egg and vanilla and beat until combined well.  Add all dry ingredients to the bowl (including coconut and raisins), and mix on low speed just until combined. Do not over mix.
Scoop cookies out onto a baking sheet. I used a 1 3/4 inch cookie scoop. Flatten slightly with palm of hand. Bake for about 8-10 minutes on convection or about 10-11 minutes if cooking at 375 regular bake. Remove from oven when cookies have flattened and a light crust has formed. Let cool completely.
Yield about 24-30 cookies.


4/10/15

Triple Chocolate Ice Cream Cake for Sweet Saltwater Design Celebration!


What's a party without a cake?   Kayleigh and Linsey  are best friends, old college roommates, elementary school teaching partners and moms of two kids each.  They love the ocean and candy created Sweet Saltwater Designs.  They make the most precious leather, steel and wood jewelry. I  absolutely love their hand written "I love you" bar necklaces. 
They are celebrating the launch of their new website this weekend with a 48 hour Instagram "party" and asked me to share a cake recipe for their celebration.  My favorite way to celebrate is to combine both cake and ice cream in one dessert. 
Tillamook is my favorite ice cream and this cake combines the goodness of Tillamook with a home made cake and rich chocolate frosting! It's one of our family favorite desserts. 
Happy day Kayleigh, Linsey and Sweetwater Design! 


Triple Chocolate Ice Cream Cake
A Bountiful Kitchen
print recipe

3/4 cups unsweetened cocoa powder, plus more for pans
1 3/4 cups all-purpose flour
1 1/2 cups sugar
1 1/2 teaspoons baking soda
3/4 teaspoons baking powder
3/4 teaspoons salt
2 large eggs
1/2 cups buttermilk
1/2 cup warm water
1/2 cup sour cream
3 tablespoons canola or vegetable oil
1 teaspoon vanilla extract
Ice cream, 1.75 quart container of chocolate (I used Tillamook)
Chocolate Frosting (recipe follows)

Place rack in center of oven and heat oven to 350 degrees. Butter 2-9 inch round cake pans, and line bottoms with parchment; butter parchment, and dust with cocoa.
Into the bowl of an electric mixer fitted with the paddle attachment, sift cocoa, flour, sugar, baking soda, baking powder, and salt. With the mixer on medium speed, stir in eggs, buttermilk, warm water, sour cream, oil, and vanilla until smooth, about 3 minutes.
Divide batter among prepared pans. Bake until tester inserted in center comes out clean, 25 to 30 minutes.
Let cakes cool in pans on a wire rack for 10 minutes, remove from pans and cool completely. I place the layers on a cooling rack in the fridge to cool them quickly.


Chocolate Frosting:
1/2 cup butter, softened
4 cups powdered sugar
1/2 cup cocoa powder
3-4 tablespoons milk or cream
1 teaspoon vanilla
dash of salt

Cream butter, powdered sugar and cocoa in a large bowl. Mix in milk and vanilla, add salt. Beat until smooth add a little more milk if needed.

Assembly, three basic steps:

1. When cakes are cooled completely, place one of the cakes on a sheet of parchment paper or wax paper. I like to place the cake in a 10 inch Spring form pan or 10 inch cake pan, but a plate will work as well. Scoop the ice cream onto the cake. I use about 3/4 of the container. Try to make an even layer of the ice cream, then place the second layer of cake on top of the ice cream. Using another piece of parchment or wax paper, Press down on the top layer of cake. Don't worry the cake will not be ruined, press down evenly, so the ice cream will be compacted and the layers meet up more closely on the sides. Don't cry if part of the cake sticks to the paper, just scrape it off an eat it as an appetizer.
* see additional note below about pressing down on cake.

2. Place the cake in the freezer for at least two hours.
3. When ice cream cake has been frozen for at least two hours, remove from freezer and place on serving plate. Frost top and sides of cake. Place back in freezer and let sit for at least another hour.
If preparing ahead and cake is frozen for several hours, remove about 30 minutes before serving to allow for easier cutting.

Tips:
-Don't let the length of this recipe intimidate you. It's basically cake, ice cream and frosting. Best to start this recipe the day before serving. You can make the cakes, and place in the freezer or fridge for easy handling. Make sure to freeze on a  flat surface.
-I have used lots of different recipes over the years. Boxed, home made, they all work well with ice cream cakes. But home made is always best :)
-You may use any flavor of ice cream. I thought when I picked up this flavor it was plain chocolate. While I loved the flavor and taste of "Udderly Chocolate", I prefer a solid color for the ice cream layer. I just like the way it looks as opposed to the mixed brown and white of this particular carton of ice cream.
-*Pressing down on the second layer of cake: This step is important if you want to be able to frost the sides of the cake and avoid huge gaps between the cakes. Press down evenly. It may be helpful to press down using a cookie sheet to get an even surface.
-This cake keeps well in the freezer for about 2 weeks if covered tightly with plastic wrap.

3/23/15

ABK's Salted Caramel Chocolate Chip Cookies


Hey. You know how I was obsessed about perfecting the chocolate chip cookie? And how I made batch after batch until I created the Tried and True Chocolate Chip Cookie??  If you've been reading this blog for any amount of time, you know what I'm talking about. If not, read these posts: Post One CC Cookies and Post Two, updated Tried and True CC Cookies

A few months ago, I made a batch of cookies and put them on my Instagram. If you're not following along there, come join me! I post every day (almost) and share the latest and greatest goings on in my kitchen. Anyway, I posted a photos of my CC Cookies one day on Insta, and a reader said - you should try melting a square of caramel on top.  Well, if that wasn't the greatest idea ever! Add a little coarse salt.  Genius. 
Not me. The cookie. 
If you want to take the humble, but always crowd fave cc cookie to a whole new level, try the ABK Salted Caramel CC Cookie. You're going to love it. 


ABK's  Salted Caramel Chocolate Chip Cookies
A Bountiful Kitchen

* Note- the first batch I cooked with the caramel on top of the dough the whole time the cookie baked. The second batch, I made following my recipe directions, bake cookie, remove, add caramel and cook a couple more minutes. This is the reason some of the caramel looks more melted on some of the cookies.

1 cup (2 sticks) butter, softened *
3/4 cup granulated sugar
3/4 cup packed light brown sugar
1 tablespoon vanilla extract
2 large eggs
2 3/4 cups all-purpose flour*
1 teaspoon baking soda
1/2 teaspoon salt ( I prefer coarse salt)
2 cups  or 1 (12-oz. pkg.) chocolate chips, I prefer Guittard Milk Chocolate for this recipe
Peter's Caramel (see note below) or individual pieces of soft caramel (see note below) Kraft caramel not recommended
additional coarse salt for top of cookies

Preheat oven to 375° F. If using convection, preheat to 375 as well.
For regular oven, place rack in middle of oven. When using a convection oven, you should be able to bake on all racks at one time.
Cut butter into pieces ( about 2 tablespoons each) and place in mixing bowl. I use a Kitchen Aid and power it on 2 (low).  After a few seconds, add granulated sugar, brown sugar and vanilla extract. Mix on low speed until creamy (this takes just a few seconds). Add eggs, beating just until incorporated and smooth.  Never turn the beaters on high. Using a spatula, scrape down the sides of the bowl and bottom of the bowl to insure all ingredients are incorporated.
Dump 2 cups of the flour, soda, salt and chocolate chips all together into bowl with butter mixture. Add the remaining 3/4 cup of flour to the top of this mixture. Slowly mix the dry ingredients and the chocolate chips together.  Do not over mix.  Turn the dough with a rubber spatula so the bottom of the dough is mixed into the top of the dough. This will insure the flour is mixed in properly and the chips are distributed evenly.
Using a cookie scoop, drop onto un-greased baking sheets, or baking sheets lined with parchment paper. Place 6 scoops of dough on each baking sheet. Flatten slightly with the palm of your hand.
If using convection, bake for 7 minutes. If using regular oven, bake at 375 for 8-9minutes. Cookies should be slightly golden. Remove from oven and place a piece of caramel on top of the cookie. Using the block Peter's Caramel, I cut off a slice, then tore off individual pieces, about the size of a quarter. don't press down on the cookie, just place the caramel on top. Place back in oven and bake for an additional 2-3 minutes, or until top is set and caramel is a bit melted. Do not over bake! Remove from oven. Sprinkle each cookie with a bit of coarse sea salt.
Cool on baking sheets completely.
Yield 18 large cookies.
Tips:
(or my mini-epistle on cc cookie making and baking)
-Only use butter. Unsalted is best. The butter should be more firm than room temperature butter. I take it straight out of the fridge, and microwave it for about 20 seconds.
-*Our altitude is about 4,400 ft. So, I use about 2 3/4 cups flour total. The original Toll House recipe calls for 2 1/4 cups. If you are at sea level, you will probably need less flour than the 2 3/4 cup.
-Don't over beat the butter-sugar mixture, or the batter will become too soft, and your cookies will not be beautiful and puffy. They will resemble pancakes. 
-Don't sift the flour.
-There is usually a notable difference between using a convection and a standard oven. If you bake at the same temperature, for the same amount of time, the convection cookie will be done, with a beautiful, golden, slightly crispy outer layer. Still soft on the inside. And it will be taller than the cookie baked in a standard oven. Not everyone has a convection oven- if you don't, you can still bake a great cookie using a standard oven!
-I think two of the biggest mistakes made while baking cookies are:
1-Over mixing. This will cause the batter have too much air incorporated, producing a fluffy, instead of a chewy cookie.
2- Over bakingUnder baking is good! Not under baked to the point the cookie is wet and doughy, but just until the top sets, and the dough looks like it has a bit of a crust.
-Chocolate chips - For semi sweet,  I use Nestle Semi Sweet chips. You can't go wrong here. But for Milk Chocolate, we prefer Guittard . The chips are called Maxi Chips and are sold in a silver colored bag.
-If the cookie spreads too much, or the edges are not even, I take a small spatula and push the edges inward to create a cookie that is round. This has to be done immediately after removing from the oven.
-I purchased Peter's Caramel, a dipping and cooking caramel at Orson Gygi in SLC in a 5 lb block. You may also use other brands of caramel. I do not recommend using caramel sauce, the cookies will not set up properly. Readers have also reported that Kraft caramels do not work in this recipe. The caramel softens while cooking, but does not soften enough to spread, and then hardens too much after cooling.
- High Altitude info: Not recommended-directions on Nestle Choc Chip package for high altitude- I have tried this variation, and don't like the result. The cookies aren't quite sweet enough, and have a crispy more cake like texture. Here are the directions on the package: (again I do NOT recommend using this method, but have printed it here as an FYI)  Increase flour to 2 1/2 cups. Add 2 teaspoons water with flour and reduce both granulated sugar and brown sugar to 2/3 cup each. Bake drop cookies for 8 to 10 minutes and pan cookie for 17 to 19 minutes.
-Last tip. Mound the cookie into a ball. I make them about the size of a golf ball. I use a cookie scoop, because it's easier for me. For years, I just used a spoon, and then shaped them by hand. Make sure to flatten the cookie just a bit before baking. To yield 18 cookies use a  2 1/4 inch scoop.

3/13/15

ABK's Fresh Strawberry Pie


I originally posted this pie recipe back in 2009, when I was trying to find a recipe for strawberry pie made without Danish Dessert or Jello. I couldn't find one I loved, so I came up with my own version.
This recipe has just a few ingredients, and is so simple to make.


Start with fresh strawberries

Cook a few of the berries, add sugar and cornstarch

add a little strawberry jam
mix the glaze with the fresh berries

dump into the crust


It starts with a home made single pie crust, fresh berries, strawberry jam and a little sugar and cornstarch to thicken the glaze. It tastes like a strawberry pie should.
Hope you love this recipe and enjoy Pi Day tomorrow!


Fresh Strawberry Pie
A Bountiful Kitchen


1- 8 inch baked and cooled pie or tart crust
2   quarts strawberries, washed and hulled, divided
½ cup sugar
1 ½ tablespoons cornstarch
2 tablespoons strawberry jam
red food coloring
Whipping cream

Mash about 1 cup of the strawberries in a small saucepan. Add the sugar and strawberry jam. Stir to dissolve.Whisk in cornstarch, and cook over medium heat until bubbly and mixture begins to thicken, about 10 minutes. Add about 5 drops of red food coloring, stir. Set aside to cool. Cut the remaining strawberries in half and place in large bowl. After the sugared mixture is cooled, pour over the fresh strawberries, and mix gently. Pour all of the strawberries into the pie shell. Refrigerate for about 2-3 hours. Top with whipping cream.

Tips:
-Use the freshest strawberries you can find, without bruises or discoloration.
-Serve pie with in about 6 hours of assembling if possible.
-You may use either a single pie crust or a tart shell.
-Keep refrigerated until ready to serve.
-Don't forget the whipped cream. Seriously essential.