Showing posts with label seriously simple. Show all posts

1/30/14

Seahawk Salmon Sliders with Sriracha Mayo


In 1976 our little JC Penney Store in Bremerton, WA was visited by a celebrity. His name was Jim Zorn, and he was the quarterback for the newly formed Seattle Seahawks. I stood in line to get a photo of  Jim; he gave me a hug and a signed a 5x7 glossy black and white with his name and a scripture. I was star struck over the most beautiful person I had ever met.  Since I was 13 at the time, it never really worked out for us…my earliest memory associated with the Seahawks= my crush on Jim Zorn.
Oh to be 13, in braces, and in love.


Bremerton, WA

In the 38 years the Seahawks have been in existence, this weekend will be their second Super Bowl appearance. Kind of a big deal.
We watched the Seahawks play an away game, on a Thursday night in Phoenix last fall.
The 12th man? Alive and well in Phoenix.  It seemed like a home game with all of the Seahawk fans in attendance.

Me and my baby.

In honor of my mother, little brother and his family who LOVE the Seahawks, I created a dish that reflects the flavors of the Northwest in one fresh little slider.  It is perfection in a bite- a little sweet, spicy, creamy and crunchy. So simple. Takes less than 1/2 hour start to finish. If you are going to a Super Bowl party and want to take a dish that's not your ho-hum Little-Smokie-in-bbq-sauce fare, you've hit the gold mine.
Best new appetizer.
Ever.
Say it with me.
SEEEEEEEEAHAAAAAAAAAAAAWKS!


Seahawk Sliders with Sriracha Mayo
A Bountiful Kitchen

1 1/2 lbs salmon fillet
1 cup prepared teriyaki sauce ( I like Soy Vay's Veri-Veri Teriyaki)
1 large or 4 baby cukes, sliced thin*
1 small can water chestnuts, drained and cut into matchstick pieces
12 small dollar size rolls, sliced, or one french baguette, sliced into 12- 1" pieces
decorative toothpicks, if desired

for sauce:
2 tablespoons mayo
1 tablespoon Sriracha Sauce**
1 tablespoon rice or cider vinegar

Cut salmon into 4-6 pieces and place in bowl with teriyaki sauce. Make sure all pieces are coated in sauce.
Make sauce by whisking mayo, Sriracha and rice vinegar in a small bowl. Set aside. If not using immediately, set in refrigerator.
Heat a cast iron grill pan (the type with ridges that create grill marks) over medium high heat for about 5 minutes or until the pan sizzles when a drop of water is placed on pan. Spray with cooking oil, or quickly wipe with a paper towel and canola oil.
Place salmon onto the grill pan, cook for about 3-4 minutes per side. Make sure to grill the sides of the salmon as well for about 1 minute each. The total grill time for the fish should be about 8-10 minutes.
Remove from grill pan and let sit on plate. If not using immediately, set aside and cover with foil to keep warm.
To assemble sliders:
Place a small amount of salmon on a roll, top with sliced cucumbers and water chestnuts, drizzle a teaspoon of sauce over salmon and veggies. Place top half of roll on top and skewer with long toothpick if desired to keep top of roll in place.  Serve immediately.
Yield about 12 - 2 inch sliders.


Tips:
-*I purchased baby cukes at Costco. The seeds are very small so there was not a need to seed the cucumbers. If you are using full size vegetables, you will probably need to seed before slicing.
-**Sriracha Sauce is found in most grocery stores in the Asian section. It is a sauce made of ground chili peppers, garlic, salt and vinegar. It can be used in many recipes where you need a bit of a kick!
-This dish is best served warm, but is fine at room temperature as well.
-If you cannot find dollar size rolls, you may use any type of small roll. This recipe also works well served on a sliced french baguette, open faced ( similar to bruscetta).


12/30/13

Sun Dried Tomato and Artichoke Bruschetta


Do you love baked artichoke dip?  This is similar, but also incorporates sun dried tomatoes. It's rich, creamy and a little tangy. It's a one bowl- mix, spread and bake process.  If you've got five minutes,  you have time to whip up this recipe.  You'll have an appetizer guaranteed to please everyone from cowboys to food snobs.
Perfect for ringing in
2
0
1
4
See you next year :)


Sun Dried Tomato and Artichoke Bruschetta
A Bountiful Kitchen
print recipe

1/3 cup sun dried tomatoes, drained and chopped
3-4 oz  marinated artichokes, drained, chopped in half (approx. 1/2 cup before chopping)
1/4 cup parmesan cheese, grated
1/4 cup chopped fresh parsley, plus extra for garnish (optional, but really adds color to dish)
1/3 cup mayonaise
1/4 teaspoon garlic salt
fresh ground pepper
1 french baguette, cut into 3/4 inch slices

Preheat oven to 350 degrees. Place oven rack on top third of oven.
Gently mix together sun dried tomatoes, artichokes, parmesan cheese, chopped parsley and mayo. Season with garlic salt and pepper.
Spoon mixture onto baguette slices and place on baking sheet.
Bake for about 10-12 minutes.  The topping should puff up slightly and turn bit golden on top.
Remove from oven. Place on plate and serve immediately, sprinkle with additional chopped parsley if desired.
Makes about 12-15 slices.

Tips:
-You may substitute regular canned artichokes (in water)  for  marinated artichokes. If using regular canned artichokes, add one teaspoon of lemon juice to the recipe.
-To "drain" the sun dried tomatoes, I  use a fork to remove the tomatoes from the jar. No need to use a strainer.
-Brush the baguette slices with olive oil and toast them under the broiler if you like the bread more crunchy. Top with the spread and bake as directed.
-To serve as a dip, simply mix up the artichoke and tomato mixture and spoon into a small oven proof dish. Bake for 15 minutes as directed. Serve with veggie slices, chips, crackers, pita slices or bread.

12/13/13

Roasted Red Pepper Hummus


It's Friday. You have a holiday party tonight. You're suppose to bring something to share.
You've come to the right place.
Oh, and you're looking for something semi-healthy? Serious? Now I'm really going to be your new best friend.
Do you have ten minutes?  Okay, let's make this.


If you are making your own Tahini, throw some sesame seeds into a food processor. Add a couple of tablespoons of olive oil. Blend until smooth, or semi smooth. I like to use a little Cuisinart mini for this. Or buy Tahini at the store, like most normal people. You can also skip the Tahini, and substitute a couple of tablespoons of sesame oil. 


Throw all of the ingredients into a blender or food processor.


Here's a pic after I mixed up one batch, then decided to double the recipe so I could have some for at home, as well as taking to the party :)


Pulse, pulse, pulse, then bleeeeend. Until smooth. Add a little liquid from the red pepper jar, or a few tablespoons of olive oil (I used olive oil) if your hummus is too thick. 


Scoop the mixture into a bowl or crock. Garnish with a little parsley or sesame seeds.
Get on your party clothes. 
You still have time to practice your dance moves. 
Happy Holiday. 


Roasted Red Pepper Hummus 
adapted from Allrecipes
print recipe

1 (15 ounce) can garbanzo beans(chickpeas), drained
1 (4 ounce) jar roasted red peppers, drained, reserve juice for thinning if needed*
1/2 cup crumbled feta cheese
3 tablespoons fresh squeezed lemon juice
2 tablespoons Tahini (see recipe below)*
1 clove garlic, minced
3 tablespoons chopped fresh parsley
1/2 teaspoon ground cumin
1/4  teaspoon cayenne pepper
salt to taste, I like coarse sea salt
olive oil, if desired to smooth hummus*

In an electric blender or food processor, puree the chickpeas, red peppers, feta cheese, lemon juice, tahini, garlic, fresh parsley, cumin, cayenne, and salt. Process, using long pulses, until the mixture is fairly smooth, and slightly fluffy. Add liquid as suggested or olive oil to make a smooth consistency. Make sure to scrape the mixture off the sides of the food processor or blender in between pulses. Transfer to a serving bowl and refrigerate for at least 1 hour if possible. 
Remove from refrigerator before serving, bring to room temperature before serving.
Serve with flat bread, crackers, or vegetables. 

Tips:
-*If the hummus seems too thick, you may use some of the juice from the roasted red peppers to thin the mixture, or blend in a little olive oil. I use about 2 tablespoons per single recipe. 
-*Tahini is found in most grocery stores. Sometimes by the peanut butter, sometimes by the beans or ethnic foods. I don't like to buy it because it's so simple to make, and a jar us usually about $7-8. Tahini is simply ground sesame seeds made into a paste. Here's my recipe:
Blend some seeds in a food processor or grinder or blender (about 1/3 cup) pulse several times until finely ground, add a little olive oil to make a paste. I like to toast the seeds first in the oven or stove top for a few minutes. I buy sesame seeds in bulk at the grocery or in the Asian section of the grocery, where they are less expensive compared to seeds purchased in the spice section. 
-The hummus can be made up to 3 days ahead and refrigerated. Best served at room temperature.
-This recipe is easily doubled.

11/19/13

Fresh Cranberry-Raspberry Sauce


What's your Thanksgiving dinner assignment?  For less experienced cooks, assignments usually include: drinks, fruit platter, veggie tray, corn or some other no-fail type item. If you're looking for a way to upset surprise your Mother-in-Law and bring something out of the ordinary, bring what she requested, then take along a nice little dish of cranberry-raspberry sauce. It's unbelievably simple and delicious.
Who knows, maybe next year, you'll be hosting!
Or single.


Fresh Cranberry-Raspberry Sauce
A Bountiful Kitchen
print recipe

2 cups fresh or frozen cranberries
1 cup fresh raspberries or frozen, whole, without syrup
1 cup water
1 cup sugar

Place all ingredients in large saucepan. Bring to a boil and continue to boil for about 5 minutes, or until most of the cranberries have burst and the mixture thickens a bit. Stir occasionally. Remove from heat and scrape into a heat proof bowl. Let cool and serve immediately or store in fridge for up to one month.
Serves 8 as a side.
Easily doubled.

11/8/13

Grandma's Corn Pudding


Corn. So ordinary.
How to dress it up for the holiday? Make it yours.
For years I've wanted to help the corn, make it feel a little less naked at Thanksgiving. But it's always an afterthought. Throw the corn into a pot and cook while we ask a blessing on the feast.
It always seems a little out of place to me. The plain yellow kernels sitting in the bowl, while every other dish was given so much care and preparation. This year I'm dispensing with the bowl and serving corn pudding. It's a little sweet. A little salty. A smooth bit of cream-corn goodness in a beautiful little circle on your plate. Yes, you can bake and serve it straight from the dish. I opted for cutting into circle shapes, which dressed it up a bit more.
And, you know, we all want the corn to feel dressed at the table.


Grandma's Corn Pudding
Adapted slightly from Allrecipes.com
print recipe

1/2 cup milk
4 tablespoons cornstarch
5 eggs
1/3 cup butter, melted
2 tablespoons white sugar
2 cups frozen corn or 1 (15.25 ounce) can whole kernel corn
2 (14.75 ounce) cans cream-style corn
1 teaspoon salt
garnish with chopped green onions

Preheat oven to 400 Degrees. Grease a 2 quart casserole dish.
In a large bowl, whisk cornstarch into cold milk until smooth and no lumps appear.
Add eggs and beat until eggs are incorporated. Add melted butter and sugar, stir in corn, creamed corn and salt. Blend well. Pour mixture into prepared casserole dish.
Bake for 1 hour or until golden on top and set. Garnish as desired.
Serves 8-10

Tips:
-I baked in a 9x13 glass pan, then waited for the dish to cool a bit (about 10 minutes). After cooling a few minutes, I cut the pudding into circles using a biscuit cutter. I cut the circles as close together as possible to eliminate any waste. If you want, you can just serve it in the dish. Or bake it in ramekins or custard cups, greased and filled about 1-1 1/2 inch full. Place the ramekins on a cookie sheet and check after about 40-45 minutes. 
-If using frozen corn, do not thaw before adding to dish.
-This dish may be made ahead and re-heated. 

11/6/13

Bread Cubes for Stuffing


Hey there. You and I have been friends for a long time now. You know what to expect this time of year. Thanksgiving talk.
I'm going to start out the month with a post about making your own stuffing. Because I believe stuffing, not turkey, is the crown jewel of an amazing Thanksgiving feast. I purposely make huge batches so I can eat it for days after the celebration. If you are scratching your head and asking "what's wrong with instant stuffing out of a box?" We need to have the talk.
Yes, that talk.
Never, ever, use pre-made "just add water and serve" boxed stuffing.
Homemade. Your new mantra. Homemade. Homemade. Homemade.
Homemade= a new life.
Your new life starts with a simple task. Drying bread.
Every time you have extra bread sitting around the house and you know you aren't going to eat it all up before it gets stale, cube it and bake. Every time you have spare bread (Baguettes, French bread, Sandwich bread, rolls, Artisan bread) cut it up.
It's that simple.
Here are a couple of recipes I've posted in past years. The first is my mom's tried and true (for over 50 years) Apple and Sausage Stuffing. It's simple, delicious, and it's on our holiday table every year. If you are looking for a starter dressing, this is it.


The second recipe is a less traditional, but delicious Artisan Stuffing with big chunks of mushrooms, onions, Italian Sausage, cornbread, Artisan, French Bread and fresh herbs. It's fresh and fun and a nice addition to your traditional feast.


Today- instructions on how to prepare the bread for your home made stuffing. In a few days, I'll post a new stuffing recipe. If you have a favorite stuffing/dressing you'd like to share, post a link in the comments, we would all love to see what you're planning for the big day...


Bread Cubes for Stuffing
print recipe

Loaf of Artisan or French Bread or any other type of leftover bread or rolls
Olive oil
sea salt and fresh ground pepper

Cube the bread, spread out onto a large cookie or baking sheet.
Drizzle with olive oil.
Sprinkle generously with sea salt and fresh ground pepper.
Bake in 250 degree oven until bread is lightly toasted and completely dried out.
About 1-1 1/2 hours, depending on density of bread and oven.
Cool completely, bag until ready to use.

Tips:
-Also delicious as croutons.
-Save the crumbs as well to use in dressing.
-You may also up the temp on the oven to 300 and bake for about 30-40 minutes.

10/29/13

Slow Cooker Tomato Basil Soup


Every year on Halloween, it was a trick to get the kids to eat real food before going out in the neighborhood to collect treats. My rules on Halloween (besides stay in the neighborhood, don't run, say "thank you" after screaming trick or treat and don't eat the candy till we inspect it) were:
1. Eat dinner before you go out. 
2. Eat a few pieces of candy that night, then put the stash away until the next day. There was a limit on how much candy you could eat each day, something like 3-5 pieces.

Then I grew a new brain, and came up with the new Foster Family Halloween standard:
1. Eat a bowl of home made chicken noodle soup and buttermilk scones before going out. Invite your friends over to eat with you. Amazing how your kids will actually eat dinner if their friends are with them, and they're eating something they love. 
2. Eat the candy you gathered that night ASAP, therefore alleviating your mother the hassle of policing how much candy you eat every day for the following month. The bulk of treats were usually gone in a day or two. 
If you're looking for an easy fix for dinner on Halloween, try this recipe. I Pinned it a while back, made it and loved it. After you take the blender to the ingredients, the kids will never know they are eating something healthy.
Happy Halloween!


Slow Cooker Tomato Basil Soup
adapted from Big Girls Small Kitchen
print recipe

3 tablespoons olive oil
3 large carrots, scrubbed or 2 cups baby carrots
2 medium sweet onions, diced
1 clove garlic, chopped
1 tablespoon salt
3 28-ounce cans whole peeled tomatoes
1 quart chicken (or vegetable) broth
10 basil leaves, fresh, plus a few more for garnish
Fresh grated Parmesan for garnish
Slow cooker:
Combine all ingredients in a slow cooker. Cover and cook on low for 5-7 hours, until flavors are blended and vegetables are soft. Allow the soup to cool slightly.  using an immersion blender, blend the soup until smooth. Or puree in batches in a blender. Serve immediately, or keep on low until ready to eat.
Stove-top version:
Combine all ingredients in a heavy lidded pot or dutch oven over medium-high heat. Bring to a boil, then turn heat down to low, and simmer, covered, for about 2 hours, until flavors are blended and vegetables are soft. Allow the soup to cool slightly. Then puree as instructed above. Garnish with fresh basil and Parmesan cheese.

Tips:
If you like a creamier version, omit about 1 cup of the chicken broth and add milk or half and half.

10/23/13

Favorite Apple Crisp


I was digging through a folder of dessert recipes the other day and found an article on the closing of the Red Apple, an old SLC institution. It was housed in the basement of a building in the middle of the block on 100 South between State and Main, across from what is now the City Creek Center. They made great sandwiches and one of my favorites, Apple Crisp. The Red Apple was one of the only places I knew of where you could order house made apple crisp any time of the year, whether it was October or  April . After years of being in business, they closed the doors and moved on to other adventures.
I realized after looking at the article, I've never posted our favorite version of apple crisp. You probably have your own family favorite take on this classic dessert. Ours comes from years of testing out different recipes and then coming up with a recipe that is sweet, salty, caramely and heavy on the crisp.  I like a good amount of topping on my crisp, not a thin layer that leaves you wanting more to eat with the apple filling. I also like the bit of crunch the oats add, instead of using all flour. If you don't already have a version you love give this one a try. It may become your new favorite!
Hope you're enjoying the beautiful Fall weather .


Favorite Apple Crisp
A Bountiful Kitchen
print recipe

4 lbs of apples, preferably Granny Smith, peeled and sliced
1 tablespoon vanilla
3/4 cup dark brown sugar*
1 teaspoon cinnamon
1/4 teaspoon nutmeg
dash of salt

Topping:
1 1/4  cup old fashioned oats
3/4 cup all purpose flour
1/2 cup brown sugar, dark or regular
1 teaspoon cinnamon
1/2 teaspoon salt
1/2 cup butter (not margarine) , cubed


Place rack in center of oven and preheat oven to 375 degrees.
Lightly grease a 9x13 pan or two-9 inch pie plates.
Place apples into a large bowl. Sprinkle the apples with one tablespoon of vanilla. Top with brown sugar, cinnamon, nutmeg and dash of salt. Pour apple mixture into prepared pan(s).
In same bowl, Place all dry topping ingredients.  Using fingers or a pastry cutter, cut butter into dry ingredients. Spread/sprinkle topping onto top of apple mixture.
Bake for about 45 minutes or until apples are bubbly and topping is golden brown.
Remove and let sit for 15 minutes. Serve warm with vanilla ice cream or whipped cream.

Tips:
-*you may use regular brown sugar, dark will produce a more caramelized filling.
-Apple Crisp is best served immediately after baking. If you need to make this ahead, you may put the dish together and bake the dessert for about 30 minutes. Remove, but do not cover or topping will get soggy. Let sit on counter to cool.
Before serving, preheat oven to 425 and finish baking dessert on top third of oven for about 15-20 minutes, or until heated through and bubbly.


10/15/13

Brisket Tacos with Mango Barbecue Relish


People often ask where I get ideas to make all of the recipes I post on ABK?  Besides my enormously huge and creative mind (eheheh) some of my ideas come from:
1. My cookbook collection (over 300 at last count)
2. I'm a cooking magazine addict. Have I ever told you how difficult it is for me to part with magazines??  When we moved down the street last winter, so did stacks of magazines. I did manage to toss boxes of Bon Appetite and Gourmet mags that were from the 80's and 90's into the recycle bin. Ridiculous, I know.  If they ever make a show called "Hoarders, Magazine Addition" I'll be on the pilot.
3. If you've read ABK for any length of time, you know my new favorite place to find recipes is  on Pinterest. Love the visuals. Love the convenience of literally hundreds of thousands of recipes available with a simple right click. Last week, I pinned a recipe on my board  "Cooking, Next on my List". There were so many re-pins the next day,  I decided to test out this recipe ASAP.
We loved it. The caption another Pinner left under the photo read "Now THIS is Texas!!" Crockpot tacos.  I'm not sure about the Texas part (if y'all are Texans, you'll have to try this out and let me know what you think).  
This recipe has a sweet twist. You'll have to give up a can (or two) of Dr. Pepper for the sauce. You know it's going to be good if the recipe calls for meat swimming in DP.  And the Mango Relish? Stash the leftovers for topping your eggs in the morning. Yummy.


Leftover meat? See recipe idea in "Tips" below.


Brisket Tacos with Mango Barbecue Relish
adapted from Confessions of a Foodie Bride
print recipe

Brisket
3-4 lb brisket, shoulder or cross rib roast
Salt
Ground black pepper
1 tablespoon chili powder
2 cloves garlic, minced
16 oz  Dr. Pepper, not diet (I'm sure Coke or Pepsi will work as well)

Mango Barbecue Relish
2 tablespoons olive oil
1 medium onion, chopped (about 3/4 – 1 cup)
1 clove garlic, minced
1/2 cup ketchup or bbq sauce
2 tablespoons lemon juice
2 tablespoons Worcestershire sauce
1 teaspoon Spicy Brown mustard
Salt
Pepper
1/4 cup mango chutney
Quesadillas
8 flour or corn tortillas
olive oil or cooking spray, to brush tortillas
chopped red pepper and onions (sautéed or fresh), sliced avocado, fresh mango, lime for garnish

Note- Don't let the length of this recipe scare you off. It's basically 3 simple steps:
cook meat in slowcooker, make a (less than 5 minute) relish/bbq sauce and assemble the tacos or quesadillas. 

Meat:
Rub the meat with salt, pepper, chili powder, and garlic.
Place brisket in slow cooker and pour the Dr. Pepper around the sides and a little over the top, taking care to not wash away all of the spice.
Cook on low for 8 hours, or in the oven covered tightly at 250 for 6-8  hours.
Remove meat from the crockpot. Slice or pull apart meat. Drain off some of the juice. Keep meat warm until ready to assemble.
Mango bbq Relish: 
While meat is cooking, heat olive oil in a 2-qt sauce pan. Saute onions for 5 minutes. Add garlic and cook until fragrant.
Stir in the remaining ingredients and simmer for 5 minutes.
Transfer to a blender or food processor and run until smooth, or use a immersion blender and blend in pan. Set aside until ready to assemble tacos. 
Assemble:
Heat a griddle or large pan over medium-high. Cook the tortillas just until warmed. Place tortillas on plate.
Top with warm meat and mango relish. Garnish as desired.
Yield: 8-10 servings

Tips:
-Make sure to use regular, not Diet Dr. Pepper.
-This dish may be served as quesadillas or tacos. To make quesadillas, shred Monterey Jack cheese, spread over tortillas, top with meat and a bit of mango relish. Grill, slice and serve.
-I used the leftover meat (about 2 cups) and sautéed an onion and a red pepper as a base for chili. 
Add a can of small red beans and a can of chili beans, a chopped tomato and a bit of water. Simmer and serve.  

9/18/13

Fresh Corn and Tomato Salad


I originally posted this salad a couple of years ago. It is a perfect side with our Family Favorite Enchiladas or any type of barbecue dish.  Soon, fresh corn and tomatoes will disappear.
Forever.
Thought you needed a little drama in your life.


Fresh Corn and Tomato Salad
A Bountiful Kitchen

6 ears corn or one small bag of frozen corn
3 large fresh tomatoes,  or 1-2 pints of grape or cherry tomatoes
1/2 large sweet onion or about 1 cup chopped
1/2 cup chopped fresh basil
two to three sprigs fresh oregano (optional)
2 tablespoons white balsamic vinegar
1/4 cup olive oil
coarse sea salt
fresh ground pepper

Boil corn in large pot of water for about 7 minutes. Drain and plunge corn into cool water. Cut corn off cob and set aside to cool completely. If using frozen corn, do not thaw. 
Chunk tomatoes and onion. Coarsely chop basil and strip the oregano off stems. Place cooled corn, chopped vegetable and herbs into large bowl. Toss with vinegar and olive oil. Season to taste. Serve chilled or room temperature

9/16/13

Southwest Slow Cooker Chicken


Have you heard? We're on a roll at A Bountiful Kitchen. Super simple. Quick and easy.  Last week I posted Slow Cooker Honey Sesame Chicken, and Baked Taco Rollups.  This week, Southwest Slow Cooker Chicken.
It doesn't get easier than this. This is a dump-and-cook-in-the-crockpot recipe. You can serve it over rice, on tortilla chips, on a bed of lettuce, or in a taco (soft or hard shell). We usually eat it rolled up in a soft flour tortilla, with some lettuce and tomato. This is, by far, my favorite slow cooker recipe.
I'm betting it will be yours too.


Southwest Slow Cooker Chicken
A Bountiful Kitchen
print recipe

4 frozen chicken breast halves
2-3 cups salsa (red or green) I prefer green
1- 15 oz can black beans, drained
1 small bag of frozen corn or 1-15 oz can corn, drained
salt and pepper
2 cups grated cheese (cheddar, monterey jack, pepper jack if you like it spicy)
4 oz cream cheese (regular or low fat)

Coat the inside of a slow cooker with cooking spray.
Place the chicken in the cooker, salt and pepper generously.
Pour the salsa over the chicken.
Pour the drained black beans and corn on top of the chicken and salsa.
Cover with lid and cook on low for about 3 1/2 hours.
When the chicken is done, Spread the grated cheese over the top of the mixture in the slow cooker, and then top with 4 oz of cream cheese. Cover and let cook for another 1/2 hour.
Remove lid and gently break up the chicken. Spoon the mixture over tortilla chips, shredded lettuce or  taco shells.
Serves 6-8

Tips:
-The cooking time may vary, depending on the size of your slow cooker and how hot it cooks.
-Don't worry about thawing the chicken, it will cook up just fine!

9/11/13

Baked Taco Rollups


Monday, after I posted Slow Cooker Sesame Honey Chicken on my Insta, my friend Robilyn commented  "I'll be making this tomorrow! What else can I make this week?"  Today, I dropped something off at her home, and guess what? There was a yummy smell coming from her kitchen.
The power of Insta! She had the Honey Sesame Chicken in her Slow Cooker. Love it when that happens. Also my young friend Megan made the sesame chicken and posted a pic on Insta of her dinner last night. Meg's the cutest newlywed and she's learning to cook for her new little family (Meg +Tony). So sweet.
In a world filled with fast food, and pre-made pre-packaged  everything, it's a rarity to see people (especially young peeps) cooking dinner. Here's my 2 cents:  It doesn't need to be complicated. Or take a long time. If you haven't cooked in a while (or ever), start small. Make a slow cooker meal. Or try this recipe. It's kid and hubs friendly.


I believe this recipe was originally named "Baked Tacos" and made with hard shells. Grant is a hard shell hater (already told that story here), so I changed the recipe a bit. The filling take just a few minutes to make and the rollup part takes another 5 minutes. Lay out a little taco bar with chopped lettuce, tomatoes, cheese, salsa, guac and chips.  Let your fam pile the salad or condiments onto a plate. Serve the taco rollup on the side.  It's a fun change from an ordinary taco and if you have little ones, a taco rollup is much easier to grip. Promise they'll love it.
Now you have two dinners in your repertoire!
Watch out Martha.


Baked Taco Rollups
Adapted from Mommy I'm Hungry
print recipe

2 lbs extra lean ground beef (or ground turkey)
1 medium onion diced
1 small can diced green chilies, mild
1 recipe for homemade taco seasoning (below)
1 (8 ounce) can tomato sauce
1 (16 ounce) can refried beans (regular or fat free)*
2 cups shredded Colby-jack  or cheddar cheese
flour tortillas, small to medium size

Suggested Condiments-
lettuce chopped
tomatoes chopped
olives
sour cream
Sheri's Salsa
Guacamole

Preheat the oven to 400 degrees.
In a large skillet brown meat and onion over medium-high heat. Drain off any excess liquid. Add chilies, refried beans, tomato sauce, and taco seasoning. Mix well and cook for a few minutes until bubbly. Add a little water or tomato juice if the mixture seems dry.
Spoon  about 3 tablespoons of the taco meat mixture onto a tortilla. Sprinkle with about a tablespoon of cheese. Roll up as you would a taquito, not filling the tortilla too full, but rolling fairly tight, so the tortilla will not come undone easily.  Place filled tortillas in a single layer onto a lightly greased baking sheet, seam side down. Bake at 400 degrees for about 12-15 minutes or until the cheese has melted and the tacos are heated through.
Remove from the oven and serve with optional condiments.
Makes about 12-15 medium tacos.

Taco Seasoning
1 tablespoon chili powder**
1/4 teaspoon garlic powder
1/4 teaspoon onion powder
1/4 teaspoon crushed red pepper flakes
1/4 teaspoon dried oregano
1/2 teaspoon paprika
1 1/2 teaspoons ground cumin
1 teaspoon sea salt
1 teaspoon black pepper

In a small bowl, mix all together. If making extra seasoning, store in an airtight container.
This is enough for one recipe of taco rollups above.
**less chili powder if you are serving to those who don't like spice.

Tips:
-*I used about 3/4 of a 16 oz can of refried beans. We liked the filling with less bean and more meat.
Another option is to add a can of drained pinto beans and smash them with a potato masher into the meat after the meat is cooked. Add about 1 tablespoon of canola oil while mashing beans.
-If serving to young children (who may not eat a whole taco) or using as an appetizer, cut the tacos in half, preferably on a diagonal.
-Heat up leftovers wrapped in a paper towel for about 1 minute in microwave.


9/9/13

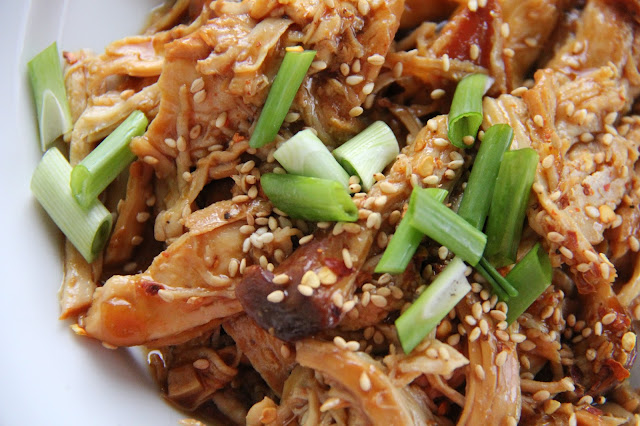
Slow Cooker Honey Sesame Chicken


We are now two weeks into the new school year.
Adjustment time. As in- get my act together and figure out what I'm making for dinner before 6 pm.  I'm always looking for quick-fix dinner ideas. This recipe takes a little thought ahead of time, but you're set when the "What's for dinner??" question surfaces. It's simple and a complete meal when served with a dish of stir fried veggies.
The leftovers would be perfect for lunch served over some greens tossed with a little Balsamic dressing.
Lunch for Momma.
That's what I'm talking about.


Slow Cooker Sesame Chicken
Adapted from LDS Living Magazine online
print recipe

4 boneless, skinless chicken breasts, fresh or frozen*
1/2 cup honey
½ cup soy sauce
1 cup diced onion
¼ cup ketchup
2 tablespoons vegetable or canola oil
2 cloves garlic, minced
¼ teaspoon red pepper flakes (optional)
1/2 teaspoon pepper
-------------------------------------
1 heaping tablespoon cornstarch
1/3 cup water
Sesame seeds

In slow cooker, combine honey, soy sauce, onion, ketchup, oil, garlic, pepper flakes and pepper. Place chicken in cooker, turn to cover with sauce. 
Cook on low 3 to 4 hours or just until chicken is cooked through. 
Remove chicken from slow cooker, leaving sauce in ceramic insert. 
Turn heat to high on slow cooker.
Whisk cornstarch into water and pour into slow cooker. Whisk to combine with sauce. Replace lid and cook sauce on high 10 more minutes or until slightly thickened.
Shred chicken, then return to pot and toss with sauce before serving. Sprinkle with sesame seeds if desired and serve with rice.
Makes 4 to 6 servings.
Tips:
-*I usually just throw chicken into the slow cooker frozen. It cooks in 3-4 hours on low. No thawing needed!


9/3/13

ABK Green Smoothie and 5 year Blogiversary Blendtec Giveaway!


It's been five years since I started blogging.  Five years and four hundred and sixty seven recipes after I posted  Watermelon Salad,  I still love sharing recipes and the stories behind them. To celebrate the five year mark, I'm having a BLENDTEC BLENDER giveaway!
Oh my.
This is the very best blender.
On the planet.
I know you've seen the "Will it Blend" videos :)
Want to hear the story behind our little connection with Blendtec?
I'll try to make it short.


Remember when the smoothie shops started popping up everywhere? There was a Zuka Juice shop (now Jamba) around the corner from Grant's office.  One day, while we were waiting in line to get a smoothie, I told Grant (my in-house patent attorney)  he should get the name of the company that makes the smoothie blender and see if they had a patent attorney. He wrote down the name of the blender, contacted Tom Dickson, owner and inventor at Blendtec. The rest is history. Eventually, Grant helped Blendtec get a patent for the 5-sided "Wild Side" jar. You've seen it, right?  The Wild Side jar was so successful at blending "twice the work in half the time" that the biggest name in the blending industry, Vita-Mix, copied Dickson's  5-sided jar.
Oops. Bad idea.
Grant, his brother Brett, and the Holland & Hart team sued Vita-Mix for patent infringement. After six years, they won the largest patent infringement award in the history of the state of Utah. Hooray for Tom and Blendtec. Love it when the system works.
So there you have it, the short version of why it's not a good idea to copy your neighbors work.

Want to know how to win the Designer Series Blendtec with Wildside Jar  ?


The giveaway will be a little different this time because it's all on Pinterest!
If you don't have a Pinterest account, read this post for step-by-step instructions on set up. Thank you again to Corrine at Mint Arrow for guest blogging with Pinterest tips!


A Bountiful Kitchen's Pinterest giveaway rules: 

2. Pin the giveaway post.  
3. For extra entries, pin up to 5 recipes from A Bountiful Kitchen per day. (please make sure they are ABK recipes, pin directly from the ABK site. 


the not so small print:
Winner will be chosen at random and MUST follow A Bountiful Kitchen on Pinterest, and have pinned the original contest post (this post) to be eligible. The giveaway will run from Tuesday, September 3, 2013 to Thursday, September 5, 2013 at midnight, Pacific Time.  The winner will be announced Friday morning September 6, 2013 and will be chosen by Random Number Generator. U.S. residents only. 
I was not paid or received products for this post. The opinions shared are my own. The giveaway item was purchased by me, for you.


Hello. Cooking blog.
Here's a recipe for my favorite smoothie. I came up with this back in January, and have been making one almost every morning since. It's not a beautiful green smoothie, because I always add blueberries. Mine is kind of a purple-brown smoothie. Appetizing, right? But it tastes good and it's  simple, and gets a few fruits and veggies into my system each day. After I make this, I pour two glasses and in a bit of a falsetto do "cheers" with Grant and say "to our health". I know. Not normal behavior.
Have a great week!


ABK's Favorite Green Breakfast Smoothie
A Bountiful Kitchen
print recipe

16 oz cold water
2-3 cups fresh spinach
6 frozen strawberries
1 medium carrot or a handful of baby carrots
1 cup blueberries fresh or frozen
1 apple, cored
1 ripe banana

Pour water into pitcher. Add spinach, strawberries, carrot, blueberries, apple and banana.
Place lid on blender and blend until smooth. I use the #5 setting on my blender which is a 40 second blend.

Tips:
-I like to use frozen strawberries, even when fresh are available, because it makes the smoothie a bit thicker and serves also to make it cold.
-to easily core the apple I set it on a cutting board and make four slices around the core. No peeling needed.
-Melinda taught me this trick, if you purchase spinach and you think it may spoil before you use it up, place the leaves in a Ziplock in the freezer and use the spinach frozen. Same goes for any fruits or veggies you want to use in the smoothie.

8/29/13

Tomato, Cucumber and Cottage Cheese Salad


Don't you love it when you Pin something, and click on the photo, expecting to be taken to the link that will provide the recipe, then- nothing? Dud. A while back, I Pinned a photo of a salad that I thought looked perfect for late summer months. When I tried to see the link to the photo, it was a dead end. No recipe link. Oh well.
I looked at the photo again, and discovered this: You don't need to be Martha to figure this one out.
All you need are: tomato, cucumber, cottage cheese and about 5 minutes.
Best three ingredient salad.
Ever.


Tomato, Cucumber and Cottage Cheese Salad
A Bountiful Kitchen
print recipe

Tomatoes, any type about 2 cups
Cucumbers, about 1 large or 3-4 small
16 oz low fat cottage cheese, I prefer small curd
fresh ground pepper

Wash and cut the tomatoes. Wash the cucumbers and seed if desired. Slice the cucumbers into small pieces or if using large cukes, slice long way, into fourths, so you have four long slices, then seed. Cut the cucumber into chunks. I like to leave the skin on for color.
Using a medium size bowl, preferably clear, layer the tomatoes, cucumber and cottage cheese, as you would if making a yogurt parfait. Place in fridge until ready to serve.
Serves 6-8 as a side dish.

Tips:
-This salad can be made year 'round, but is best in the summer months when garden cucumbers and tomatoes are available. That said, it is also best made with tomatoes that are NOT juicy. I like to make it  with cherry or grape tomatoes (simple to slice them in half, or leave them whole in the salad) so there is not an issue with the tomatoes giving off too much water and making the salad runny.

8/9/13

Tessa's Mini-Melts with Poppyseed Drizzle


Almost five months have gone by since this day...


Two years is a long time! My oldest son, Stephen left home to serve an LDS mission in Puebla, Mexico on February 16, 2011 (if you've been reading ABK for a while, you'll remember this post).  He returned two years, one month and three days later. That afternoon we dashed off to the airport with ballons and signs in hand. Our immediate and extended family gathered there, along with families of other missionaries who were returning that day. So much excitement. So much joy. So glad to have him  home!
In honor of Stephen serving for two years we celebrated his return with (what else?) food. We made  lots of salads, treats and some fun little sandwiches. It was nice to have something hot with the salads that didn't require too much time in the kitchen when we wanted to enjoy spending time with our newly returned missionary. Tessa gave me this recipe after she made dinner for a large group of sorority girls at the U. She said the girls loved them, and I thought, if they're good enough for the Chi-Omega's they're good enough for us! They take just a few minutes to put together, and are perfect for parties of any sort.
Grateful to have Stephen home.
So proud of his willingness to sacrifice and share the good word of God with the sweet people of Mexico.
Two years is a long time.
Yes, it is.


Mini-Melts with Poppy Seed Drizzle
Tessa Reinemer

3 dozen soft dinner rolls 
2 pounds deli meat (or have the deli slice up the exact amount of slices you need)*
1 pound sliced deli cheese, or approx 18 slices, cut in half

Topping
2 tablespoons poppy seeds
2 tablespoons yellow mustard
1/2 cup butter
1 tablespooon minced dehydrated onion (optional)
1 teaspoon Worcestershire sauce

Slice rolls and put small amount of turkey or ham with one slice of cheese.  Place sandwiches in 2- 9x13 baking dishes or one large jelly roll pan.  
Heat ingredients for topping in a saucepan until butter is melted. Brush or spoon topping onto sandwiches right before cooking.  Cover with foil.  Bake at 350 degrees for 15 minutes or until cheese melts.
Serves about 15-20.

Tips (aka more than you ever wanted or needed to know about making baked sandwiches):
-These sandwiches may be assembled in advance.  A day before is fine, but don't brush with drizzle until right before cooking.  Store in fridge covered tightly with foil.
-*Deli meat- Slice the meat in half with a sharp knife (I cut the meat all at once). If you have 36 rolls, order 18 slices of deli meat, cut in half. 
-We used a combo of ham/swiss and turkey/havarti. Both were delicious.
-For a gathering at the school, and Anibelle's baby blessing, I used Costco large croissants and cut them in half after stuffing with meat and cheese. We used:
3 doz  large croissants
4 lbs ham or turkey
2 lbs sliced cheese
Served approx 75. 

-I use the Walmart Brand rolls, found near their deli when making these for a large (100+) crowd. I pinned the rolls here, so you can see what they look like. The rolls come 16 to a package. I like these for a crowd, because they are inexpensive and they stack well, without smashing if you need to buy a large quantity. I have also used a roll that looks similar to a Granny Sycamore cluster roll from Costco. They only sell these in the fall and winter months. This roll is much thicker than the Walmart brand roll,  and I add more meat to the sandwich when using the Granny roll, so the meat is not lost in the roll!
-Cooking for 100:
plan on about 1 1/2 rolls per person if you are serving other buffet items such as salads, appetizers, sweets.
10 packages of "The Bakery" rolls from Walmart, (Potato or Sweet Hawaiian) 16 per pkg =160 rolls
Deli meat sliced, approx 80 slices, cut in half to yield 160 slices
cheese slices, approx 80 slices, cut in half to yield 160
topping:
1 1/4 lb butter, melted (5 sticks)
8 tablespoons poppy seeds
6 tablespoons mustard
3-4 tablespoons dehydrated onion (optional)
2 tablespoons Worcestershire
Follow directions above for baking.


7/30/13

Summer Reading and Layered Seafood Spread


For as long as I can remember, I've loved shrimp cocktail, deep fried shrimp, shrimp in dips, even shrimp sandwiches. Maybe it has something to do with my first memory of reading a "real" book (with chapters). It was summer in the early 70's. A few of our neighbors were commercial fishermen, so a book about a girl working in a seafood processing plant was fitting for a young girl (me) growing up in Bremerton, Washington. I don't recall the name of the book, but the memory of the visuals I had while reading are still clear. The girl in the book was hired to help process crab and shrimp after local fishermen brought in their catch of the day. After her work day was over, she was allowed to eat a bit of leftover shrimp.  I remember wishing I could sit beside the girl on the loading platform of the warehouse and share her can of shrimp. Don't you love how a book can transform you to a different place and time?? Forty years later I recall that vivid description of freshly canned shrimp.
So that's my summer reading/shrimp story. Oh-The shrimp. I've been making this appetizer for years. It's simple and delicious. Great for summer or winter. Relaxed or formal gatherings. Another tried-and-true Pinch of Salt Lake Cookbook recipe.


Layered Seafood Spread
A Pinch of Salt Lake
print recipe

8 oz cream cheese, softened
3 tablespoons mayonnaise
3 tablespoons sour cream
dash of garlic salt
1 teaspoon Worcestershire
8 oz jar chili sauce or 8 oz homemade chili sauce
1/2 bunch chopped green onions
2 cups crab meat or shrimp (small or large), cooked, deveined and chopped if desired

Combine softened cream cheese, mayo, sour cream, garlic salt and Worcestershire in a medium bowl.
Spread onto a serving platter. The cream cheese mixture should be spread into a 10-12 inch circle. You may also use a pie plate.
Pour the chili sauce on top of the cream cheese mixture, taking care to not mix into the cream cheese. Make sure the seafood is drained well. If you have rinsed the shrimp, blot dry with paper towels to avoid making the dip watery.
Top the cream cheese and chili sauce with green onions and seafood.
Serve with crackers or sliced baguette.

Tips:
-The original recipe says to make this several hour before serving. I have done this but usually wait to top the cream cheese with the rest of ingredients until just before serving. The chili sauce tends to bleed onto the cream cheese mixture if making too far in advance. If you want to make this ahead of time, mix all of the ingredients in the cream cheese layer ahead of time,  spread onto a platter, cover and set in fridge. Rinse the seafood, blot dry and put in a Ziploc bag. Chop the green onions, place in a small Ziploc bag. Just before serving, assemble.