Showing posts with label summer. Show all posts

8/9/11

Fresh Raspberry Chocolate Chip Pancakes


For breakfast on Jake's 15th birthday, I surprised him with one of his favorite treats in the world, chocolate chip pancakes. He LOVES chocolate in his pancakes.  I'm not a fan. But I do love fresh fruit in my cakes, so I threw in some raspberries I had in the fridge and sprinkled with chocolate.  Topped with Buttermilk Syrup. The result? One happy birthday boy.


Fresh Raspberry Chocolate Chip Pancakes
A Bountiful Kitchen
print recipe

1 egg
1 cup buttermilk
2 tablespoons butter
1 teaspoon vanilla
1 cup flour
1 tablespoon sugar
1 teaspoon baking powder
1/2 teaspoon baking soda
1/2 teaspoon salt
1 cup fresh raspberries, or 1 cup thawed frozen berries
1 cup chocolate chips (I used mini)

In a medium bowl beat egg, buttermilk, melted butter and vanilla together with whisk.
Add all of the dry ingredients and mix once. The batter will be a bit lumpy. If it's too think add a little water.
Heat griddle to about 330-350 degrees or if using a pan on the stove about medium high heat. Grease the pan and add 1/4 cup of batter to the pan. Sprinkle with chocolate chips and raspberries, I broke the berries in half and placed the berries on the pancakes. Cook until bubbles rise and start to pop, then flip the pancake. Once. Do not pat down. Cook (about 2-3 minutes). To test, use the corner of the spatula and poke the cake in the middle.  If the pancake is done, it  will spring back.
Serve immediately with more chocolate chips, fresh berries, and home made Buttermilk Syrup.


Buttermilk Syrup

1/2 cup butter (not margarine)
1/2 cup buttermilk
1 cup sugar
2  teaspoon vanilla
1/2 teaspoon baking soda

Heat butter, buttermilk, and sugar in a saucepan. Heat until boiling. Boil for about 1 minute. Remove from heat and add vanilla and baking soda (this will foam up, so make sure your pan is big enough to accommodate). Stir until combined. Serve immediately over pancakes or waffles.

7/11/11

Mango Blueberry Coffee Cake


I love this time of year. No rushrush to get school work done before games or other activities. Love to water the flowers outside in my bare feet before anyone gets up. Love to watch baseball games with a big iced drink. Love that I can swing into a farmers market, or the regular old grocery and find almost any fruit my heart desires.
I had some fresh mangoes and blueberries in my kitchen last week, and thought what better way to use them, than put them in a coffee cake. I used an Emeril recipe, that I lightened up a bit by subbing yogurt for sour cream, and added a few spices. Simple, fresh, delish. Loved the result.


Fresh Mango and Blueberry Coffee Cake
A Bountiful Kitchen
print recipe

Cake:
1/2 cup butter, softened
3/4 cup light brown sugar
2 large eggs
1 cup vanilla or plain yogurt
1 1/2 cups flour
3/4 teaspoon baking powder
1/4 teaspoon baking soda
1/4 teaspoon salt
1/2 to 1 teaspoon ginger, depending on your taste
1/2 teaspoon cinnamon
1 1/2 cup berries, rinsed and patted dry (I used 1 mango and enough blueberries to equal 1 1/2 cups)

Topping:
1/2 cup sugar
1/2 cup flour
1/2 teaspoon cinnamon
1/4 teaspoon nutmeg
1/4 cup melted butter
1 cup chopped pecans

Grease and lightly flour the bottom and sides of a 10-inch Spring form pan. Preheat oven to 375 and set the rack in the middle of the oven.
Cream the butter and sugar. Beat in the eggs.  Add yogurt and blend well. Add all of the dry ingredients to the bowl. Mix just until the wet and dry ingredients are incorporated. Fold in the berries and mangoes. Pour the batter into the prepared pan.
Prepare the streusel topping by mixing all of the ingredients together in a bowl. Sprinkle over the top of the cake.
Bake for 45 minutes, or until a toothpick inserted in the center of the cake comes out clean. Let cool for about 10 minutes, and run a knife around the sides of the Spring form before detaching the side form.

7/2/11

Sheri's Super Simple Salsa


This is our family go-to salsa. It's made with canned, crushed tomatoes so you can make it year round. It's as good in December as it is in July. In July, just add some fresh cut tomatoes to freshen it up a bit.
It takes about 5 minutes to throw together, and it's as popular with kids as it is with adults.
Perfect for the busy 4th weekend.


Sheri's Super Simple Salsa
print recipe

1 large can (28 oz)  crushed tomatoes
1  4 oz can chopped green chilies
1 small sweet onion, chopped
1 can Rotel (see photo below)
1 tablespoon garlic salt
1 teaspoon fresh ground pepper
1 bunch cilantro, chopped
juice of 1-2 limes (optional)

Mix all ingredients in medium size bowl.  Serve immediately, or refrigerate for up to 7 days.

Tips:
- This is best when served at room temperature.
-In the summer when fresh tomatoes are available, add 1-2 large chopped tomatoes.

6/13/11

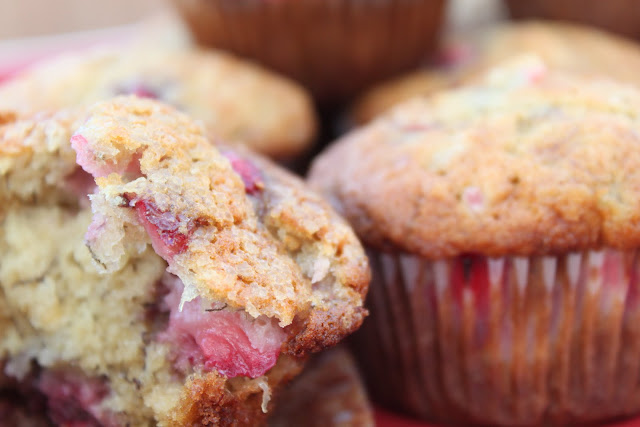
Fresh Strawberry Banana Muffins


I've always wanted to be a member of a secret club.  Last month I signed up to join a Secret Recipe Club.  Here's how it works:
-Every month, I'm assigned a random blog.
-I keep it a secret (hence the name) until the designated post time and date, given to me by the organizer of the "Secret Recipe Club".
-I get to pick a recipe, any recipe from my assigned blog.
-I can make any adjustments to suit my needs (gluten free, fat free, kosher, additions, substitutions etc.)
-Someone else out there in bloggerland, does the same, using a recipe from A Bountiful Kitchen.


This month's post comes from Heather at "Join us, Pull up a Chair".
It's like summer in a muffin.
Loved it.


Fresh Strawberry Banana Muffins
Print recipe

2/3 cup sugar
1/2 cup oil
2 eggs
2/3 cup mashed ripe bananas
1 tsp vanilla
1 2/3 cup flour
1 tsp baking soda
1/2 tsp salt
3/4 cup finely chopped strawberries


Preheat an oven to 375 degrees. Line a muffin pan with paper baking cups. In a medium bowl, combine sugar, oil and eggs; blend well. Stir in bananas and vanilla.
Add flour, baking soda and salt to the sugar mixture, stir just until combined. Gently fold in strawberries.
Spoon batter evenly into muffin tins. Bake for 17-21 minutes or until a toothpick inserted in the center comes out clean.
Yields 12 muffins.


6/5/11

Orzo, Shrimp and Summer Vegetable Salad with Pesto Vinaigrette


For some unknown reason, I feel the need to have an orzo salad with our Easter meal. Why orzo? Why at Easter? We don't really need to answer these questions.    Information that actually might be useful: Orzo is a small rice shaped pasta.  It comes in different sizes, some look more flat and like short grain rice. Other varieties of orzo are more similar to a piece of long grain rice. I prefer the longer, thinner shape. It's not rice, just pasta shaped like rice. Find it in the pasta section of your grocery.

The Easter orzo salad changes a little each year. I love shrimp, orzo and vegetables together. I tried a new recipe this year, and everyone agreed it's a keeper. I know you're going to love it too.


Orzo, Shrimp and Summer Vegetable Salad with Pesto Vinaigrette
Adapted from Bon Appetite 2008
print recipe

8 ounces orzo (about 1 1/3 cups)
6 tablespoons extra-virgin olive oil, divided
2 medium zucchini or summer squash (about 9 ounces total), cut lengthwise into 1/4-inch-thick slices
1 red or yellow bell pepper, quartered
3 tablespoons purchased pesto
2 tablespoons red wine vinegar
2 tablespoons fresh lime juice
1 pound uncooked large shrimp, peeled, deveined
2 cups tomatoes, cored, cut into 1/2-inch cubes (about 2 cups) or 2 cups grape tomatoes, slice in half
1/2 cup thinly sliced fresh basil leaves plus sprigs for garnish
1 8-ounce ball fresh mozzarella cheese, cut into 1/2-inch cubes
1 cup fresh spinach, chopped

Cook orzo in large pot of boiling salted water until tender but still firm to bite, stirring occasionally. Drain. Rinse with cold water; drain well. Transfer to large bowl and toss with 1 tablespoon oil.
Prepare barbecue (medium-high heat). Brush zucchini and bell pepper with 2 tablespoons olive oil, then sprinkle with salt and pepper. Whisk pesto, lime juice, remaining 4  tablespoons oil, and remaining 1-2 tablespoons vinegar in small bowl for pesto vinaigrette. Place shrimp in medium bowl. Add 2 tablespoons pesto vinaigrette; toss to coat.
Grill zucchini and bell pepper until crisp tender, about 2 minutes per side for zucchini and 3 minutes per side for bell pepper. Transfer to work surface. Sprinkle shrimp with salt and pepper; grill until charred and cooked through, 2 to 3 minutes per side. Place shrimp in bowl with orzo. Chop zucchini and bell pepper; add to bowl with orzo. Add remaining vinaigrette, tomatoes, sliced basil, and mozzarella; toss to combine. Season to taste with salt and pepper. 
Garnish with basil sprigs and serve cold or at room temperature.
Serves 4-6 as a side salad
This can be made ahead and kept in refrigerator for up to a day before serving. 


Tips:
-This can be prepared without a grill. If you have a convection oven, turn the heat to about 425 and cook just until vegetables start to turn golden. You may cook the shrimp in the oven as well, or saute in a pan on the stove. The flavors are definitely better when the vegetables ad shrimp are grilled on a barbecue grill.
-Don't overcook the vegetables.  They should be barely softened when cooked properly. 

9/26/10

Blackberry Hand Pies


For the past several summers, I have purchased a flat or two of fresh blackberries from my dear friend Emily. I've never eaten blackberries sweeter than Emily's. I posted a Blackberry Slump that was out of this world a couple of years back. Check it out here. So this year, the blackberries ripened a little late in the season, and harvest time didn't coincide with free time for me, so no fresh blackberries. Luckily, I still had a few packages frozen from last year. I wondered if they would work in this recipe, or if they would be too watery (after being frozen and thawed). All I can say is this: These Blackberry Hand Pies were so, so delish. I mean REALLY so yummy. You could use store bought pie crust :( if you don't want to make your own. Or if you fear making your own. We are going to have a talk about this soon.
Conquering fears.
Stepping outside the box.
Maybe a little one-on-one time.
You and me.
Baking.
My kitchen.
Think about it.


Oh- back to the Hand Pies. I can't think of a better way to start the week. I know I say this all of the time, but really, you're going to love this.
Promise :)


Oops - Still with me? One more thing. If you live in the SLC area, and want to attend an amazing boutique- hand made items, artisans selling their wares - featuring Jeni Gochnour's painted gourds (Jeni is Sara's sister- yes, that Sara: Sara's Salmon, Sara's Pork Tenderloin with Mushroom Gravy, Sara's Southwest Soup...) check out Jeni's Autumn Art Show here. This weekend. Wed thru Friday. You are going to love this too. Always my favorite boutique.
Bonus...you might even get to meet Sara and Jeni. And their lovely mom.


Blackberry Hand Pies
adapted from Gourmet -August 2006
print recipe

2 cups blackberries (3/4 pound)
1 large apple, peeled and coarsely grated ( I used a Rome Beauty)
2 tablespoons plus 1 teaspoon flour
1/4 teaspoon cinnamon
8 tablespoons sugar
Pastry dough for a double-crust pie- your own or see recipe below
1 egg & 1 tablespoon milk
2 tablespoons sugar for topping pastries, granulated or coarse
Parchment paper

Cook blackberries, apple, flour, cinnamon and 8 tablespoons sugar in a 2-quart heavy saucepan over moderate heat, stirring frequently, until mixture just boils and is thickened, about 5 minutes. Transfer to a shallow bowl to cool.
Put oven racks in upper and lower thirds of oven and preheat oven to 400°F. Line baking sheets with parchment.
Roll out half of dough 1/4 inch thick on a lightly floured surface with a lightly floured rolling pin into a rectangle, then trim into four 5-inch squares. Place about 1/4 cup of fruit filling in center of 1 square. Moisten edges of square with milk and fold into a triangle, pressing edges to seal. Transfer to a lined baking sheet and press tines of a fork around edges of triangle, or just pinch together with finger tip. Make 4 more triangles in same manner, arranging them 1 inch apart on baking sheet. Repeat with remaining dough and filling, re rolling scraps together if needed.
Brush triangles with milk-egg mixture and sprinkle with remaining 2 tablespoons sugar. Bake, switching position of pans halfway through baking, until pies are golden, about 25 minutes total. Transfer pies to racks to cool.

Pie Crust:
2 cups flour
1 teaspoon salt
1 cup shortening
½ cup very cold water

Mix flour and salt. Cut in shortening with pastry blender. Add water. Stir with fork until flour is absorbed and ball forms. Add more water if needed. Flour surface and rolling pin well. Follow directions above for rolling out.
If you want to read the whole original post, or Pie Crust 101 click here.


Tips:
-I found that using frozen berries straight from the package worked well. I thawed the package for about 1 hour before using. The berries were still partially frozen when I threw them into the saucepan with the sugar and other filling ingredients.
-The original recipe calls for a Golden Delicious apple. I think almost any type of apple would work. A Granny Smith may be too tart for this recipe.
- I think a little almond flavoring in the filling after cooking on the stove would be wonderful. About 1/2 teaspoon.

9/17/10

Chicken, Apple and Smoked Gouda Salad


What's for dinner?? Every mom's favorite 6 o'clock question.
I wanted to make a salad Sheri found in Southern Living Magazine. Jake's response? Not enough of a man-salad to interest him. He wanted "5 Guys Burgers and Fries". One of his favorite places to eat dinner. I couldn't do it. Last time I ate there, I felt like I was going to give birth to a 10 lb. brick.
It was a stand-off.
In the end, he got a greasy burger and fries. I got a fresh salad, loaded with greens, crisp apples and celery, moist chicken, sweet Craisins and crunchy roasted cashews. Oh did I mention the fresh home made honey mustard basil dressing? Yum.


Chicken, Apple, and Smoked Gouda Salad (updated 1/2015)
adapted from Southern Living Magazine
print recipe

2 Gala apples, thinly sliced (about 1 lb.)
2 tablespoons fresh lemon juice
1 (6-oz.) package baby spinach and spring greens mix
3 cups chopped, cooked chicken
1/4 of a small red onion, sliced thin
1 1/2 cups (6 oz.) shredded smoked Gouda cheese
1 1/2 cups thinly sliced celery
1 1/2 cups sweetened dried cranberries
1 1/2 cups salted cashews or pecans

Honey-Mustard Dressing:
1/4 cup mayonnaise
1/4 cup olive oil
1/3 cup cider vinegar
1/4 cup chopped fresh basil
1 teaspoon Dijon mustard
3 tablespoons honey
1/2 teaspoon ground red pepper (optional)
1 teaspoon coarse ground pepper
dash coarse sea salt

For Salad:
Toss apple slices with lemon juice.

Layer salad greens, apples, chicken, and next 5 ingredients in a large glass bowl. Serve immediately, or cover and chill up to 8 hours.

For Dressing:
Whisk together all dressing ingredients, or use immersion blender, and blend until combined.
Toss salad with 1/4 cup Honey-Mustard Dressing just before serving. Or, layer salads on individual plates and drizzle with dressing.


Tips: (after making this several times, I changed the dressing up a bit again, updated 1/2015)
-One small Rotisserie chicken may be subbed for the 3 cups cooked chicken.
-I prefer to plate the salad individually, and dress each salad.
-The original dressing recipe calls for 1 cup of mayo. Waaay too much mayo for my taste. I cut the mayo and added some olive oil and vinegar. Still a creamy dressing, just not as rich.
-Sheri used pears instead of apples. Perfect for pear season!

9/11/10

Garden Tomato & Fresh Peach Salad and Giveaway!


About the Recipe:
Found this recipe in a recent issue of Martha Stewart magazine. It called for heirloom tomatoes, which were not available in my garden on Thursday. Or on any other day, for that matter. I used my little, ordinary, garden tomatoes (go ahead, feel sorry for me) and guess what? Yum.

The recipe also called for white peaches. Uh. Not happening. The closest I came was a donut peach. Yummy, but not a white peach. I'm sharing this because at times, we (I) get hung up on having exact ingredients called for in a recipe. Running all over creation for some crazy ingredient. Been there.
This segment is called : Si's Mini lesson on getting a grip... In this case, fresh is fresh. Sure an Heirloom tomato is wonderful. A white peach, unusual. The sub of a garden fresh tomato and a delicious ripe local peach were perfect in this salad. Which, btw, if you love tomatoes and peaches- this salad is your new bff. I modified the recipe a bit- added my new bff White Balsamic (*see note in tips section below) and wow. I think we are having this for dinner a few more times this week. Even Jake (14) asked for seconds. He tried the salad with and without the olive oil and balsamic. He LOVED the balsamic version.

Moving on... The Giveaway:

I picked up this cookbook last month, and fell in love with the beautiful photos.
I love Williams Sonoma cookbooks. I'm not a big -"I need pictures in my cookbook" type of girl, but I do love WS cookbooks. This book is filled with recipes from Meyer Lemon Jelly to Proscuitto Panini with Fontina & Fig preserves. Mouth watering type of pics and recipes.
As an added bonus, the nice people at CSN Online Stores asked if I would be interested in sharing a giveaway with ABK readers. They offered a gift certificate in the amount of $55. Good at any of their online stores.
Leave a comment about the best thing you ate this summer. Comment deadline:
Tuesday, September 14, 2010. Midnight.
Winner announced on Wednesday.
Good luck!


Garden Tomato and Peach Salad

1 white or other variety fresh ripe peach
1 large heirloom tomato
thin sliced red onion
fresh basil
Ricotta, crumbled
Coarse or Sea Salt
Fresh Ground pepper
Extra Virgin Olive Oil
White Balsamic Vinegar

Arrange peach and tomato slices on platter or individual salad plates.
Lay red onion slices, torn fresh basil and crumbled ricotta over top of fruit. Season with salt and pepper and drizzle white balsamic and olive oil. Garnish with basil sprigs. Serve immediately.

Tips:

-White Balsamic. I have received several emails about this product. Found in Italian specialty stores, in SLC, downtown at Tony Caputos. No more expensive than Red Balsamic. Some argue that white balsamic is not really a balsamic, whatev. You can also purchase online, one of my fave brands of olive oils and vinegars: "O Olive Oil" brand. I've tried several of their vinegars and olive oils. Great products. They may be purchased online here. Or at kitchen specialty stores (Sur La Table), or occasionally at my fave, TJMaxx.


9/3/10

Cook's Illustrated Gazpacho


I still remember the first time I had Gazpacho. I was a senior in high school ( um, yes THIRTY years ago). I was with my friend Victoria, who was a waitress at Ericksen's restaurant. Unless I am imagining this, I believe the whole name of the restaurant was" Ericksen's on the Fiord". Funny that stuck in my mind. It was a mostly brownish restaurant in Poulsbo,WA ... not in the cool, waterfront part of Poulsbo (cute little Scandinavian town), but out on the main highway, before entering into town. I know you care. Anyway. Loved my first taste of Gazpacho then, still love it now.

You've never had Gazpacho? It's a soup, served cold. Best in the late summer, when tomatoes and cuces are in season.


Perfect dish for a warm summer afternoon. Love it with a dollop of sour cream and chopped avocado on top. If you are looking for a way to make a healthy, refreshing dish without too much work, and without turning on the stove or oven...you are going to love this soup.
Promise.


Cook's Illustrated Gazpacho
adapted from Cook's Illustrated
print recipe

3 ripe medium beefsteak tomatoes (about 1 1/2 pounds),
cored and cut into 1/4-inch cubes (about 4 cups)
2 small red bell peppers (about 1 pound)cored and seeded, cubed (about 2 cups)*
2 small cucumbers (about 1 pound), one peeled and the other with skin on, both seeded and cut into 1/4-inch cubes (about 2 cups)
1/2 small sweet onion (such as Vidalia, Maui, or Walla Walla) minced or chopped (about 1/2 cup)
1 medium garlic cloves , minced or pressed through a garlic press (about 1 teaspoon)
2 teaspoons table salt
1/3 cup sherry vinegar ( I subbed balsamic: 1/2 white 1/2 red)
Ground black pepper
5 cups tomato juice Cook's recommends Welch's
1 teaspoon hot pepper sauce (optional)
8 ice cubes

Garnish with:
chopped avocado
sour cream
Extra-virgin olive oil
chopped olives
croutons


Combine the tomatoes, bell peppers, cucumbers, onions, garlic, salt, vinegar, and pepper in a large (at least 4-quart) nonreactive bowl. Let stand until the vegetables just begin to release their juices, about 5 minutes. Stir in the tomato juice, hot pepper sauce, if using, and ice cubes. Cover and refrigerate to blend flavors, at least 4 hours and up to 2 days.

Adjust the seasonings with salt and pepper and remove and discard any unmelted ice cubes. Serve cold, drizzling each portion with about 1 teaspoon extra-virgin olive oil and topping with the desired garnishes.

Tips:

-Cook's recommends serving in chilled bowls.

-*I used one red pepper, and one yellow zucchini. Love the color of the zucchini. I'm sure a yellow pepper would work nicely in this recipe as well.

Bought these at my fave fruit and veggie stand in Brigham City.


Love this olive oil. Perfect for drizzling a little on before serving...


8/30/10

Fresh Corn and Tomato Salad


Summer came a little late here...mid June again this year.
Now that it's late August, tomatoes are finally on! Corn is super sweet. Fresh herbs are plentiful.
Do you love- fresh, simple and absolutely delicious?
This is it.


Fresh Corn and Tomato Salad
adapted from allrecipes.com

6 ears corn
3 large fresh tomatoes
1/2 large onion or about 1 cup chopped ( I used a sweet onion)
1/2 cup chopped fresh basil
two to three sprigs fresh oregano (optional)
2 tablespoons white vinegar ( I used white balsamic)
1/4 cup olive oil
coarse sea salt
fresh ground pepper

Boil corn in large pot of water for about 7 minutes. Drain and plunge corn into cool water. Cut corn off cob and set aside to cool completely.
Chunk tomatoes and onion. Coarsely chop basil and strip the oregano off stems. Place cooled corn, chopped vegetable and herbs into large bowl. Toss with vinegar and olive oil. Season to taste. Serve chilled or room temperature

Tips:
-The recipe called for white vinegar, but I love white balsamic (sweeter) vinegar. Apple cider vinegar would also work. I don't recommend regular balsamic vinegar. The dark red color will discolor the onion and corn and the overall look of the salad will change.

8/21/10

Fresh Blackberry Ice Cream


If your name is Melanie Evans- and your SUMMER BDAY is Monday the 23rd, don't read this post.

Summer is almost over! Actually, after Sunday, it's over. Because, you see, in my mind, summer is over when school begins (how many commas can I use and misuse use in this sentence??). School starts MONDAY. Therefore, on Monday summer is gone.
Over.
Finito.
Anyway. Where did the three months go??
Here's what I have been doing since August 3...


Meet Jack. Jackie. Mr. J. Little J. Puppy. Peppito. Pupparoni.


Not a lot of time lately for cooking or blogging. I did manage to throw together some ice cream a week ago. It was yummy. Used Ben and Jerry's Sweet Cream Base #1, which Ben & Jerry recommend as a base for fruit. I always double this when making in my White Mountain Ice Cream Maker. Yes, blackberries are still on. I ate an entire delish-sweet pint purchased at the B-town Farmers Market this week. Yum. Hurry.
Don't look Melanie Meg- Summer is almost over...


Fresh Blackberry Ice Cream
Ben and Jerry's Sweet cream base #1


2 large eggs, as fresh as possible
3/4 cup white sugar
2 cups heavy or whipping cream
1 cup milk, preferably whole

For fruit mix in:
1 pint fresh blackberries
3/4 cup sugar
juice of 1/2 lemon


Prepare fruit for mix in:
Pour 3/4 cup sugar over washed fruit. add juice from 1/2 lemon. Set in refrigerator for 1-2 hours, mix about every 1/2 hour.

Prepare sweet cream base:
Whisk the eggs in a mixing bowl until light and fluffy, about 2 minutes. Whisk 3/4 cup sugar a little at a time, then continue to whisk until completely blended, about 1 minute more. Pour in the cream and milk and whisk to blend.
Freeze the ice cream as directed according to machine directions. When the ice cream is set, drain the fruit mixture and add to the cream base. Serve immediately if you like soft set ice cream, or place canister in freezer for at least 2 hours for hard set.

Tips:
-Ben and Jerry's directions instruct you to add the drained off juice from the fruit to the cream base, then stir the fruit in by hand. I've tried adding the drained off sugary juice to the cream base and like the finished product better without the juice.
-This recipe works well with raspberries too.

8/12/10

Chocolate Zucchini Cake


Zucchini. Here are my questions regarding Zucchini:
Where did that name come from?
Why is it when you plant one, you have enough for a village (or at least your whole cul-de-sac)?
Why is it always priced $1.79 a lb at the grocery, even in the summer, when it seems like zucchini are more plentiful than mosquito's?
I know you have probably read a hundred "Best zucchini recipe ever!!" Most of those are bleehck. My vote goes to this one. This is the best thing I have ever made or eaten using zucchini (with or without the fresh whipped cream topping). Oh, and if you are still wondering if you should give this one a go, it's one of Laurie's recipes, yes, that Laurie.
Special thanks to our neighbors the Farr fam who keep us in zucchini :)
All.
Summer.
Long.


Chocolate Zucchini Cake
Laurie Cutler

Cream:
½ cup butter
½ cup vegetable oil
1 ¾ cup sugar

Add:
2 eggs
1 t. vanilla

Add and then beat for 2 minutes:
2 ½ cups flour
3 T. cocoa
½ t. cloves
½ t. cinnamon
1 t. soda
½ t. salt

Add:
2 cups zucchini, peeled, seeded, and grated
½ cup buttermilk

Fold in:
1 cup milk chocolate chips

Pour into a 9 x 13 pan and bake at 325 for 45 minutes (check with a toothpick).
Best when served slightly warm with whipped cream.

Tips:

-This recipe works fine without peeling and seeding the zucchini. Just grate or blend the zucchini before adding to the cake mixture.
-Semi sweet chips are great in this recipe.

8/3/10

Margherita Pizza


Three of my favorite things are:
Fresh Mozzarella.
Fresh tomatoes.
Fresh basil.
Love this pizza. Even though it means turning on the oven in the summer, it is the best time to make this dish. The tomatoes are fresh, basil is plentiful. Fresh and easy. Traditional Margherita Pizza calls for crushed tomatoes as the sauce, fresh mozzarella and basil. In the summer, I like to make a sauce, add fresh sliced tomatoes and toss the basil on after baking.
Unless you are say, a 12 year old boy, you are going to LOVE this.


Margherita Pizza
yield 2- 10 to 12 inch thin pizzas
print recipe (includes sauce and crust)

olive oil, about 2 tablespoons per pizza
1/2 lb fresh mozzarella, sliced
2 Roma or other tomatoes, sliced
fresh basil leaves about 1/2 cup leaves
fresh grated Parmesan, optional
pizza sauce (recipe attached)
pizza dough (recipe attached)

Prep work:
About 1 1/2 hours before you want to have dinner-
Make the dough and set aside to rise.
Make the sauce and let simmer.
1/2 hour before cooking, preheat oven to 475 degrees

After the dough has risen, split into two balls and roll each one out and place on a cookie sheet or pizza pan. Drizzle dough with olive oil and spread with the back of a spoon or a pastry brush. Using as much sauce as desired, spread prepared sauce onto crust, then top with mozzarella and tomato slices. Sprinkle with grated Parmesan, if using. Place into hot oven and bake for about 12 minutes on bottom half of oven, or until cheese is melted and bottom of crust is golden brown. Remove from oven and top with fresh basil leaves, serve while hot.


Pizza Dough
yield 2 thin 10-12 inch crusts
print recipe

3/4 cup warm water (105°F to 115°F)
1 envelope active dry yeast
1/4 teaspoon sugar

2 cups (or more) all purpose flour
1 teaspoon sugar
3/4 teaspoon salt
3 tablespoons olive oil


Pour 3/4 cup warm water into small bowl; stir in yeast. Let stand until yeast dissolves, about 5 minutes. Sprinkle with about 1/4 teaspoon sugar, to help yeast grow.
Brush large bowl lightly with olive oil. Mix 1 1/2 cups flour, sugar, and salt in processor or Kitchen Aide. Add yeast mixture and 3 tablespoons oil; process until dough forms a sticky ball. Slowly add remaining flour. Transfer to lightly floured surface.
Knead dough until smooth, adding more flour by tablespoonfuls if dough is very sticky, about 1 minute. Transfer to prepared bowl; turn dough in bowl to coat with oil. Cover bowl with plastic wrap and let dough rise in warm draft-free area until doubled in volume, about 1 hour. PUNCH down dough.
Roll out dough according to recipe instructions. Start in center of dough, working outward toward edges .
Can be made 1 day ahead. Store in airtight container in refrigerator.


Pizza Sauce
yield enough sauce for 4-6 pizzas
print recipe

28-ounce can crushed tomatoes in puree ( about 3 1/2 cups)
3 tablespoons olive oil
1 tablespoon dried or 1/4 cup each: chopped basil, parsley and oregano
1 clove minced garlic, optional
pinch of sugar
salt and pepper to taste

preparation:
In a large non-reactive saucepan bring all ingredients to a simmer, uncovered, stirring occasionally, 20 minutes, or until sauce is reduced to about 2 1/2 cups. Cool to room temperature. Sauce keeps, covered and chilled, 5 days.

Tips:
-If you are in a hurry, you may use store bought crust, or roll out thawed bread dough. Roll it thin.
-Farmers Markets are a great place to buy fresh basil and tomatoes for less than half the price at most grocery stores.
-Using a pizza stone will produce a crispier bottom crust. Highly recommend this.