Showing posts with label summer. Show all posts

7/24/10

The World's Best Fresh Blueberry Muffins


My baby (6'1") turned 14 today. When I asked what kind of cake he wanted, he asked for blueberry muffins. Since it was for his bd, I wanted to make something extra special.
I found this recipe on The Bitten Word. I've made dozens of blueberry muffins over the past 30 years. Same old , same old .
These are different. Here's what sets them apart: Home-made blueberry "jam" on top of the muffin. Seriously yummy. Top that with sugar and a heavy dose of fresh lemon zest. Fit for a birthday treat.
Happy bday Jake. Love, your Mother.


The World's Best Fresh Blueberry Muffins
Cooks Illustrated

printable recipe

Yield: 12 muffins

Lemon-Sugar Topping

1/3 cup sugar
2-3 teaspoons finely grated zest from 1 lemon

Muffins

2 cups (about 10 ounces) fresh blueberries, picked over
1 1/8 cups (8 ounces) plus 1 teaspoon sugar
2 1/2 cups (12½ ounces) unbleached all-purpose flour
2 1/2 teaspoons baking powder
1 teaspoon salt
2 large eggs
4 tablespoons (½ stick) unsalted butter, melted and cooled slightly
¼ cup vegetable oil
1 cup buttermilk *
1½ teaspoons vanilla extract

*If buttermilk is unavailable, substitute 3/4 cup plain whole-milk or low-fat yogurt thinned with 1/4 cup milk.

FOR TOPPING: Stir together sugar and lemon zest in small bowl until combined; set aside.

FOR MUFFINS: Adjust oven rack to upper-middle position and heat oven to 425 degrees. Spray standard muffin tin with nonstick cooking spray. Bring 1 cup blueberries and 1 teaspoon sugar to simmer in small saucepan over medium heat. Cook, mashing berries with spoon several times and stirring frequently, until berries have broken down and mixture is thickened and reduced to ¼ cup, about 6 minutes. Transfer to small bowl and cool to room temperature, 10 to 15 minutes.

Whisk flour, baking powder, and salt together in large bowl. Whisk remaining 1 1/8 cups sugar and eggs together in medium bowl until combined, about 45 seconds. Slowly whisk in butter and oil until combined. Whisk in buttermilk and vanilla until combined. Using rubber spatula, fold egg mixture and remaining cup blueberries into flour mixture until just moistened. (Batter will be very lumpy with few spots of dry flour; do not over mix.)

Use ice cream scoop or large spoon to divide batter equally among prepared muffin cups (batter should completely fill cups and mound slightly). Spoon teaspoon of cooked berry mixture into center of each mound of batter. Using small spoon, gently swirl berry filling into batter. Sprinkle lemon sugar evenly over muffins.

Bake until muffin tops are golden and just firm, 17 to 19 minutes, rotating muffin tin from front to back halfway through baking time. Cool muffins in muffin tin for 5 minutes, then transfer to wire rack and cool 5 minutes before serving.

Tips:
-I just mixed all of the dry ingredients in a bowl, then mixed the wet ingredients together, and folded the dry into the wet ingredients. Then folded in the blueberries.
-I was concerned that the mixture would overflow, but they baked up perfectly.
-Best when eaten warm or with in 12 hours of baking.
-This recipe makes 12 large beautifully shaped muffins.

7/10/10

Erin and Misty's Basil Couscous Salad aka- my new favorite salad


My amazing friend Erin (who recently left our neighborhood for Cali, can't even get started on how much we miss her and her fam) , gave this recipe to me last fall. Erin inherited this recipe from her little sis, Misty . I filed it away until this summer because I thought it looked like a great summer salad. Tried this recipe out the other night, when I needed to make a salad for 60. It was a wedding shower, and perfect for the event. First try, I used the spring mix suggested, but I really dislike it when a salad goes limp. Don't you hate that? I like using romaine in salads that are heavy on other filler ingredients. Reason being- I like the green to be substantial enough to support the other ingredients. Salads are like shows. In this salad, the greens are support, and all of the other ingredients are leads. Melinda, my show-a-holic friend, who is turning 48 (yikes, you're old!) this week will love this analogy.
Anyway, tonight, I made the salad again, with romaine and spinach. Loved it. The Romaine was firm and crunchy. No problem tossing the dressing with the salad. No limp leaves. Hooray for firm lettuce! I know you think I'm weirdly obsessive about ridiculous things.


Basil Couscous Salad
Erin Blake and Misty Mayfield

printable recipe
1 package Olive Oil and Garlic Couscous
12 cups Romaine lettuce (about 1 large or two medium heads)
1/2 cup Craisins
1/2 cup grated Asiago or Parmesan cheese
1 1/2 cups or 3-4 medium ears fresh white corn, cooked, cooled and cut off cob*
1/2 cup toasted pumpkin seeds

Fresh Basil Dressing:
(enough for a double batch of salad)
1 cup fresh basil leaves*
1 cup mayonnaise
1/2 shallot, chopped (optional)
1 cup buttermilk
2 tablespoons red wine vinegar
Salt and Pepper to taste

For best results- a day before, or at least a few hours before:
Cook couscous according to package directions. Cool completely. Refrigerate.
Wash and dry lettuce, set aside in refrigerator.
Cook corn, rinse with cool water. Cut corn off cob and place in refrigerator to cool completely.
Make dressing by mixing all ingredients in blender or by using a hand immersion blender. Refrigerate.

When ready to serve:
Place cooked couscous in a large bowl. Chop lettuce into bite size pieces. Add lettuce and rest of salad ingredients into bowl. Just before serving, drizzle dressing (I only use about 1/2 ) and toss. You may serve additional remaining dressing on the side.
Tips:
- When I say "large" head of Romaine, I'm not talking about a Costco head of Romaine. Those are Romaine hearts. If you are using Costco Romaine, probably about 4-5 heads will do.
-Misty said this salad was originally served with chopped chicken as a main ingredient. Great for a main dish salad.
-The first time I made this salad, I tried to cook the couscous and cook the corn and let both cool before adding to the salad. It really works best to cook both several hours or the day before and refrigerate. Also best to use really cold lettuce and dressing. I tried both ways, and had the best result when preparing ingredients the day before and then toss the ingredients when all completely chilled.
-*You may use frozen corn. I won't be as delicious, but you won't know the diff if you don't use fresh first. ;)
-*Don't even think about using dried basil.

6/14/10

Cowboy Salsa


Last week, we spent 4 days with 380 kids (age 14-18) and adults (acting as Ma's and Pa's and support crew) on the plains just outside of Evanston Wy-O. Dressed in pioneer garb- bonnets, hats, long skirts, aprons, pantaloons, suspenders, cowboy hats, etc. No cell phones, computers, ipods or electronic games. Kids pulling handcarts in the rain, wind and sun. We loved - cookouts, singing around campfires, sleeping in tents and the aroma in the lovely green port a potties.


All willing participants. Why? If you are from our part of the country, you are familiar with this seemingly odd ritual, which occurs about once every 4 years. If you aren't from here, here's a quickie version of why we do this:

When early Latter-day Saints longed to gather in the West from 1847 to 1860, handcarts
were a means of helping them on their journey. Today, youth and adults seek to grasp the
spirit of faith, courage and determination these pioneers represented. Youth and leaders dress in pioneer clothing, divide into trek families of 8-12 people and pull handcarts on and off dirt roads for about 20-25 miles. Some pull handcarts over the original pioneer trail; others pull handcarts on land in their areas. No matter where they are, all who participate open themselves to having their hearts touched by the pioneers’ sacrifices and testimonies of the Savior
.


A pic of Joseph (my great great Grandpa) and Caroline Thompson Black (GG Gran), and their little family :) Joseph is the son of William and Jane Black. Joseph walked all the way from Nauvoo, IL to the Salt Lake Valley as a young boy in 1849.


Anywho. Amazing experience. My love and connection to my Great-Great-Great Grandmother Jane Johnston Black, and her husband William Black were re-affirmed, as I walked and thought of the sacrifices they made when they crossed the plains in the same area. Faith? Leaving their worldly possessions and extended family in Ireland, England and later Illinois to trek West. I've never had to exercise faith to that degree. Three nights of camping and I'm ready to be home in bed. There's a reason why I was born in 1962.


I'm going on and on about trekking, and almost forgot about the food. We did have some awesome food on the trail. Here are a few pics. I'm pretty sure the pioneers ate what we ate. Ahhhm. sure they did.


My cute friend Mary Jane brought ingredients to make ice cream on the trail.
This boy was the lucky recipient of the dasher.


Laurie's Roasted Rosemary Potatoes


Barbecued Chicken


Cowboy Salsa
Kelly Exxon

1 pkg zesty Italian dressing (mix as directed: 1/4 c vinegar, 3 T water, 1/2 c oil)
3 ears of corn, cooked, cooled and cut of the cob
or
1 can white corn, drained
1 can black-eyed peas, drained*
2 avocados, diced
3 Roma tomatoes, diced
1/2 c green onions, chopped
1/2 c fresh cilantro, chopped
2 limes, juiced

Mix Italian dressing as directed on package in a large bowl using a wire whisk. Add all other ingredients and stir gently until combined. Cover and refrigerate. Best made the day before, flavor increases over time.

Tips:
-Really yummy with fresh corn, in season now.
- I was unable to find canned black eyed peas so I soaked and cooked dried black eyed peas, according to directions on back of package. Use about 2 cups (after cooking). You need to start this step the day before. I'm sure canned black beans (rinsed and drained) would be a good sub.

5/7/10

Mother's Day Menu 2010 -Part 5- Sweet and Sticky Grilled Chicken


Mom,

Thanks for:
Hot breakfast every morning. I begged for cold cereal, but you would only let us have it two mornings a week. Because you thought eggs, ham, potatoes and toast were healthier :) Remember the phase I went through in jr high when I wanted soup & sandwich for breakfast? Of course, you accommodated me. Weird kid.
All of those home made lunches, because I wouldn't eat school lunch.
All of the drill and cheer costumes/uniforms and all of the school clothes you hand made for me. The sequined hat you made when I was in baton with matching wrist cuffs (red white and blue, of course). The mint green and white striped poncho you crochet in the 4th grade ( still have it), with pom poms, and fringe on the ends that Dad helped cut, while I waited for the school bus. All of the Mother -daughter matching dresses. How did I miss out on the sewing gene?

Always welcoming my friends into our home.
An endless supply of brownies, cookies and your favorite, Hawaiian Punch for fam and friends.
You taught me about love for family. Family was always first for you and Dad. I look back on my childhood with fond memories. Now that my third child is about to graduate from high school, I'm starting to really understand how wonderful you were/are. I'm just beginning to "get" what you gave up for me. You moved thousands of miles away from your mom. You left all of your friends and family in Japan to be with your husband, and raise your kids in a country where you struggled to learn the language. You had to learn how to drive a car at 30. How to write checks, keep a house, take care of us, all without the support of your family. Sometimes, Dad was on a ship for months at a time. The pay of a Navy Chief was small, and somehow, you seemed to make it all work-without credit cards! About once a year you could call home and talk to your family. I remember those calls- lots of laughing and loud talking in Japanese; the call always ended with a few tears.


You never had anything negative to say, about friends, neighbors, Dad or your kids. You just loved us. All of us. My lasting memory of our days on Country Lane will be you- leaning out of the side door in your house coat saying "Play nice". That's been your life motto. Play nice. Treat others with love and kindness. I'm still learning. When I grow up - all the way, I hope to be like you.
Love you Mom.

If you are lucky enough to be with your mom this Mother's Day, treat her to this yummy and simple Sweet and Sticky chicken. She'll absolutely LOVE the ginger pomegranate sauce!


Sweet and Sticky Grilled Chicken

1 1/2 cups Pomegranate juice
1 cup plus 2 tablespoons packed dark-brown sugar
1/2 cup soy sauce
2 tablespoons finely grated fresh ginger
1 garlic clove, minced
8 chicken breast halves, or equivalent amount of assorted chicken pieces
Coarse salt,pepper
olive oil to prevent sticking to grill


Bring juice, sugar, soy sauce, ginger, and garlic to a boil in a saucepan. Reduce heat, and simmer until mixture has thickened to the consistency of honey, 35 to 40 minutes. Let cool.
Using a sharp knife, make three diagonal slashes through the skin and flesh on both sides of each piece of chicken (this will help the flavors permeate the meat). You may also use skinless chicken.
Preheat grill to medium-low. (If you are using a charcoal grill, coals are ready when you can hold your hand 5 inches above grill for just 7 seconds.) Generously salt and pepper chicken and brush with olive oil. Place chicken on grill, cook for about 5 minutes. Turn chicken and begin basting side that was just grilled. Close cover, and grill 4 minutes. Flip chicken, and brush with additional sauce. Continue to cook, flipping and brushing with sauce every 4 to 5 minutes, until cooked through, about 20 minutes total.

10/3/09

Smoky Grilled Corn Salsa


Two lessons I have learned as a cook:

1. Read the recipe. Twice. How many times have I made a recipe and not had all of the ingredients, or botched the assembly? Yearly lesson: Jam making. How it should be- Gather all of the ingredients. Check the list. Twice. Read the instructions. Twice. Follow the instructions. Make Jam.

My jam making experience: Read through ingredient list quickly. Start talking on phone, or to someone in the kitchen, throw the fruit in the pot, add sugar and pectin, boil. Pick up direction sheet. Rats! First batch, now (insert fruit used) SYRUP. This happens EVERY SUMMER.

Blackberry Syrup '09


2. Lesson #2. My kids will laugh about this bc when they were all learning to drive Grant would say "Lesson #1 Always buckle your seat belt." The next time they got in the car, lesson #1 would be "Always check the rear view mirror." Lesson #1 was always changing. They have had SO many laughs about that.
Anyway- back to my lesson #2: if you make something and the recipe says let it sit for ___ hours, then LET IT SIT. It really may taste better, set up better etc. e.g., Smoky Grilled Corn Salsa.


I made this last week when our local corner fruit/vegetable
stand had a delivery of fresh picked corn.

I love any type of corn salsa, and thought the grilled flavor would be a fun change. I made it, mixed it up - and tasted. Well, I won't be making this again, I thought. I would give it a 5 on a scale of 10. I placed it in the refridge until dinner time. A few hours later I took it out and WOW. Transformation. This is one recipe that really needs to sit so all of the flavors can blend and develop. So yes, my lesson #2 is an important one.
Oh - and the driving lessons. Thankfully we are 3 down and 1 to go with kids learning to drive. Teaching kids to drive...not one of my talents.


Smoky Grilled Corn Salsa
printable recipe

2 red bell peppers, quartered, seeded
3 ears of fresh corn, husked
1/2 sweet onion, quartered
4 tablespoons (about) olive oil, divided
2 garlic cloves, minced
1 teaspoon ground cumin
3 tablespoons fresh lime juice
1 tablespoon bottled chipotle hot sauce
1 bunch green onions, green part only, chopped
1 cup chopped fresh cilantro
Salt and pepper to taste

Prepare barbecue (high heat). Brush bell peppers, corn, and sweet onion with some olive oil. Grill vegetables until well charred in spots, turning occasionally with tongs and removing pieces as they brown, 10 to 15 minutes. Cool slightly. Cut bell peppers and onion into 1/3-inch pieces. Cut corn off cob.

Heat 2 tablespoons oil in heavy small skillet over medium-high heat. Add garlic and cumin; sauté until garlic begins to sizzle but does not brown, about 30 seconds. Pour into large bowl; mix in lime juice and hot sauce. Mix in vegetables. Season to taste with salt and pepper. Cool completely; mix in chopped green onion and cilantro. Let sit in refrigerator for at least 2 hours.

Adapted from Bon Appetit

9/27/09

Beef Enchiladas with Roasted Tomatillo Sauce and Fresh Peach Salsa


Whenever I ask my kids what they want for a birthday meal, or any meal for that matter, the answer I get most often is: enchiladas. I loved the Santa Fe Enchiladas we made a while back. The sauce was a little on the spicy side, and took a while to make, but worth every minute. This recipe calls for lots of tomatillos. Little, round, paper-like wrapped green things in the produce section of the grocery.


I added a few roasted Anaheims, because I love the flavor. The texture of this sauce was totally different than the Santa Fe's. If you like a smoother texture, go with the Santa Fe enchiladas. These are seedier. Tomatillos=little seeds. For a little heat- I used one Serrano chili, you can add two if you like to have your mouth on fire while enjoying your a meal. Remember to use gloves, or a plastic sack over your hands to remove the seeds. Don't say I didn't warn you. And don't touch your eyes. Can you tell I'm a MOM?? Oh - and the peach salsa - enough with the peaches already! I know that's what you are thinking. You know how I love fruit with salty and spicy. This was my way to slip in the sweet and use up a few more peaches. Try these, I know you're going to love them.


Beef Enchiladas with Roasted Tomatillo Sauce

1 small red onion, halved
2 pounds tomatillos, husked and rinsed
3 large anaheim peppers
1 Serrano chili pepper, stemmed and seeded
1 cup of chicken broth
2 tablespoons sour cream, optional
kosher salt
sugar
16 corn tortillas
6 cups shredded chuck roast*
6 1/2 cups shredded cheese- jack, mozzarella or cheddar/jack combo, divided
1 cup fresh cilantro, chopped and divided
2 tablespoons of olive oil
3/4 crumbled queso fresco or crumbled feta

Preheat broiler. Slice half of onion into thin rings and set aside for garnish. Place the other onion half, tomatillos and chilies on a foil lined baking sheet. Broil until all of the vegetables are softened and slightly browned about 7-10 minutes, turn if needed. Transfer the vegetables to a bowl, and chop with hand immersion blender, or transfer to a blender and blend in batches until smooth. Add chicken broth and sour cream, puree. Season with salt and a dash of sugar. Set aside.

Prepare 2- 9x13 pans for cooking. Spray both pans lightly with Pam, and put about 1/2 cup of the sauce mixture in each pan. Spread mixture around so it covers the bottom of the pan.

Stack the tortillas and wrap in a damp paper towel in microwave and heat just until warm and soft, about 1 minute. Keep covered. Toss the meat with 4 cups of the grated cheese and 1/2 cup chopped cilantro. Place some of the meat mixture in the middle of a tortilla, roll up and place seam side down in the prepared 9x13 pan. After filling all of the tortillas, brush with a little olive oil and broil until golden about 2-3 minutes. Pour the remaining sauce over the enchiladas and top with remaining cheese. Reduce oven heat to 350 and bake for about 15-20 minutes. Garnish with sliced red onion, and queso or feta cheese and fresh cilantro. Serve with fruit salsa.

Tips:
-This recipe makes 2 9x13 pans, and can easily be halved.
- I used a 3-4 lb roast. Early in the day, or the next time you cook a roast for dinner, throw in another one for an additional meal. Place roast in pan, fat side up (if not trimmed), season well. Add about 1/2 cup water (around the sides of the meat, not poured over the top), a whole sliced onion on top of the meat and cook low and slow - in crock pot for about 8-10 hours or in a 275 oven in heavy dish covered with foil for about 8 hours. Remove from oven, discard any fat, shred or chop meat when cooled a bit. If making before day of use, cook then refrigerate, or freeze for later use. Save the broth from meat in a jar and freeze to make gravy or soup base.
-If making enchiladas ahead and baking later in the day, wait to cover the enchiladas with sauce until just before baking. Bring pan of enchiladas to room temperature, then proceed with broiling instructions. Cover with sauce and proceed with baking instructions. Otherwise, the enchiladas will absorb too much of the sauce before baking.


Fresh Peach Salsa

2 Peaches, peeled, pitted and chopped
1/2 cup chopped cilantro
1/2 cup chopped red onion
1 avocado, chopped, optional
2-3 tablespoons of fresh lime juice
pinch sugar
salt
pepper

Mix together all ingredients in bowl. Season to taste.

9/21/09

Perfect Peach Crumble


Peaches for breakfast, lunch and dinner. Peach salsa, peach jam, peaches with cream, peaches with ice cream, peach coffee cake.... I love peaches. You have to work fast when someone gives you a box or two, or five. I know canning peaches would be a good idea. That's what I usually do. I still have a dozen quarts of peaches left over from last year, and some in the freezer, and several jars of jam. Hmmm- brilliant idea. Maybe this year I could just make enough pies and crumble and salsa to share with friends, then I wouldn't have to can this year. Um. It's not working out that way. I feel a little like Lucy in the IL Lucy episode where she and Ethel are working in the chocolate factory - you know what I'm talking about? Instead of chocolates, it's peaches. They just keep ripening. I keep giving them away... keep peeling and cutting, baking and eating. I just can't keep up- you get the picture.
This past summer I found this recipe for Peach Crumble in Cooks Illustrated. It was just as they promised. No runny peach filling. No slimy topping from juicy peaches. Crisp and yummy. Just the right amount of spice, and a topping that was sweet, but not too sweet. I've made 6 of these in the past couple of days. Great result every time. The key is to sugar the peaches and then let them sit (macerate) to draw out the excess juices. The other essential step is to bake the crumble topping before adding to the fruit, then top and bake a second time. The process takes more time than a regular crisp or crumble, but well worth the effort.
Note to self for next year: Canning is a good idea.


Perfect Peach Crumble
Cooks Illustrated

Filling
3 1/2 pounds ripe but firm peaches (6 to 7 medium), peeled and pitted;
each peach halved and cut into 3/4-inch wedges (about 6-7 cups prepared peaches)
1/3 cup granulated sugar
1 1/4 teaspoons cornstarch
1 tablespoon fresh lemon juice
Pinch salt
Pinch ground cinnamon
Pinch ground nutmeg

Topping
1 cup unbleached all-purpose flour
1/4 cup granulated sugar, plus 1 tablespoon (divided)
1/4 cup packed brown sugar (light or dark)
1/8 teaspoon salt
2 teaspoons vanilla
6 tablespoons unsalted butter , cut into 6 pieces, softened
1/2 cup pecans

Adjust oven racks to lower and middle positions; heat oven to 350 degrees.

FOR FILLING: Gently toss peaches and sugar together in large bowl; let stand for 30 minutes, tossing several times. Drain peaches in colander set over large bowl. Whisk 1/4 cup drained peach juice, cornstarch, lemon juice, salt, cinnamon, and nutmeg together in small bowl; discard excess peach juice*. Toss juice mixture with peaches and transfer to 8-inch-square or 9 inch greased pie plate.

TOPPING: While peaches are draining, combine flour, sugars (reserving 1 tablespoon granulated sugar), and salt in work bowl of food processor; drizzle vanilla over top. Pulse to combine mixture. Add butter and half of nuts; process until mixture clumps together about 30 seconds, pausing halfway through to scrape down sides of work bowl. Sprinkle remaining nuts over mixture and combine. Transfer mixture to parchment-lined baking sheet and spread into even layer. Bake on middle rack until lightly browned and firm, 18 to 22 minutes. Remove from oven and break into chunks. Set aside. You can do this early in the day or the day before and store in a sealed bag or plastic container until ready to use.

TO ASSEMBLE AND BAKE: Grasping edges of parchment paper, slide topping over peaches or scoop up by handfuls and distribute over peaches, breaking up any large pieces. Sprinkle remaining tablespoon sugar over top and place on lower oven rack. Increase oven temperature to 375 degrees and bake until well browned and fruit is bubbling around edges, 25 to 35 minutes. Serve warm with vanilla ice cream or whipping cream.


Tips:

-*Instead of discarding extra peach juice- pour into large glass filled with ice and about 2-3 tablespoons of fresh lemon juice. Fill glass to top with cold water and stir for fresh peach lemonade. Drink while contemplating what to do with all of the peaches sitting on back porch.

9/17/09

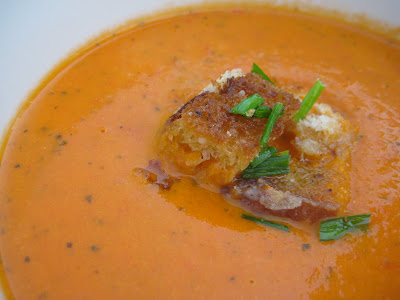
Martha's Fresh Tomato Soup with Parmesan Chive Croutons


My sweet friend Melanie gave me a big box of tomatoes fresh out of her garden yesterday! Joy! Happiness! More tomato toast! More BLT's! Now I can pretend it's still summer, and enjoy these gems. I had this tomato soup a few years ago at a Recipe Club dinner and loved it. It takes about 10 minutes to make. I'm sharing my modified version. I cut the amount of cream and butter, so I could eat this for lunch without feeling guilty. Gilt. It's really a four letter word isn't it?? If you leave the "u" out. Anyway. I made this and it seemed to be missing something - I know I just said I left out some of the cream and butter. No, it needed a yummy crouton. I froze a few extra pieces of french bread I made a couple of weeks ago, so I pulled that out of the freezer, sliced it up (frozen) and threw it into a pan. Yummalicious. Thanks Mel.


Martha's Fresh Tomato Soup
adapted from Martha Stewart

3 Tablespoons butter
3 tablespoons olive oil
2 medium onions, chopped
4 cloves garlic
1/2 cup white cooking wine, or white grape juice
8 cups chopped tomatoes, skins left on
1-2 teaspoons kosher salt
1-2 teaspoon fresh ground pepper
1 cup fresh basil, chopped
1/4 cup cream

Melt butter in stock pot. Add chopped onion and garlic, cook for about 5 minutes, or until soft. Add wine or grape juice, tomatoes, salt, pepper and basil. Cook for another 5 minutes. Cool for about 5 minutes add cream if desired. Blend soup in batches using blender*until all soup is smooth. Return to stockpot, add cream and heat just until warmed through. Serve with croutons.
Yield: 4-5 large bowls


Parmesan Chive Croutons

bread 2-3 slices
olive oil
grated parmesan
fresh chives,chopped (I used garlic chives)
kosher salt
pepper

Cut up 2-3 pieces of bread, preferably a dense and crusty bread. I used leftover french, and it was still yummy.
Heat a non stick skillet using medium high heat. Add about 3-4 tablespoons olive oil. Toss bread in pan and cook for about 3-4 minutes. Season with salt and pepper. Sprinkle generously with grated parmesan, toss and add chopped chives. Remove from heat and let cool. Top soup with croutons. This can also be cooked in the oven at 350 degrees for about 10-15 minutes or until browned. To cook in oven: toss all ingredients and place on foil lined cookie sheet, bake as directed.


Tips:
-The original recipe called for 6 tablespoons butter and no olive oil. I like this lighter version better. If you really want to cut fat, leave out the butter altogether and just use 3 tablespoons of the olive oil (total). I tasted the soup before adding the cream (1/4 cup, cut down from original 1/2 cup) and thought it was really good without the cream addition too.
-*If you have a hand held immersion blender (read about it here)- there is no need to let the soup cool before blending up, also no need to transfer out of the stock pot. Just add the cream to the pot after blending.

9/9/09

Amy's Bakery Plum Upside Down Cake & Giveaway!


Just before the summer ended (yes, it's over) I went on a girl's trip with my daughters to NYC. It was the first time for both of them, the second for me. It was sooososo fun.


We stayed out late, and got up early. We had an agenda. It was: see all there was to see, eat all there was to eat, shop, shop, shop, show, show, collapse.


By Saturday night, when we met Corrine's friend Natalie for dinner, we were worn out! We took a list of restaurants to visit, and hit a few of them, ended up grazing most of the days, and finding all types of wonderful bakeries and treats on our outings. One of our favorite places was Amy's Bread. They have three locations: one in Hell's Kitchen, Chelsea Market and Greenwich Village. We tried several treats and also had a yummy lunch at the Greenwich location. Everything was delish. They sell a cookbook that is beautifully written, with wonderful pictures and stories about their beginning, creations, and customers who frequent their stores. I loved the book so much, I bought TWO - because, I thought, if anyone would love this book, it would be A Bountiful Kitchen reader.


I am so happy to have this collection of recipes! Can you tell I'm on a sugar high? I've been baking this morning. I'll post another "Amy's" recipe with the name of the winner, who will be selected by the random counter. Leave a post with your favorite memory (food related- of course) from summer 2009. All entries must be left by midnight Thursday, September 10th. Winner will be announced on Friday.


My favorite summer 2009 food memory has to be when I was sitting in a diner with Corrine and Brookie at about 11:30 PM after seeing a show, none of us were very hungry, but we decided to order a pizza. The waiter said "We're all out". "WHAT???" I said. "You are kidding. How can you be out of pizza?" Brooke told me to calm down. Note: Brooke just spent the whole summer working in Yellowstone, working front desk at a hotel then waiting tables, listening to cranky tourists from 7 AM till 11 PM almost every day. Ok, fine. I didn't need pizza. So, we picked another menu item. Well, actually we ordered the mac and cheese with proscuitto, the triple layer Devil's food cake with cream, and an egg cream soda. 'Cause we weren't hungry. Yeah. And we all had a good laugh.

With all of the recipes to choose from in the new cookbook, why plum cake? We have a plum tree. I don't know if it was the excessive amount of RAIN we had this spring and summer, or the cooler weather? But, the plums are HUGE. And the crop was enormous.


I had to get out the loppers (is that what they are really called, or did Grant make that up?) and cut branches, loaded with plums and drop them right into the garbage can. I think I still picked about 3 bushels. And there are still branches loaded with plums. Call me if you need any to make this cake.

Oh - the cake. It is yummy. I love the cornmeal in the cake. It's much lighter than I anticipated. More like a cake, than a coffee cake. It is melt in your mouth good when it's warm. And it's beautiful too. I just had to get up and take another bite. Tart, sweet, buttery, carmely (know it's not a word). You should put Amy's on your list of places you must eat in NYC.


Plum Upside Down Cake

Topping ingredients:
3/4 cups light brown sugar
1/4 cup unsalted butter

Melt together in a small sauce pan. Boil for 2 minutes, don't over cook or mixture will get grainy. Pour into a greased 9x13 pan and set aside.

Cake ingredients:
6 to 8 small black or red plums, whole
1 1/2 cups unbleached all purpose flour
3 tablespoons cornmeal
1 1/2 teaspoons baking powder
1 teaspoon kosher salt
1/2 cup unsalted butter, softened
1 cup sugar
4 eggs, separated
1 1/2 teaspoons vanilla
2/3 cup milk, whole (I used 1/3 skim, 1/3 cream)
Sugar for egg whites, 2 tablespoons

Preheat oven to 350 degrees.
Wash all plums, and cut in half. Pit and slice each half into 4 wedges ( I sliced into about 8, because my plums were big). Arrange the fruit, cut side down on top of the topping. Set the pan aside.
In a medium bowl, add the flour, cornmeal, baking powder, and salt. Whisk together.
Ina small bowl with an electric mixer, cream the butter for cake for 1 minute, or until light. Add the sugar and continue beating for about 1 minute. Add the egg yolk and vanilla and mix 1 minute more. Add half of the flour mixture to the batter and mix briefly. Then add half the milk and mix again. Repeat until all ingredients are incorporated. Set aside. In a small bowl, beat the egg whites until frothy about 1-2 minutes. Increase speed and beat until soft peaks form. Add the 2 tablespoons sugar a little at a time and beat until stiff, but not dry. Fold about 1/4 of the whites into the cake mixture to lighten it. Gently fold in the remainder just until incorporated.
Pour the batter into the prepared pan and spread evenly over the topping. Place pan in center of oven and bake for 30-33 minutes. Or until blade of knife inserted in center comes out clean. Let the cake cool on wire rack for about 5-10 minutes. Run a knife around edge to loosen. Invert onto rectangular plate.