Showing posts with label New Beginnings-college and missionary meals. Show all posts

8/3/15

Favorite Summer Pasta Dinner


You know those nights when you just cant bring yourself to cook, but the thought of eating drive thru makes your stomach turn?? This is my simple solution. It's called Favorite Summer Pasta (and anything you have in the fridge) Dinner.


Here's the deal. Look in your fridge or freezer. Pull out any type of vegetable. It can be broccoli, carrots, peppers, spinach, green beans, asparagus. You'll need about 2 cups. Then some protein. Chicken goes well in this dish. Or you can use just about anything you have. I'd probably pass on Spam, but almost anything else goes. Shrimp, turkey, bratwurst, leftover steak, pork, even ground meat. Or if you're not a meat lover, you can simply add more veggies. Tofu (a firm texture) folded into this would be wonderful too!


I used Harmons brand of pasta, which I highly recommend. It has a comparable quality to that of pasta made in Italy. Trust me on this, I've carried home bags full of dried pasta from Italy on past trips. Once I realized for about the same price I could purchase the imported items here, I filled my carry-on with other items.


Get yourself a pot and grow a few fresh herbs.
Joy in a pot. 
If you have access to fresh tomatoes, use them! If you don't have any fresh tomatoes, use boxed or canned. And the fresh herbs? If you don't already have an herb pot, vow to grow one next summer.
In the amount of time it takes you to run to In and Out you can make this at home!
You're going to love it.
Promise.


Favorite Summer Pasta
A Bountiful Kitchen

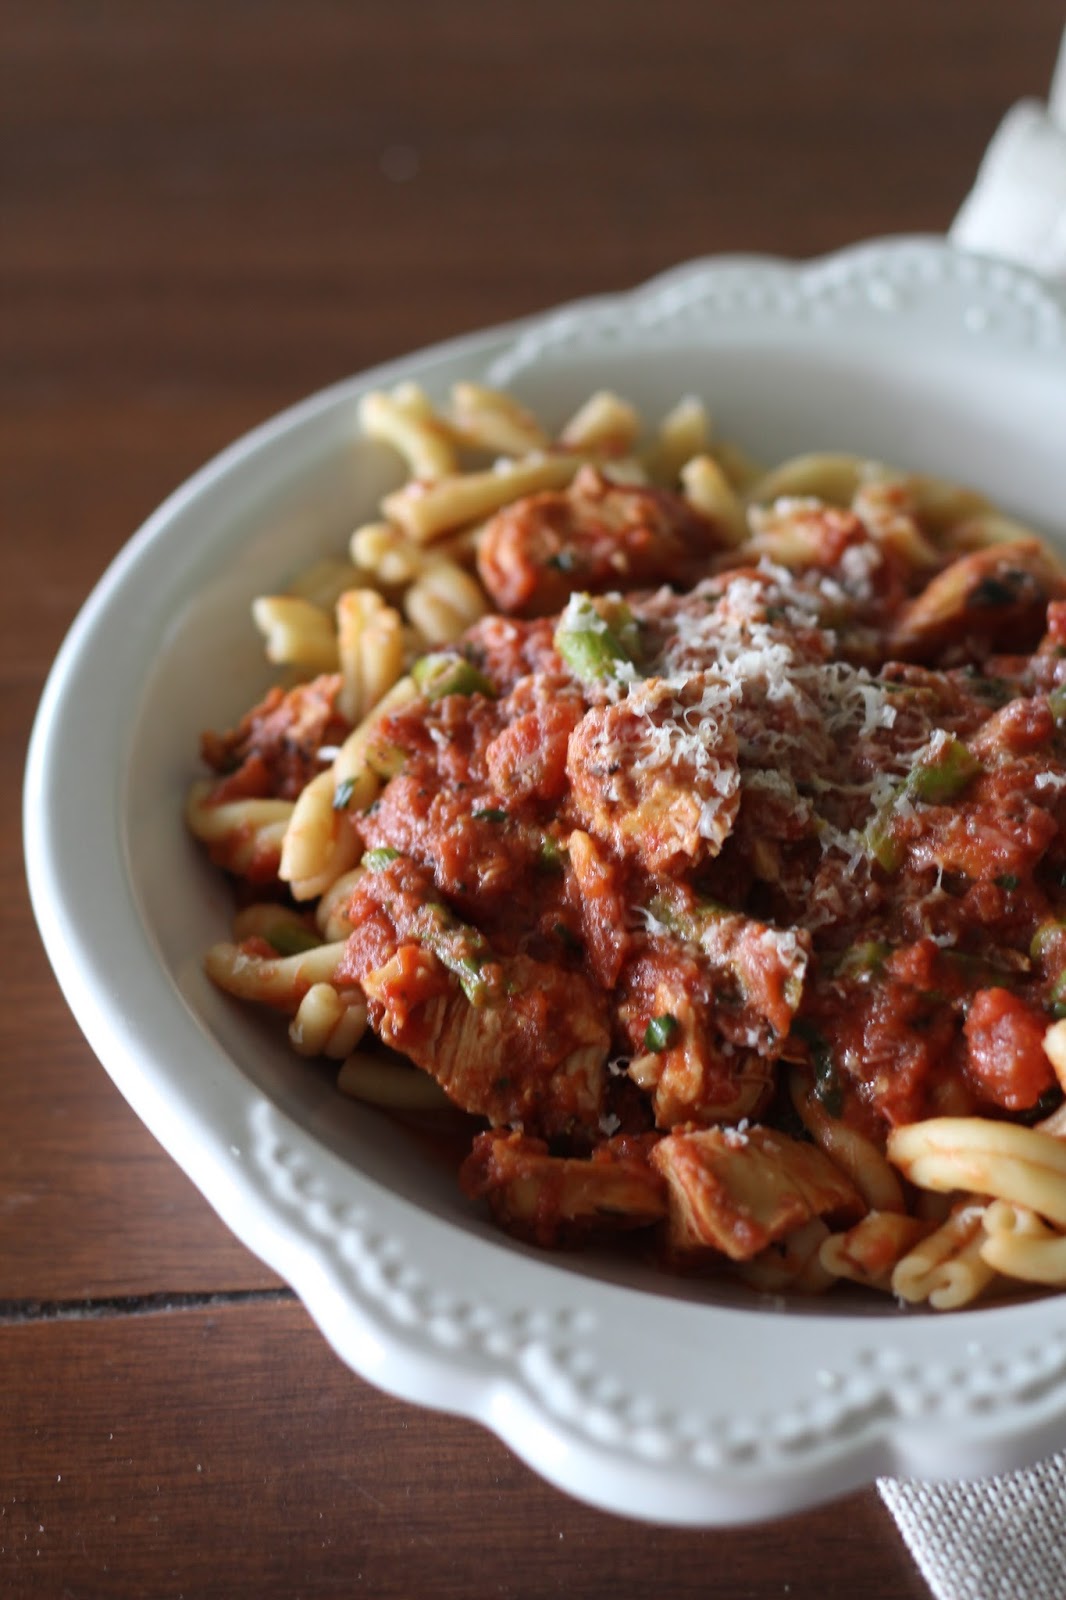
1/2 lb Harmons pasta, any shape will do, I used Casarecce pictured above
2-14 oz or one 26.46 oz carton Pomi brand chopped tomatoes,
or about 28-30 oz chopped fresh tomatoes in their own juice
2 cloves fresh garlic cloves, minced
1/2 cup fresh basil
2-3 tablespoons each fresh chopped oregano, rosemary, thyme
1 tablespoon olive oil
1 teaspoon salt or to taste
fresh ground pepper
1/2 teaspoon sugar
1/4 cup cream (optional)
2 cups chopped fresh vegetable such as asparagus, broccoli, green beans, peppers, etc
2 cups chicken (or other meat), chopped into bite size pieces and cooked
1/2 cup grated Parmesan or Romano cheese, additional for topping pasta

Cook the pasta according to package directions until al dente, drain and set aside.
Pour the chopped tomatoes in a large saucepan. Simmer over medium high heat. Add garlic, herbs, olive oil, salt and pepper and sugar. Simmer for about 15 minutes or until reduced a bit.
Meanwhile, chop vegetables and place on plate and microwave for about 2 minutes, covered or until the veggies are barely cooked and bright in color. Toss into sauce and add chicken as well.
Add cream and cheese and cook for another minute. Remove from heat. Toss sauce with cooked pasta. Serve immediately with additional grated cheese on top.
Serves about 4 as a main dish or 6 as a side dish

Tips:
-This recipe is easy to double. Simply double the sauce and cook the entire package of pasta. Doubled, it will serve 8.
-It is best to use fresh vegetables and fresh herbs in this recipe. Although, the Pomi brand (purchased at Harmons) chopped tomatoes work very well in place of fresh tomatoes. if using fresh tomatoes, make sure to use a variety that will yield a lot of juice. I do not recommend using fresh Roma's in this recipe, they don't typically yield enough juice.
-I found the Harmons brand pasta needed a bit more cooking than the package directions. I cooked the pasta for about 10-11 minutes total for a perfect al dente texture. Make sure to test this in your kitchen. Depending on size of pot, how much water and pasta are in the pot, how hard the water is boiling will all be factors in how quickly pasta cooks. Do not over cook!


6/30/15

Cheese and Garlic Twisted Breadsticks


I've been making these Quick Cheese and Garlic Twisted Breadsticks for years. They take less than an hour start to finish and paired with a salad or soup make a meal complete! They are simple enough to make with your kids this summer, they'll love to cut the dough into strips, sprinkle with cheese and then twist.
I love them paired with these main dish salads:


Panera's Strawberry Poppy Seed and Chicken Salad Copycat recipe

BLT Pasta Salad with Buttermilk Ranch Dressing


Here's a little step by step to help you out:


Roll out on a floured surface. Doesn't need to be a perfect rectangle...

Spread with butter and garlic mixture (optional).
I skip this step if I'm in a hurry, sprinkle with cheese, cut into strips. 
Fold the strips back to meet the top of the dough. 


Gently twist one end of the dough.
It's okay if the cheese spills out the side of the breadstick!


Place the breadstick on the greased baking sheet.
Brush with egg and sprinkle with poppy or sesame seeds.
Or skip this step if you're in a hurry.


Shown with Panera Copycat Broccoli Cheddar Soup Recipe


Cheese and Garlic Twisted Breadsticks
A Bountiful Kitchen

1 1/2 cups warm water
1 package active dry yeast or 2 1/2 teaspoons dry yeast
1 tablespoon honey
1 teaspoon salt
3 1/2 to 4 1/2 cups flour
1 egg, beaten (optional)
1 clove crushed garlic mixed with 2 teaspoons salt, or 1 tablespoon garlic salt
2-3 tablespoons butter, softened or melted
1 1/2 cup grated cheese (Cheddar, Co-jack, Parmesan)
poppy seeds, sesame seeds optional

Place the warm water in a large bowl. Sprinkle the yeast over top of the water. Let sit for about five minutes or until bubbly. Stir in honey. Add the flour and salt, a cup at a time, until dough pulls away from sides of bowl and is no longer sticky. Remember, it is easier to work with dough that has not had too much flour added.
Let the dough sit for about 15 minutes. This step is not necessary, if you are in a hurry, go ahead and proceed to next step.
Mix the butter and garlic or garlic salt in a small bowl.
Roll the dough out on a floured surface into about a 10x15 rectangle. Spread or drizzle the surface of the dough with melted butter and garlic mixture. This step is optional, you may simply sprinkle the dough with grated cheese, but the flavor is much better with the garlic butter mixture spread on top first.
Grease a jelly roll pan with cooking spray. Pre heat oven to 400 degrees. Place rack in middle of oven.
Using a pizza cutter, cut the bread sticks in to 8-12 pieces (width wise), depending on the desired size. Take one end of the dough strip and fold upward to meet the top of the other end of the strip (see photo). Continue until all of the strips are folded. Pick up one dough strip and gently twist in one direction, holding the other end while twisting. Place the twisted dough strip on the greased baking sheet. Repeat until all of the dough has been twisted and placed on baking sheet. Dough may be brushed with beaten egg and sprinkled with poppy or sesame seeds.
Let the dough sit in a warm place for about 20 minutes.
Place in oven and let bake for about 15-20 minutes or until golden brown.
Serve immediately.

Tips:
-When making any type of bread, the kitchen should be warm and draft free. The microwave oven is a great place to put a bowl of rising bread dough. Place a cup of water in the microwave on high for one minute. Remove the water and place the bowl of bread in the microwave oven with the door shut. The temperature inside of the oven is perfect!
-While this recipe is supposed to be a thirty minute recipe, the texture of the bread is better if you let it raise a bit before baking. If you have lots of time, let it raise for 30-40 minutes after making the dough, then another 30-40 minutes after shaping into breadsticks and before baking.

1/6/15

Our Favorite Chicken Divan


If you were to ask my kids what their favorite dinner was growing up, bets are they would all say the same thing. We called it "Chicken, Broccoli and Rice", but it is known to most as Chicken Divan. There are several ways to make Chicken Divan, the super simple canned soup route or the made from scratch version. It's one of those- adult version or kid version recipes.
My kids love both. When I was in a hurry, I could have dinner on the table in less than 20 minutes start to finish with the canned soup version, but the from scratch version doesn't take much longer, and in my opinion,  tastes waaay better. My favorite way to serve this dish is to bake it in the oven after making the sauce. I love the way the dish tastes when the sauce is spread over the rice and baked for a few minutes. But serving it straight from the stove top works too.
Oh, one more thing. If you're looking for a way to get your kids to eat broccoli, this dish should do the trick.


Our Favorite Chicken Divan aka  Chicken, Broccoli and Rice Dinner
A Bountiful Kitchen
print recipe

6-8 cups cooked rice ( I like Pearl or Japanese style rice for this dish)
4-5 cups chopped broccoli
1/2 cup butter
1/2 cup flour
1- .49 oz packet chicken flavoring*
1 teaspoon each salt and pepper
4 cups milk (skim)
1 cup mayo (regular or low fat)
4 cups cooked chicken
1 cup milk
1-2 cups grated cheddar cheese

Cook rice, set aside.
Steam broccoli by placing on a plate or non metal pie plate with about 3 tablespoons of water, cover with a damp paper towel and microwave on high for about 3 minutes or until bright green. Remove and set aside.
Melt butter in a large pan over medium heat. Add flour and cook while whisking and butter and flour make a smooth paste. Cook for about 2 minutes. Add one package liquid chicken flavoring and salt and pepper. Slowly add milk to the mixture a little at a time, whisking while adding milk.
Cook until mixture thickens, about 3-4 minutes on medium-medium high heat. Continue whisking.
Add mayo, whisking until smooth. Add broccoli, chicken and cheese. If the mixture is too thick, add an additional cup of milk until desired consistency.
If baking (not necessary) grease a 9x13 pan. Spread cooked rice (it's okay if it is still hot) into the dish. Pour chicken and broccoli mixture over the rice. Bake for about 20 minutes at 350 degrees. Top with additional grated cheese last ten minutes of baking.
If serving without baking all ingredients together, scoop rice onto individual plates and spoon broccoli and chicken mixture over the top of the rice.
Serves about 6

Alternative super quick and easy recipe, aka :

Foster Children's  Favorite Chicken, Broccoli and Rice Dinner

6-8 cups cooked rice
4-5 cups chopped broccoli
4 cups chicken (about 2-3 large chicken breast halves)
2 tablespoon olive or canola oil
salt and pepper
2 can cream of chicken soup regular or low fat
2 cans milk
1 cup mayo light or regular
1-2 tablespoons bottled lemon juice
2 cups grated cheese
more milk to thin, if necessary

Chop broccoli, set aside.
Cut up the chicken and place in a large pan with oil over medium-high heat. Cook until no longer pink, about 3-4 minutes. Add chopped broccoli to chicken in pan, cook until broccoli is bright green (about 3 minutes) . Add salt and pepper. Whisk in the soup, milk, mayo, lemon juice and grated cheese. Continue to cook until smooth and cheese is melted, about 5 minutes.
Serve over top of cooked rice.

Tips:
-*I like to use Swanson brand "Flavor Boost" 100% Natural Concentrated Broth. There are 4 packets to a box. You may also use bullion cubes(2) or other types of chicken flavoring. It is not necessary to use the flavoring in the second recipe, the canned soup has plenty of chicken flavoring.


4/28/14

Mary's Honey Nut Granola


My friend Mary makes the best granola.  It's crunchy, nutty, slightly sweet and a bit salty.  And the best part, aside from the taste, is the simplicity of the recipe. Granola is so easy to make. You can mix up a batch and put it in the oven while you're folding laundry, or balancing the checkbook, or reading cooking blogs :) A few minutes of stirring and baking and you'll have breakfast for days (or weeks) to come.
I love a bit of granola on my yogurt in the morning, or just a handful or two with some fruit. You can substitute different nuts and add whatever you like, but I loved the walnut and almond combo.


This makes quite  a bit of granola, so if you want to package some up and give it away as a gift, I guarantee the recipient will love it. Mother's Day, is just around the corner. How about ditching the usual candle and lotion and try making Mom some granola instead?
She'll  love it.
Promise.


Mary's Honey Nut Granola
Mary Primos
print recipe

6 cups thick-cut old fashioned oats
2 cups slivered almonds
2 cups chopped walnuts
1/2 cup canola oil
1/3 cup honey
2 teaspoons vanilla
1/2 teaspoon cinnamon
1 teaspoon salt (I like sea salt)

Preheat oven to 325 degrees. Line a large rimmed baking sheet with parchment paper.
Place dry oats, almonds and walnuts in a large bowl. Mix together.
In a separate small bowl, whisk together oil, honey, vanilla, cinnamon and salt.
Pour  wet ingredients over mixed oats and nuts and toss until mixed well.
Spread mixture on prepared baking sheet. Bake for 20 minutes or until golden brown, stirring every 5 minutes.
Let cool completely, then store.

Tips:
-This is a great gift to send in the mail, for mom or missionaries, college students or loved ones in the military. Let the granola cool completely, then scoop into Ziplock bags. Press all of the air out of the bag, seal and send. It keeps for two to three months if sealed properly.


3/5/14

Cracker Barrel Biscuits (copycat recipe)


You know how I love a good biscuit.
This recipe is a Southern classic. It's rumored to be the Cracker Barrel recipe.  It calls for ingredients all self-respecting Southern cooks have in their kitchen: self rising flour, shortening, and buttermilk. If you're a Yankee, (like me) you probably don't have self rising flour on hand at all times. No worries. You can make your own in a minute with three simple ingredients.


Oh, one more tip, My dear friend Miss Mary (what the kids love to call her) was visiting from Mississippi a few weeks ago. I made a big batch of biscuits for breakfast one morning, and we ended up having quite a few left over. I'm kind of a biscuit snob, so I'm not one to eat a leftover biscuit. I was about to throw them away when she told me the secret to re-heating leftover biscuits.  Listen up. Split them in half. Butter both of the insides. Lay them on a cookie sheet and broil just until lightly browned and heated through. Careful not to burn. They taste fresh and almost better than the first baking. We ate up every last crumb.
The rumor about these being the Cracker Barrel recipe? I've eaten a Cracker Barrel biscuit and I can tell you this.  This recipe makes a biscuit that's tender and flaky, like CB's. A bit of crunch from being baked at 450, a bit salty, which is perfect with the jam you're going to put inside. If we're comparing, I have to say no restaurant I've ever dined in serves a biscuit this good. It's hard to beat a home made biscuit.
Get baking.


Cracker Barrel Biscuits
adapted from cdkitchen.com found on Pinterest
print recipe

2 cups self rising flour (or  you may make your own, recipe below)
1/3 cup solid shortening, I prefer Crisco
2/3 cup plus 2 tablespoons buttermilk, shaken
melted butter

Pre heat oven to 450 degrees, and set rack in middle of oven.
Place the self rising flour into a medium size bowl. Cut the shortening in , using a pastry cutter, or two knives. Add the buttermilk all at once. Gently fold the buttermilk into the flour and shortening, until the
dough gathers together, and the flour is mixed in. I use a large wood spoon for this.
Turn the dough onto a lightly floured surface and pat gently into a disc about one inch thick. Do not over handle the biscuits, this will make them tough, and not tender.
Gently cut the biscuits, using a biscuit cutter or glass. Place onto a cookie sheet.
Brush the tops of biscuits with melted butter.
Make sure the oven is completely pre heated  and up to 450 when the biscuits are placed in to bake.
Bake for about 15 minutes, or until golden brown on top and bottom.
Makes 9- 2 1/2 inch biscuits. Biscuit yield will depend on size of cutter.

Self Rising Flour :
1 cup flour
1 1/2 teaspoons baking powder
1/2 teaspoon salt
Mix together in a bowl with a fork. Store in a container or Ziploc bag until ready to use.
I double this for the Cracker Barrel recipe, and have a little leftover for the next time I make biscuits.
Measure out 2 cups for the recipe above.


10/29/13

Slow Cooker Tomato Basil Soup


Every year on Halloween, it was a trick to get the kids to eat real food before going out in the neighborhood to collect treats. My rules on Halloween (besides stay in the neighborhood, don't run, say "thank you" after screaming trick or treat and don't eat the candy till we inspect it) were:
1. Eat dinner before you go out. 
2. Eat a few pieces of candy that night, then put the stash away until the next day. There was a limit on how much candy you could eat each day, something like 3-5 pieces.

Then I grew a new brain, and came up with the new Foster Family Halloween standard:
1. Eat a bowl of home made chicken noodle soup and buttermilk scones before going out. Invite your friends over to eat with you. Amazing how your kids will actually eat dinner if their friends are with them, and they're eating something they love. 
2. Eat the candy you gathered that night ASAP, therefore alleviating your mother the hassle of policing how much candy you eat every day for the following month. The bulk of treats were usually gone in a day or two. 
If you're looking for an easy fix for dinner on Halloween, try this recipe. I Pinned it a while back, made it and loved it. After you take the blender to the ingredients, the kids will never know they are eating something healthy.
Happy Halloween!


Slow Cooker Tomato Basil Soup
adapted from Big Girls Small Kitchen
print recipe

3 tablespoons olive oil
3 large carrots, scrubbed or 2 cups baby carrots
2 medium sweet onions, diced
1 clove garlic, chopped
1 tablespoon salt
3 28-ounce cans whole peeled tomatoes
1 quart chicken (or vegetable) broth
10 basil leaves, fresh, plus a few more for garnish
Fresh grated Parmesan for garnish
Slow cooker:
Combine all ingredients in a slow cooker. Cover and cook on low for 5-7 hours, until flavors are blended and vegetables are soft. Allow the soup to cool slightly.  using an immersion blender, blend the soup until smooth. Or puree in batches in a blender. Serve immediately, or keep on low until ready to eat.
Stove-top version:
Combine all ingredients in a heavy lidded pot or dutch oven over medium-high heat. Bring to a boil, then turn heat down to low, and simmer, covered, for about 2 hours, until flavors are blended and vegetables are soft. Allow the soup to cool slightly. Then puree as instructed above. Garnish with fresh basil and Parmesan cheese.

Tips:
If you like a creamier version, omit about 1 cup of the chicken broth and add milk or half and half.

10/23/13

Favorite Apple Crisp


I was digging through a folder of dessert recipes the other day and found an article on the closing of the Red Apple, an old SLC institution. It was housed in the basement of a building in the middle of the block on 100 South between State and Main, across from what is now the City Creek Center. They made great sandwiches and one of my favorites, Apple Crisp. The Red Apple was one of the only places I knew of where you could order house made apple crisp any time of the year, whether it was October or  April . After years of being in business, they closed the doors and moved on to other adventures.
I realized after looking at the article, I've never posted our favorite version of apple crisp. You probably have your own family favorite take on this classic dessert. Ours comes from years of testing out different recipes and then coming up with a recipe that is sweet, salty, caramely and heavy on the crisp.  I like a good amount of topping on my crisp, not a thin layer that leaves you wanting more to eat with the apple filling. I also like the bit of crunch the oats add, instead of using all flour. If you don't already have a version you love give this one a try. It may become your new favorite!
Hope you're enjoying the beautiful Fall weather .


Favorite Apple Crisp
A Bountiful Kitchen
print recipe

4 lbs of apples, preferably Granny Smith, peeled and sliced
1 tablespoon vanilla
3/4 cup dark brown sugar*
1 teaspoon cinnamon
1/4 teaspoon nutmeg
dash of salt

Topping:
1 1/4  cup old fashioned oats
3/4 cup all purpose flour
1/2 cup brown sugar, dark or regular
1 teaspoon cinnamon
1/2 teaspoon salt
1/2 cup butter (not margarine) , cubed


Place rack in center of oven and preheat oven to 375 degrees.
Lightly grease a 9x13 pan or two-9 inch pie plates.
Place apples into a large bowl. Sprinkle the apples with one tablespoon of vanilla. Top with brown sugar, cinnamon, nutmeg and dash of salt. Pour apple mixture into prepared pan(s).
In same bowl, Place all dry topping ingredients.  Using fingers or a pastry cutter, cut butter into dry ingredients. Spread/sprinkle topping onto top of apple mixture.
Bake for about 45 minutes or until apples are bubbly and topping is golden brown.
Remove and let sit for 15 minutes. Serve warm with vanilla ice cream or whipped cream.

Tips:
-*you may use regular brown sugar, dark will produce a more caramelized filling.
-Apple Crisp is best served immediately after baking. If you need to make this ahead, you may put the dish together and bake the dessert for about 30 minutes. Remove, but do not cover or topping will get soggy. Let sit on counter to cool.
Before serving, preheat oven to 425 and finish baking dessert on top third of oven for about 15-20 minutes, or until heated through and bubbly.


9/16/13

Southwest Slow Cooker Chicken


Have you heard? We're on a roll at A Bountiful Kitchen. Super simple. Quick and easy.  Last week I posted Slow Cooker Honey Sesame Chicken, and Baked Taco Rollups.  This week, Southwest Slow Cooker Chicken.
It doesn't get easier than this. This is a dump-and-cook-in-the-crockpot recipe. You can serve it over rice, on tortilla chips, on a bed of lettuce, or in a taco (soft or hard shell). We usually eat it rolled up in a soft flour tortilla, with some lettuce and tomato. This is, by far, my favorite slow cooker recipe.
I'm betting it will be yours too.


Southwest Slow Cooker Chicken
A Bountiful Kitchen
print recipe

4 frozen chicken breast halves
2-3 cups salsa (red or green) I prefer green
1- 15 oz can black beans, drained
1 small bag of frozen corn or 1-15 oz can corn, drained
salt and pepper
2 cups grated cheese (cheddar, monterey jack, pepper jack if you like it spicy)
4 oz cream cheese (regular or low fat)

Coat the inside of a slow cooker with cooking spray.
Place the chicken in the cooker, salt and pepper generously.
Pour the salsa over the chicken.
Pour the drained black beans and corn on top of the chicken and salsa.
Cover with lid and cook on low for about 3 1/2 hours.
When the chicken is done, Spread the grated cheese over the top of the mixture in the slow cooker, and then top with 4 oz of cream cheese. Cover and let cook for another 1/2 hour.
Remove lid and gently break up the chicken. Spoon the mixture over tortilla chips, shredded lettuce or  taco shells.
Serves 6-8

Tips:
-The cooking time may vary, depending on the size of your slow cooker and how hot it cooks.
-Don't worry about thawing the chicken, it will cook up just fine!

9/11/13

Baked Taco Rollups


Monday, after I posted Slow Cooker Sesame Honey Chicken on my Insta, my friend Robilyn commented  "I'll be making this tomorrow! What else can I make this week?"  Today, I dropped something off at her home, and guess what? There was a yummy smell coming from her kitchen.
The power of Insta! She had the Honey Sesame Chicken in her Slow Cooker. Love it when that happens. Also my young friend Megan made the sesame chicken and posted a pic on Insta of her dinner last night. Meg's the cutest newlywed and she's learning to cook for her new little family (Meg +Tony). So sweet.
In a world filled with fast food, and pre-made pre-packaged  everything, it's a rarity to see people (especially young peeps) cooking dinner. Here's my 2 cents:  It doesn't need to be complicated. Or take a long time. If you haven't cooked in a while (or ever), start small. Make a slow cooker meal. Or try this recipe. It's kid and hubs friendly.


I believe this recipe was originally named "Baked Tacos" and made with hard shells. Grant is a hard shell hater (already told that story here), so I changed the recipe a bit. The filling take just a few minutes to make and the rollup part takes another 5 minutes. Lay out a little taco bar with chopped lettuce, tomatoes, cheese, salsa, guac and chips.  Let your fam pile the salad or condiments onto a plate. Serve the taco rollup on the side.  It's a fun change from an ordinary taco and if you have little ones, a taco rollup is much easier to grip. Promise they'll love it.
Now you have two dinners in your repertoire!
Watch out Martha.


Baked Taco Rollups
Adapted from Mommy I'm Hungry
print recipe

2 lbs extra lean ground beef (or ground turkey)
1 medium onion diced
1 small can diced green chilies, mild
1 recipe for homemade taco seasoning (below)
1 (8 ounce) can tomato sauce
1 (16 ounce) can refried beans (regular or fat free)*
2 cups shredded Colby-jack  or cheddar cheese
flour tortillas, small to medium size

Suggested Condiments-
lettuce chopped
tomatoes chopped
olives
sour cream
Sheri's Salsa
Guacamole

Preheat the oven to 400 degrees.
In a large skillet brown meat and onion over medium-high heat. Drain off any excess liquid. Add chilies, refried beans, tomato sauce, and taco seasoning. Mix well and cook for a few minutes until bubbly. Add a little water or tomato juice if the mixture seems dry.
Spoon  about 3 tablespoons of the taco meat mixture onto a tortilla. Sprinkle with about a tablespoon of cheese. Roll up as you would a taquito, not filling the tortilla too full, but rolling fairly tight, so the tortilla will not come undone easily.  Place filled tortillas in a single layer onto a lightly greased baking sheet, seam side down. Bake at 400 degrees for about 12-15 minutes or until the cheese has melted and the tacos are heated through.
Remove from the oven and serve with optional condiments.
Makes about 12-15 medium tacos.

Taco Seasoning
1 tablespoon chili powder**
1/4 teaspoon garlic powder
1/4 teaspoon onion powder
1/4 teaspoon crushed red pepper flakes
1/4 teaspoon dried oregano
1/2 teaspoon paprika
1 1/2 teaspoons ground cumin
1 teaspoon sea salt
1 teaspoon black pepper

In a small bowl, mix all together. If making extra seasoning, store in an airtight container.
This is enough for one recipe of taco rollups above.
**less chili powder if you are serving to those who don't like spice.

Tips:
-*I used about 3/4 of a 16 oz can of refried beans. We liked the filling with less bean and more meat.
Another option is to add a can of drained pinto beans and smash them with a potato masher into the meat after the meat is cooked. Add about 1 tablespoon of canola oil while mashing beans.
-If serving to young children (who may not eat a whole taco) or using as an appetizer, cut the tacos in half, preferably on a diagonal.
-Heat up leftovers wrapped in a paper towel for about 1 minute in microwave.


9/9/13

Slow Cooker Honey Sesame Chicken


We are now two weeks into the new school year.
Adjustment time. As in- get my act together and figure out what I'm making for dinner before 6 pm.  I'm always looking for quick-fix dinner ideas. This recipe takes a little thought ahead of time, but you're set when the "What's for dinner??" question surfaces. It's simple and a complete meal when served with a dish of stir fried veggies.
The leftovers would be perfect for lunch served over some greens tossed with a little Balsamic dressing.
Lunch for Momma.
That's what I'm talking about.


Slow Cooker Sesame Chicken
Adapted from LDS Living Magazine online
print recipe

4 boneless, skinless chicken breasts, fresh or frozen*
1/2 cup honey
½ cup soy sauce
1 cup diced onion
¼ cup ketchup
2 tablespoons vegetable or canola oil
2 cloves garlic, minced
¼ teaspoon red pepper flakes (optional)
1/2 teaspoon pepper
-------------------------------------
1 heaping tablespoon cornstarch
1/3 cup water
Sesame seeds

In slow cooker, combine honey, soy sauce, onion, ketchup, oil, garlic, pepper flakes and pepper. Place chicken in cooker, turn to cover with sauce. 
Cook on low 3 to 4 hours or just until chicken is cooked through. 
Remove chicken from slow cooker, leaving sauce in ceramic insert. 
Turn heat to high on slow cooker.
Whisk cornstarch into water and pour into slow cooker. Whisk to combine with sauce. Replace lid and cook sauce on high 10 more minutes or until slightly thickened.
Shred chicken, then return to pot and toss with sauce before serving. Sprinkle with sesame seeds if desired and serve with rice.
Makes 4 to 6 servings.
Tips:
-*I usually just throw chicken into the slow cooker frozen. It cooks in 3-4 hours on low. No thawing needed!


8/29/13

Tomato, Cucumber and Cottage Cheese Salad


Don't you love it when you Pin something, and click on the photo, expecting to be taken to the link that will provide the recipe, then- nothing? Dud. A while back, I Pinned a photo of a salad that I thought looked perfect for late summer months. When I tried to see the link to the photo, it was a dead end. No recipe link. Oh well.
I looked at the photo again, and discovered this: You don't need to be Martha to figure this one out.
All you need are: tomato, cucumber, cottage cheese and about 5 minutes.
Best three ingredient salad.
Ever.


Tomato, Cucumber and Cottage Cheese Salad
A Bountiful Kitchen
print recipe

Tomatoes, any type about 2 cups
Cucumbers, about 1 large or 3-4 small
16 oz low fat cottage cheese, I prefer small curd
fresh ground pepper

Wash and cut the tomatoes. Wash the cucumbers and seed if desired. Slice the cucumbers into small pieces or if using large cukes, slice long way, into fourths, so you have four long slices, then seed. Cut the cucumber into chunks. I like to leave the skin on for color.
Using a medium size bowl, preferably clear, layer the tomatoes, cucumber and cottage cheese, as you would if making a yogurt parfait. Place in fridge until ready to serve.
Serves 6-8 as a side dish.

Tips:
-This salad can be made year 'round, but is best in the summer months when garden cucumbers and tomatoes are available. That said, it is also best made with tomatoes that are NOT juicy. I like to make it  with cherry or grape tomatoes (simple to slice them in half, or leave them whole in the salad) so there is not an issue with the tomatoes giving off too much water and making the salad runny.

8/9/13

Tessa's Mini-Melts with Poppyseed Drizzle


Almost five months have gone by since this day...


Two years is a long time! My oldest son, Stephen left home to serve an LDS mission in Puebla, Mexico on February 16, 2011 (if you've been reading ABK for a while, you'll remember this post).  He returned two years, one month and three days later. That afternoon we dashed off to the airport with ballons and signs in hand. Our immediate and extended family gathered there, along with families of other missionaries who were returning that day. So much excitement. So much joy. So glad to have him  home!
In honor of Stephen serving for two years we celebrated his return with (what else?) food. We made  lots of salads, treats and some fun little sandwiches. It was nice to have something hot with the salads that didn't require too much time in the kitchen when we wanted to enjoy spending time with our newly returned missionary. Tessa gave me this recipe after she made dinner for a large group of sorority girls at the U. She said the girls loved them, and I thought, if they're good enough for the Chi-Omega's they're good enough for us! They take just a few minutes to put together, and are perfect for parties of any sort.
Grateful to have Stephen home.
So proud of his willingness to sacrifice and share the good word of God with the sweet people of Mexico.
Two years is a long time.
Yes, it is.


Mini-Melts with Poppy Seed Drizzle
Tessa Reinemer

3 dozen soft dinner rolls 
2 pounds deli meat (or have the deli slice up the exact amount of slices you need)*
1 pound sliced deli cheese, or approx 18 slices, cut in half

Topping
2 tablespoons poppy seeds
2 tablespoons yellow mustard
1/2 cup butter
1 tablespooon minced dehydrated onion (optional)
1 teaspoon Worcestershire sauce

Slice rolls and put small amount of turkey or ham with one slice of cheese.  Place sandwiches in 2- 9x13 baking dishes or one large jelly roll pan.  
Heat ingredients for topping in a saucepan until butter is melted. Brush or spoon topping onto sandwiches right before cooking.  Cover with foil.  Bake at 350 degrees for 15 minutes or until cheese melts.
Serves about 15-20.

Tips (aka more than you ever wanted or needed to know about making baked sandwiches):
-These sandwiches may be assembled in advance.  A day before is fine, but don't brush with drizzle until right before cooking.  Store in fridge covered tightly with foil.
-*Deli meat- Slice the meat in half with a sharp knife (I cut the meat all at once). If you have 36 rolls, order 18 slices of deli meat, cut in half. 
-We used a combo of ham/swiss and turkey/havarti. Both were delicious.
-For a gathering at the school, and Anibelle's baby blessing, I used Costco large croissants and cut them in half after stuffing with meat and cheese. We used:
3 doz  large croissants
4 lbs ham or turkey
2 lbs sliced cheese
Served approx 75. 

-I use the Walmart Brand rolls, found near their deli when making these for a large (100+) crowd. I pinned the rolls here, so you can see what they look like. The rolls come 16 to a package. I like these for a crowd, because they are inexpensive and they stack well, without smashing if you need to buy a large quantity. I have also used a roll that looks similar to a Granny Sycamore cluster roll from Costco. They only sell these in the fall and winter months. This roll is much thicker than the Walmart brand roll,  and I add more meat to the sandwich when using the Granny roll, so the meat is not lost in the roll!
-Cooking for 100:
plan on about 1 1/2 rolls per person if you are serving other buffet items such as salads, appetizers, sweets.
10 packages of "The Bakery" rolls from Walmart, (Potato or Sweet Hawaiian) 16 per pkg =160 rolls
Deli meat sliced, approx 80 slices, cut in half to yield 160 slices
cheese slices, approx 80 slices, cut in half to yield 160
topping:
1 1/4 lb butter, melted (5 sticks)
8 tablespoons poppy seeds
6 tablespoons mustard
3-4 tablespoons dehydrated onion (optional)
2 tablespoons Worcestershire
Follow directions above for baking.


2/24/13

Tessa's French Peasant Bread


Guess what the weather forecast is for the weekend. If you said SNOW, you're a winner.  Heavy sigh. Last week, we went to Southern Utah for baseball.


Oh.
Sun. I remember you. Warm. Blue skies. Sunscreen. No boots.
Then Monday came, reality along with it. Back to the North.
Snowy day= The perfect time to bake bread.


If you are a lifer on A Bountiful Kitchen, you know I love my friend Tessa. And I love her cooking. Tessa brought this to a dinner party at Christmas and I fell in love.  So simple. No kneading. No mixer required. Makes two loaves. Perfect for sharing on a cold winter day.


Tessa's French Peasant Bread
Tessa Reinemer
print recipe

1 pkg dry yeast
2 cups warm water
1 tablespoon sugar
2 teaspoons salt
4 cups flour
oil
cornmeal
melted butter

Place yeast, water, sugar and salt in warm water and stir until dissolved. Add flour and stir until blended. Do not knead.
Cover and let rise for one hour or doubled in size. Flour or grease hands and remove dough from bowl and place in 2 rounds on oiled cookie sheet ( or parchment paper ) sprinkled with corn meal. Let rise and additional hour. Brush top with melted butter.
Bake at 425 degrees for 10 minutes.
Reduce oven temperature to 375 degrees and cook an additional 15 minutes.
Remove from oven and brush again with butter.
Serve warm.