Showing posts with label giveaway. Show all posts

8/7/15

Fresh Blueberry and Greek Yogurt Muffins


To celebrate the 7 year Blogiversary of A Bountiful Kitchen, I gave away 2 gift cards to William Sonoma on my Instagram page this week! The winners are:

@Sundanceshan (Shannon Holley) and her friend @laurie_03g whom she tagged! 
Please email me at : Fostersi at msn dot com to claim your  Williams Sonoma giftcards. 
You have 24 hours to claim the prize. Thanks to everyone who entered! 


I was having a discussion with my food-loving blogging daughters, Corrine and Brookie last week about good muffins and how difficult  it is to find a place that makes good muffins.  You know, not muffins from a mix, purchased from a food supplier.  We are talking home made muffins. The thought of purchasing one of those muffins from a mix makes me want to open my own little place! Here's my daydream... Open a place in Bountiful. Breakfast and lunch. No set menu. Biscuits, muffins,  home made lemon ricotta pancakes. Breakfast casseroles. A salad of the day. Soup of the day. Cookies, brownies, cake, pie.  Maybe a sandwich or two. Doesn't that sound dreamy?! Fountain Diet Coke with lots of fresh lemon and lime and PELLET ICE.  I would do almost anything for unlimited pellet ice.

The only problem- I don't want to be married to a business. So I'll just keep blogging in my Bountiful Kitchen.  And dreaming of my little shop. :)

Here's my latest creation, inspired by a few recipes I found on Pinterest! If you're looking for recipe inspiration, Pinterest is a great place to formulate meal plans, plan showers, luncheons, even Sunday dinner. I changed the recipes I found to cut the butter out ( my attempt at healthier eating).

I've found the butter won't be missed in most muffin recipes and the texture is hardly changed. I love the faint coconut scent when using coconut oil! Fresh blueberries are found everywhere right now, but frozen can be used in this recipe as well.
Hope you're enjoying the last few weeks of summer!


Fresh Blueberry and Greek Yogurt Muffins
A Bountiful Kitchen

3 tablespoons coconut oil
3 tablespoons canola or vegetable oil
1 cup sugar
2 eggs
8 oz Greek yogurt, plain or vanilla flavored ( I prefer plain) or you may use traditional yogurt
2 1/2 cups flour
1 teaspoon baking powder
1 teaspoon baking soda
1/2 teaspoon salt
2 cups fresh or frozen blueberries or other berries

Pre heat oven to 375 degrees and place rack in center of oven.
Generously grease a 12 cup muffin tin, or use cupcake liners.
In bowl of a mixer, place oils and sugar. Mix for about 1 minute until sugar and fats are incorporated. Don't worry if the coconut oil is still visible in small pieces, it will melt when cooked.
Add eggs, beat for another minute or until incorporated. Mix in the yogurt until blended well.
Add the flour, baking powder, baking soda and salt all at once. Mix just until flour disappears, about 15-30 seconds on low.
Fold in the berries using a large spoon or spatula.
Using a scoop, evenly distribute the batter into muffin cups. When scooping, generously scoop the batter. The scoop swill be heaping.
Place in oven, bake at 375 for about 20-23 minutes or until a toothpick inserted in center comes out clean. Let sit on counter and cool for about 10 minutes, then remove from pan. Freeze any leftovers for a quick breakfast on a busy morning!

Tips:
-Do not be alarmed, the batter is very thick, similar to cookie dough batter.
-Do not over mix the batter and especially make sure to FOLD in the fruit so it will not get crushed before baking.
-Use fresh fruit such as blueberries, blackberries, marionberries etc. If you are using frozen fruit, do not thaw before baking. Take from freezer measure and fold into batter.


12/5/14

Snake River Farms Kurobuta Ham with Grilled Pineapple and Pomegranate Pineapple Glaze and Giveaway Winner!


Now that Thanksgiving is in the rear view mirror, and Christmas is just around the corner, the big question is- What to serve for Christmas dinner? I'm all about planning our Thanksgiving menu for weeks ahead, and spending hours in the kitchen preparing Thanksgiving dinner. But Christmas is a little different for me. Years ago, I gave up spending Christmas in the kitchen.  It's more of a stay in my jammies,  eat breakfast casserole, and enjoy the family type of day. I usually serve either ham or beef on Christmas day. Both are relatively simple to place in a pan and roast, leaving precious time to make a couple of simple side dishes (which I usually prepare a day or two ahead).  Those dishes can just be heated or pulled out of the fridge and served.


This year, I'm serving a Snake River Farms Kurobuta Ham. Snake River Farms is a family owned business that was founded in 1968. They are located in Boise, Idaho and are a business dedicated to producing the highest quality beef and pork in the USA. Snake River Farms are involved in every step of the beef life cycle including ranching, feeding, animal nutrition, processing meat, marketing and sales.


How much of a difference can there be in meat, you say? And particularly in ham?   I've cooked everything from grocery brand hams, to ham from specialty stores and mail order businesses, to spiral sliced hams sold in national chains. The Kurobuta hams from Snake River Farms come from 100% purebred Berkshire hogs grown in a network of small family farms using a slow fed process.  This is hands down the best ham I've ever eaten.
Ever.
In my life.
It has the perfect blend of salt, sweet and smokey flavors.  The Kurobuta ham is "...considered to be equivalent in status to Kobe beef." It's so tender, a butter knife is all you need at your place setting. I love it served with a bit of grilled fresh pineapple and some Pomegranate Pineapple Glaze. This dish takes about 10 minutes to prepare (the glaze).  Place it in the oven and you're free to watch another round of It's a Wonderful Life!


Want one for your holiday table? I've got an exclusive offer on a free ham for you and your holiday guests from Snake River Farms, enter below. Trust me. You want this ham on your table!
If you don't happen to win the ham the awesome folks at Snake River Farms are also offering a coupon code for free shipping, just use the code BOUNTIFUL when checking out. Make sure to order early so your ham will have time to ship and thaw.
Good luck!


Baked Ham with Grilled Pineapple and Pomegranate Pineapple Glaze
A Bountiful Kitchen
print recipe

** Snake River Farms Kurobuta hams are shipped frozen, make sure to allow enough time for  shipping and for ham to properly thaw in refrigerator before roasting- about 4-5 days. All Snake River Farms hams are fully cooked, but SRF recommends cooking in 325 degree oven, 20 minutes per pound allowing internal temperature to reach 140 degrees.

1 - Bone in Kurobuta Ham, 12-15 lbs*
1 Fresh Pineapple

glaze:
1 1/2 cups pomegranate juice (sold in refrigerated section of grocery)*
8 oz can crushed pineapple, not drained, or 8 oz fresh chopped pineapple
3/4 cup brown sugar
1 tablespoon soy sauce
1 tablespoon prepared yellow mustard
1 tablespoon Worcestershire sauce

1/4 cup cold water
2 teaspoons cornstarch

Ham and oven prep:
About an hour before cooking, remove ham from refrigerator. Unwrap and place on roasting rack or place in roasting pan or pan that will hold the meat and catch the juices, fat side up.
Place rack on lower third of oven, remove any racks above that will interfere with cooking of ham.
For sauce:
In a small saucepan whisk together juice, crushed pineapple, brown sugar, soy sauce, mustard and Worcestershire sauce. Cook over medium high heat for about 5 minutes.
Whisk together 1/4 cup cold water and 2 teaspoons cornstarch in a measuring cup until smooth.
Slowly add the cornstarch mixture to the juice mixture in the pan, leaving the pan on heat. Reduce the heat to medium and continue to cook and whisk until slightly thickened. This will take about a minute. Cook for about 2 minutes and reduce heat again to low. When sauce is thickened a bit, turn heat off and leave on stove.
Place ham in oven for about 1 hour, uncovered.
After one hour,  slide rack out of oven, and pour about 3/4 cup of glaze over ham, making sure to cover all surfaces facing upward. Use a brush if needed. Slide the ham back in the oven, continue to cook until internal temperature reaches 140 degrees.
Remove from oven. Place a little more glaze on the ham if desired. Serve the remaining glaze with the ham on the side.

For grilled pineapple:
Lay pineapple on side, cut off top and end. Slice the remaining pineapple into 1/4 to 1/2 inch slices.
Brush pineapple lightly with olive oil or canola oil. Grill over medium high heat on bbq grill until lightly golden, or broil on cookie sheet in oven for about 2-3 minutes or slightly softened.

Tips:
-Allow several days for ham to thaw in refrigerator.
-Use a meat thermometer to gauge the internal temperature of ham. I like the oxo instant read thermometer, or a good old fashioned meat thermometer from the grocery store will work as well.
-If you purchase a 14 lb ham, you will need to allow 4-4 1/2 hours for warming in oven. Also allow about 10-15 minutes before carving ham after removing from oven.
- If you are not using an instant read thermometer, make sure your thermometer is facing the oven door, so you can peek at it occasionally and see the internal temp of the ham. You don't want to have to open the oven every time you take a peek at the meat!
-If your ham looks like it is drying out, cover loosely with foil and continue warming.
-If you like to serve lots of sauce with your ham, double the sauce recipe.
-*you may use a boneless ham as well, the cooking/warming time will need to be reduced most likely. Follow package instructions.
-**You may also substitute cherry or orange juice for the pomegranate juice.


Congratulations to R. Labrum, you have won a Snake River Farms Kurobuta Ham! Please email me at Fostersi at msn dot com to claim your prize.


11/12/14

Savory Yams with Bacon, Cream and Fresh Thyme and Harmons Giftcard Giveaway Winner!

photo credit Becky, Vintage Mixer


A few weeks ago the Harmons bloggers gathered and had a little pre-Thanksgiving meal. It was an afternoon of  photo taking, discussing our favorite holiday dishes, and of course, feasting on good food. We all went away stuffed and excited to share new recipes with our readers!


Savory Yams with Bacon, Cream and Fresh Thyme


photo credit, Caroline Drake, Armelle Blog
We partnered with Harmons to offer five, yes, five $100 gift cards just in time for holiday grocery shopping! Harmons provided the gift cards, and we've provided recipes to make this your best holiday season, ever.


photo credit- Becky at Vintage Mixer

For our Harmons gathering, I made Slow Cooker Mashed Potatoes and Savory Yams with Bacon, Cream and Fresh Thyme (recipe below).
You'll want to follow each of the Harmons bloggers for multiple doses of amazing cooking and general family/lifestyle ideas each day! The other dishes that rounded out our meal and links to recipes are listed below. Don't forget to scroll to the bottom of this post for multiple chances to win a $100 giftcard!


Fresh Cranberry Orange Relish from Becky at Vintage Mixer
love, love, loved both of these recipes. 
photo credit Becky, Vintage Mixer


photo credit Caroline Drake, Armelle Blog


Chocolate Mousse Pie from Caroline at Armelle Blog
made with an olive oil crust. On my list of pies to make this month.

photo credit, Caroline Drake


Sesame Green Beans with Bacon and Chestnuts 
from Rachael at LaFujimama
pretty sure this will be on my holiday table!


Sausage Herb Stuffing from Jesseca at One Sweet Appetite
can't wait to try this, stuffing is my favorite. 


photo credit Caroline Drake, Armelle Blog

Last, but not least is my recipe for Savory Yams with Bacon, Cream and Fresh Thyme.  This recipe is rich, without being over the top. So often yams are used in a sweet dish at holiday time. I thought creating a dish that used savory flavors would be perfect for our holiday gatherings. I've made it three times in the past three weeks, and it's been a hit every time.
Fifteen more days til Thanksgiving!
Can't wait.


Savory Yams with Bacon, Cream and Fresh Thyme
A Bountiful Kitchen
print recipe


5-6 medium size yams or sweet potatoes (about 8-10 cups total)
1/2 lb bacon
1 tablespoon olive oil
1 small onion, chopped (about 1 cup)
1 cup heavy cream
fresh thyme, about 4 tablespoons stripped from stems, plus a few sprigs for garnish after cooking
salt and pepper

Wash yams, place in large pot. Cover with cold water. Bring water to boil and cook for about 30 minutes, or until barely fork tender.
Meanwhile, chop bacon and cook until crisp, drain grease and set aside.
Wipe out pan used to cook bacon, add 1 tablespoon of olive oil and cook until soft and slightly golden.
Remove yams from boiling water. Drain and set  yams on counter and let cool a bit. Peel and slice or cut into small chunks.
Place cut up yams in a greased 9 x 13 or similar size baking pan. Sprinkle with fresh thyme.
Drizzle fresh cream onto yams. Sprinkle with cooked onions and bacon.
Cover and bake for about 30 minutes at 350 degrees, or place in refrigerator until ready to bake.
May be made up to 3 days in advance. Let sit on counter when removing from refrigerator for about an hour before baking.
Garnish with additional fresh thyme before serving.


Click to Copy Embed Code

8/29/14

Winner for Harmons Gift Card!

The Random Generator selected entry #230, Alicia Cravens for the Harmons $100 Gift Card. Congratulations Alicia! I will email you and send the card out today.
Thanks to everyone who entered, and a special thanks to Harmons, who provided the card for this giveaway!

8/25/14

Harmons Grocery $100 Giftcard Giveaway!


Hey there. Want to win a $100 gift card to everyone's favorite grocery store?
You can spend it however your heart desires...


Take a cooking class at one of their classroom locations. The card will cover a class for you AND a friend.
Or use it to book a special party! Woot!


Use the card to buy gear to rep your favorite team. Harmons has sweatshirt, t-shirts, decals, lanyards, cups, hats, insulated bags, chairs, tables and lots, lots more.
GO UTES!
Oh, they have BYU stuff too.

I LOVE this little fold up table.
And that little people UTE chair. So cute.


Harmons has gifts for your family and friends.
And stuff for you, too.


Quality appliances. 


Fun dishes, items for baking, picnics, specialty cooking, and locally made gifts. 
Everything from aprons to hand made soaps.


Have you spent your gift card yet? 


Maybe you just want to spend it on GROCERIES. You're in luck. You've come to the right place.


Here's the deal. One winner, announced on Friday. Enter below.
Thanks to Harmons who sponsored this giveaway.
Good Luck!


a Rafflecopter giveaway

8/31/13

pinterest 101: how to get set up and get the most out of pinning


Remember last week, when I talked to you about the giveaway we're having at ABK to celebrate our 5 year blogiversary?? You don't remember?? Here's the post. Take a look.
Ok, so the deal is, you have to have a Pinterest account to enter the giveaway, which you won't want to miss. One word.
BLENDTEC. 
The giveaway starts Tuesday. As in September 3, 2013.
If you aren't yet acquainted with Pinterest, I've asked my daughter Corrine, who is a professional Pinner :)  to give you step by step instructions!  She has her own blog Mint Arrow, where she posts awesome deals on quality products every day. Check out Mint Arrow here.
No recipe today. Just a Pinterest tutorial.
Hope you all have a wonderful Labor Day weekend!
See you Tuesday,
Si


three years ago when i was planning my wedding, i found myself running into the most annoying problem over and over. every time i found a beautiful picture of a floral arrangement, a cake topper, or a bridesmaid dress online, i would right click the image, save it to my desktop, and then move it into a wedding folder. well that's great except a) it was taking up a lot of needed space on my hard drive and b) the bigger problem: when i wanted to go back and look at the whole entire blog post, i had absolutely no clue where it originated.


enter pinterest.

pinterest opened up a whole new world for me. not only could i instantaneously go right back to the original source of any blog photo, i could organize all sorts of information into virtual pin boards. it was literally like being able to rip out a page in a bridal magazine and pin it up on a wall. except it was like i could search thousands of bridal magazines at once! i was hooked. three years later, i have over 6.6k pins and i actually get paid to manage the pinterest accounts for two well-known companies.

today i am going to show you how to get started with a pinterest account, and then i'm going to share some of my tips and secrets to making your pinterest experience as productive, enjoyable and amazing as possible!

first of all, pinterest allows you to sign up with an email address or a facebook account. don't worry - we can be sure that the things you pin don't show up in your facebook friends' news feeds!


if you have a facebook account, sign up through that so you can automatically find all of your facebook friends' pinterest accounts. you can choose to automatically follow all of them, or manually chose those whom you'd like to follow. i highly recommend manually choosing, and here's why: you probably have facebook friends from all walks of life, but that doesn't mean you have lots in common with all your facebook friends!

i manually chose friends whose tastes i like or admire, people who i felt like cooked well, had good style, cute homes, and overall similar likes to mine.

when pinterest asks you this question below, say yes! the more you can do to cater your pinterest experience to your likes, the better.


once you are following a few friends or, if you set up your account with email, once you've picked a few suggested boards to follow (they will prompt you through this), you can start re-pinning things!

every time you log into pinterest, you will see new images your friends have been pinning. if you see a pin you like, you can hover over that photo and click the "pin it" button so you can go back to that pin anytime.


for many people, this next tip is where many people miss the best part of pinterest! if you're reading one of your favorite blogs (like a bountiful kitchen!) or you see an online article you find interesting, instead of thinking, "oh i better print this recipe right away" or, "i hope i remember where i saw that," you can just pin it! it's literally as if you ripped out a page in a magazine and push-pinned it to a cork board in your kitchen. except you'll never lose it.

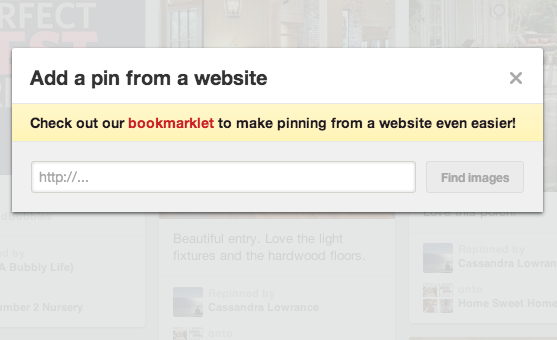
the pin it button can easily be added to your internet browser if you just click on the plus sign in the right hand corner on pinterest. this will come up:


you can click on the "bookmarklet" link to add the "pin it" button to your bookmarks! then you can click that anytime you're on a blog or webpage where you want to pin something.

those are just some of the beginning basic steps to get you started. if you need more help, you can check out pinterest's help center where they have even more thorough tutorials about the basics of pinterest.

now here are some of my favorite tips that will make your pinterest experience more enjoyable:

how to be sure you don't blow up your friends' facebook feeds with your pins:
go to the right hand side of pinterest, click on your name and select "settings."


from here you can scroll down and under "social networks" make sure that you select "no" to posting activity on your timeline.

under settings you can also decide how often you want emails from pinterest. i prefer getting one email per day, notifying me of how many people have re-pinned my pins, followed me, comments on my pins, etc. 

how to name and organize your boards: 
when you first start out with pinterest, don't worry about thinking of every board you might need. just start out with 3-5 basic boards (recipes, DIY, fashion, home and kids are a few examples) and then as you see pins that you like but don't fit into these categories (like health or travel), you can create a board that fits that pin and start pinning other pins to that board.

organizing your boards is helpful eventually. the two most popular styles i've seen are alphabetical or categorical. it's nice to have a rhyme and reason to your boards so that when you're looking for something, it's easy to find. this is as easy as dragging and dropping them into whatever order you prefer.

find other awesome pinners:
it's not weird or creepy to follow people you don't know on pinterest. it's actually really smart and totally normal. if you see a friend has re-pinned something you love, or a few things you love, see who your friend re-pinned that pin from, and follow them! 


if you love a company or a brand, like martha stewart, follow them on pinterest! chances are they will pin stuff you love.

unfollow people who aren't awesome pinners:
they'll never know you unfollowed them, but if someone is pinning stuff that isn't interesting to you, and especially if it's offensive, don't hesitate to unfollow them. you can even unfollow just one of their boards you're uninterested in. i can't tell you how many times i've unfollowed someone because i'm not that interested in seeing a billion pins about something they love and i don't.

use your mobile app:
if you have a smart phone or a tablet (like an iPad or a kindle fire), pin on those bad boys! i love love love pinning on my iPhone. as soon as i discovered i could pin from anywhere, i found myself on pinterest at every doctor's office or pedicure appointment browsing pins instead of magazines. 

USE your pins:
if you've spent time pinning yummy recipes or DIY projects or ideas on how to decorate your house, use them! i love getting on my "foodie" board to find a recipe for a party, or looking at my "interiors" board to see the gallery walls i've pinned to get a guide on how to hang pictures in my home. i look at outfits i've pinned on my "style" board if i'm trying to figure out what to wear. i love that pinterest allows you to search your own pins now too, so if you can't remember where you pinned something like "how to get sharpie stains out of carpet," you can search key words like "sharpie" to pull up that specific pin.

nobody's real-life looks like their pinterest account:
my biggest tip with pinterest is to have fun and not get overwhelmed. it's easy to see all the amazing things your friends are pinning and think, "is she gonna buy that outfit," or "is she really gonna make all that for dinner tonight," or "are you kidding me, the elf on the shelf has his own wardrobe this year?!" 


don't take it too seriously or get too overwhelmed. it should be fun and inspiring and helpful, not daunting. one of my favorite boards is my inspire board. i look at this when i need a pick-me-up on a bad day.

i hope this helps everyone love pinterest like i do! if you have any questions, please feel free to leave them in the comments below and i'll do my best to reply and try to help.

happy pinning!

xo,
c

8/26/13

Banana Chocolate Chip Layer Cake


Don't you love a good celebration? I baked up this cake to celebrate ABK's five year bloggeversary! Whoot. Not really.
I mean, I did bake this cake, but not for the bloggeversary. Just Sunday dinner. Since we all were busy running around, cramming in every possible end-of-summer activity in August, I thought celebrating A Bountiful Kitchen's five year mark should wait until after Labor Day.
You won't want to miss it.
Next week.
Giveaway.
It involves a blender.
The. Very. Best. Blender.
You have to have a Pinterest account to enter the giveaway. We're having a little tutorial at the end of the week for those of you who haven't jumped on the Pinterest bandwagon. My oldest daughter, Corrine, who has her own blog  Mint Arrow  (finding the best deal on quality items, never paying full price-click on the link and check it out) is going to guest post on ABK and help you, if you are not yet  Pinterest addicted savvy.
Oh, and if you have bananas sitting on your counter attracting fruit flies, mash them up (the bananas, not the fruit flies) and make this cake. It takes one bowl and about 5 minutes to mix up.
It is divine.


Banana Chocolate Chip Layer Cake 
A Bountiful Kitchen
print recipe

1 1/2 cups granulated sugar
3-4 medium bananas (equaling about 1 1/2 cups mashed bananas)
1/2 cup butter, room temperature
1/2 cup vegetable or canola oil
3/4 cup buttermilk
3 large eggs
1 teaspoon baking powder
1 teaspoon baking soda
1 teaspoon salt
2 1/3 cups flour
1 cup semi sweet chocolate chips

Chocolate Buttercream Frosting
3 cups powdered sugar
1/2 cup unsweetened cocoa powder
1/2 cup butter, room temperature
1 teaspoon vanilla
2 tablespoons milk, half and half or cream

Pre heat oven to 350 degrees. Grease and line (with parchment paper) two-9 inch round cake pans.
Place sugar, bananas, soft butter, oil, buttermilk and eggs in large bowl or stand mixer. Mix for about 2 minutes, until all ingredients are mixed well. Add all of the dry ingredients, except the chocolate chips and mix for an additional one to two minutes on high speed. Fold in chocolate chips. Spread the batter evenly into the two prepared pans.
Bake on middle rack of oven for about 40 minutes, or toothpick inserted in center comes out with a few moist crumbs attached.
Let cake cool, then frost with buttercream frosting.

Frosting:
Cream butter with all dry ingredients. Add vanilla, and milk a little at a time until desired consistency.
Place one of the cakes on platter, frost with 1/3 of frosting. Place second layer on top, frost top and sides of cake with remaining frosting. Top with chopped nuts, if desired.

Tips:
-This cake can also be baked in a 9x13 pan. Bake for additional 5-10 minutes, to insure middle of cake is cooked completely.

8/24/12

Triple Chocolate Ice Cream Cake


I still remember the first time I ate an ice cream cake. I was 16 and it came from Baskin and Robbins in my (then) little hometown of Bremerton, WA. My friend Lance worked at B&R on Wheaton Way.  I loved going in and chatting with him and eating a scoop of Fudge Brownie (dark chocolate with brownie chunks) on a sugar cone. One day, I had a slice of an ice cream cake.
Oh.
My.
Finding two of my favorite treats in one dessert- cake and  ice cream, topped with frosting, this was love.
Several years later, when I had kids, I started making ice cream cakes for them. It was way less expensive than buying a birthday cake and always tasted better. Ice cream cake was (and continues to be) a big hit with kids and adults alike. It's simple and one of those treats you'll get requests for over and over again.
This is my new favorite cake recipe to use when making an ice cream cake. So simple to make, you only need one bowl. It's adapted from a Martha Stewart recipe found here.  I modified it to bake up at our mountain altitude, and added sour cream for an extra moist cake.  Love the texture. It's dense enough to support the ice cream and frosting, and still fairly light, like a cake should be. I used Tillamook's "Udderly Chocolate" ice cream for the filling. YUM.

Are you still reading? Do you want to know who the winner is for our "blogiversary" giveaway? Me too. Okay, here goes.

Winner of 10 gift certificates for Tillamook yogurt; 3 gift certificates for Tillamook ice cream; the Tillamook Cheese Cookbook; and the Vintage Cakes Cookbook by Julie Richardson is...

Comment #9, Mandy B who said:
"My favorite cake is my mom's birthday cake - white or yellow cake with her special birthday cake frosting!"


Thanks everyone for playing and for all of your kind comments about this blog and sharing your fave cakes.  Now here's the recipe. Give it a try, let me know what you think...


Step-by-step assembly for your viewing pleasure :)


After you have made and completely cooled the cake, place it on a plate, or  a 10 inch cake pan lined with wax paper. Scoop the ice cream onto the cake. I use a large spoon, because I don't want the ice cream to come out in large rounded scoops. Start covering the first layer with ice cream.


FYI- this is Tillamook's "Udderly Chocolate" a mixture of milk chocolate, white chocolate and chocolate flakes.  Cover the entire top of the first layer with ice cream.


After you have covered the first layer with ice cream, top it with the second cake layer. Place another piece of parchment or wax paper on top of the cakes and press down to bring the sides of the cake together.


Finished product:
Wowie.


Triple Chocolate Ice Cream Cake
A Bountiful Kitchen
print recipe


3/4 cups unsweetened cocoa powder, plus more for pans
1 3/4 cups all-purpose flour
1 1/2 cups sugar
1 1/2 teaspoons baking soda
3/4 teaspoons baking powder
3/4 teaspoons salt
2 large eggs
1/2 cups buttermilk
1/2 cup warm water
1/2 cup sour cream
3 tablespoons canola or vegetable oil
1 teaspoon vanilla extract
Ice cream, 1.75 quart container of chocolate (I used Tillamook)
Chocolate Frosting (recipe follows)

Place rack in center of oven and heat oven to 350 degrees. Butter 2-9 inch round cake pans, and line bottoms with parchment; butter parchment, and dust with cocoa.
Into the bowl of an electric mixer fitted with the paddle attachment, sift cocoa, flour, sugar, baking soda, baking powder, and salt. With the mixer on medium speed, stir in eggs, buttermilk, warm water, sour cream, oil, and vanilla until smooth, about 3 minutes.
Divide batter among prepared pans. Bake until tester inserted in center comes out clean, 25 to 30 minutes.
Let cakes cool in pans on a wire rack for 10 minutes, remove from pans and cool completely. I place the layers on a cooling rack in the fridge to cool them quickly.


Chocolate Frosting:
1/2 cup butter, softened
4 cups powdered sugar
1/2 cup cocoa powder
3-4 tablespoons milk or cream
1 teaspoon vanilla
dash of salt

Cream butter, powdered sugar and cocoa in a large bowl. Mix in milk and vanilla, add salt. Beat until smooth add a little more milk if needed.


Assembly, three basic steps:

1. When cakes are cooled completely, place one of the cakes on a sheet of parchment paper or wax paper. I like to place the cake in a 10 inch Spring form pan or 10 inch cake pan, but a plate will work as well. Scoop the ice cream onto the cake. I use about 3/4 of the container. Try to make an even layer of the ice cream, then place the second layer of cake on top of the ice cream. Using another piece of parchment or wax paper, Press down on the top layer of cake. Don't worry the cake will not be ruined, press down evenly, so the ice cream will be compacted and the layers meet up more closely on the sides. Don't cry if part of the cake sticks to the paper, just scrape it off an eat it as an appetizer.
* see additional note below about pressing down on cake.

2. Place the cake in the freezer for at least two hours.

3. When ice cream cake has been frozen for at least two hours, remove from freezer and place on serving plate. Frost top and sides of cake. Place back in freezer and let sit for at least another hour.
If preparing ahead and cake is frozen for several hours, remove about 30 minutes before serving to allow for easier cutting.

Tips:
-Don't let the length of this recipe intimidate you. It's basically cake, ice cream and frosting. Best to start this recipe the day before serving. You can make the cakes, and place in the freezer or fridge for easy handling. Make sure to freeze on a  flat surface.
-I have used lots of different recipes over the years. Boxed, home made, they all work well with ice cream cakes. But home made is always best :)
-You may use any flavor of ice cream. I thought when I picked up this flavor it was plain chocolate. While I loved the flavor and taste of "Udderly Chocolate", I prefer a solid color for the ice cream layer. I just like the way it looks as opposed to the mixed brown and white of this particular carton of ice cream.
-*Pressing down on the second layer of cake: This step is important if you want to be able to frost the sides of the cake and avoid huge gaps between the cakes. Press down evenly. It may be helpful to press down using a cookie sheet to get an even surface.
-This cake keeps well in the freezer for about 2 weeks if covered tightly with plastic wrap.