Showing posts with label bread. Show all posts

11/10/15

Big Fluffy Pan Dinner Rolls


Remember those rolls they used to make in the cafeteria at lunch? Yes, once upon a time cafeterias in schools were used for cooking, not just heating up.  The rolls were always served with the  special Thanksgiving lunch, my favorite school lunch of the year! I loved those big fluffy white rolls... If you don't know what I'm talking about your mom does. 
Today, I'm sharing a recipe from the bakers at King Arthur Flour for Big Fluffy Pan Dinner Rolls. 


I tried this roll recipe out with Sunday dinner recently. Although there were only 5 of us at the dinner, every single roll disappeared (I halved the batch). That's a good roll! 
Perfect for  your Thanksgiving or Christmas feast of 5 or 50. They are also perfect for make ahead (see directions in recipe). Trust my on this recipe. The people at KA Flour will not steer you wrong. And neither will I :)
Make sure to follow along on Instagram  for tips and ideas for your holiday meals! 


  • Big Fluffy Pan Dinner Rolls
  • adapted from King Arthur Flour

  • 1/2 cup lukewarm water
  • 2 cups warm milk ( 100 - 110°F)
  • 3 tablespoons butter
  • 2 tablespoons sugar
  • 1 tablespoon salt
  • 2 1/2 tablespoons yeast, instant preferred
  • 6 to 7 cups King Arthur Unbleached All-Purpose Flour

Directions

  1. Combine the water, milk, butter, sugar, salt and yeast in a large bowl, or the bowl of your stand mixer. Stir well and let sit for 6 to 8 minutes, or until you see the yeast begin to foam.
  2. Add 5 cups of flour and mix by hand or with the paddle attachment until the dough forms a rough, shaggy mass. The dough will not form a ball at this point, but will be just shy of coming together.
  3. Add flour, 1/2 cup at a time and blend with the dough hook until a smooth ball begins to form. Knead by hand for about 10 minutes, or by machine for 4 to 5 minutes until a soft, smooth ball of dough is formed. The dough should feel elastic and slightly tacky to the touch.
  4. Lightly spray your work bowl with cooking spray and place the dough in the bowl. Spritz the top of the dough with spray as well and cover lightly with plastic wrap or a shower cap. Let rise for 20-30 minutes at room temperature or until the dough is full and puffy.
  5. Gently deflate the dough and pat or roll out to a rough rectangle about 8 inches by 12 inches. Cut the dough into 4 long strips, then cut each strip into 6 portions for a total of 24 dough balls. Shape into round balls as you would shape meatballs, using your cupped hands to roll the dough. Spritz your hands with cooking spray to prevent sticking.
  6. You can place the rolls into any of the following pans, well greased or lined with parchment paper: One half-sheet baking pan or 2 quarter-sheet pans. Two 13" x 9" x 2" pans. Four 8" or 9" round baking pans OR a combination of any of these pans.
  7. After the rolls are in the pans, cover again with a clean dish towel and let rise at room temperature for another 30 minutes, or until well rounded and full looking. If you are baking now, preheat the oven to 375°F and place rack in center of oven. Make sure the oven is completely preheated before placing the rolls in the oven. 
  8. Bake the rolls for 15-18 minutes or until golden brown. You can brush the baked rolls with melted butter if desired. Serve warm, store leftovers in a plastic bag for up to 3 days.
  9. If you want to freeze the unbaked buns, place in the pans as described in step 6 and allow to rise for 10 minutes. Wrap airtight and freeze for up to 4 weeks. To bake, thaw overnight in the fridge, then unwrap and bake as directed.


7/11/15

World's Best Cinnamon Rolls


I have a serious weakness for cinnamon rolls.  A few of my favorite cinnamon roll recipes are Mel's Kitchen Cinnamon Rolls,  Cutler's Cinnamon Rolls,  and Pioneer Woman's Cinnamon Roll .  When I saw this recipe on Pinterest for the World's Best Cinnamon Rolls I knew it was a must-try recipe.


I Pinned this recipe while drooling over pages of cinnamon roll photos on Instagram one evening. The author of this recipe is Carrian, from Oh, Sweet Basil. Carrian worked on this recipe for SIX YEARS before posting it on her blog. Wow. That's a serious obsession with perfecting the cinnamon roll! I met Carrian a few years ago, and watched her teach a cooking class. She is a darling young mom who loves to cook and workout. Good combo. I just love to cook.
If you're looking for a quick recipe, this is not going to be a good fit. But if you've got several hours at home, and have time to tend a batch of rolls (while doing laundry, cleaning bathrooms, etc), this recipe will not let you down! It is one of the best recipes I have tried.
Maybe even the World's Best  :)


World's Best Cinnamon Rolls
adapted slightly from Oh, Sweet Basil
Prep time: 4 hours
Cook time: 20 mins
Serves: 20-24

Dough:
1 cup warm water
½ cup heavy cream *may substitute whole milk*
4½ teaspoons instant yeast
1 cup plus 2 teaspoons sugar, divided
½ cup buttermilk, at room temperature
2 teaspoons fine grain sea salt salt
2 large eggs, lightly whisked
⅓ cup canola oil
⅓ cup melted butter
7-8 cups all purpose flour
2 dime sized circles (NO MORE) Soy Lecithin
Filling:
12 tablespoons softened butter, unsalted
2 cups plus 2 tablespoons packed light brown sugar
½ cup white sugar
5 tablespoons cinnamon
4 tablespoons cornstarch
Frosting:
4 oz. cream cheese, at room temperature
4 tablespoons softened butter, unsalted
1½ teaspoon vanilla extract
1½ tablespoon corn syrup (light Karo syrup)
2- 2½ cups powdered sugar

In a glass measuring cup, add the water and cream. Heat in the microwave until warm, about 30 seconds to 1 minute. Make sure it's warm and not hot. Add the yeast and 2 teaspoons of sugar. Allow to foam for 5-10 minutes. In another measuring cup, add the buttermilk and warm as well. Making sure it's lukewarm, add it to the yeast mixture.
In another measuring cup, add the remaining sugar, salt, oil, butter and eggs, whisking to combine. Add to the yeast mixture in a standing mixer. Stir with a dough hook to combine. Add the flour over the top and the soy lecithin. Mix until the dough begins to form a ball then mix for 3 minutes, adding an additional ¼ cup flour if you were too light handed with the first measurement and it needs more. I never do, but everyone measures differently. Remove the dough hook and place a towel over the bowl to rise for 1-2 hours in a warm spot.
Very lightly flour the counter and roll the dough into a large, even rectangle. Spread the soft butter all the way to the edges.
In a small bowl, mix the brown sugar, sugar and cinnamon with the corn starch. Sprinkle liberally over the butter, all the way to the edges. Roll into a tight log and using floss, slice the rolls by sliding it under the dough, bring it up and make an "x", pull it tight to cut through and set it in the lightly greased cookie sheet.
Repeat until all of the rolls are in the pan and then drape with a towel to rise for 1-2 hours.
Heat the oven to 350 degrees and bake for 20-22 minutes, watching the tops because as soon as they are golden the rolls are done and you DO NOT want to over bake. Remove from the oven, cool for 2 minutes and top with frosting while hot. Sneak into another room to enjoy one all alone before the husband and kids find you.
Frosting:
Whip the cream cheese and butter together until softened. Add the corn syrup (Karo syrup) and vanilla . Slowly beat in the powdered sugar until desired consistency.


6/30/15

Cheese and Garlic Twisted Breadsticks


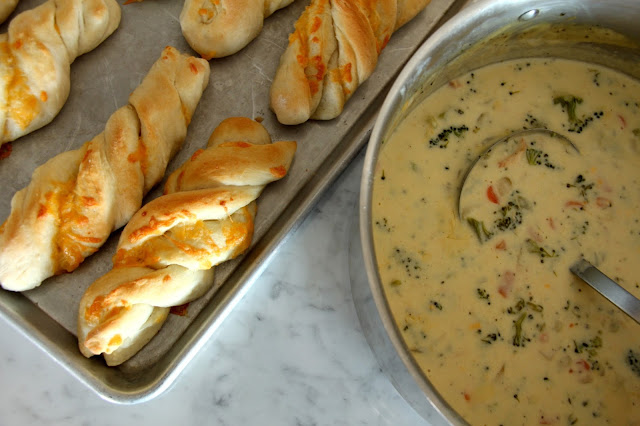
I've been making these Quick Cheese and Garlic Twisted Breadsticks for years. They take less than an hour start to finish and paired with a salad or soup make a meal complete! They are simple enough to make with your kids this summer, they'll love to cut the dough into strips, sprinkle with cheese and then twist.
I love them paired with these main dish salads:


Panera's Strawberry Poppy Seed and Chicken Salad Copycat recipe

BLT Pasta Salad with Buttermilk Ranch Dressing


Here's a little step by step to help you out:


Roll out on a floured surface. Doesn't need to be a perfect rectangle...

Spread with butter and garlic mixture (optional).
I skip this step if I'm in a hurry, sprinkle with cheese, cut into strips. 
Fold the strips back to meet the top of the dough. 


Gently twist one end of the dough.
It's okay if the cheese spills out the side of the breadstick!


Place the breadstick on the greased baking sheet.
Brush with egg and sprinkle with poppy or sesame seeds.
Or skip this step if you're in a hurry.


Shown with Panera Copycat Broccoli Cheddar Soup Recipe


Cheese and Garlic Twisted Breadsticks
A Bountiful Kitchen

1 1/2 cups warm water
1 package active dry yeast or 2 1/2 teaspoons dry yeast
1 tablespoon honey
1 teaspoon salt
3 1/2 to 4 1/2 cups flour
1 egg, beaten (optional)
1 clove crushed garlic mixed with 2 teaspoons salt, or 1 tablespoon garlic salt
2-3 tablespoons butter, softened or melted
1 1/2 cup grated cheese (Cheddar, Co-jack, Parmesan)
poppy seeds, sesame seeds optional

Place the warm water in a large bowl. Sprinkle the yeast over top of the water. Let sit for about five minutes or until bubbly. Stir in honey. Add the flour and salt, a cup at a time, until dough pulls away from sides of bowl and is no longer sticky. Remember, it is easier to work with dough that has not had too much flour added.
Let the dough sit for about 15 minutes. This step is not necessary, if you are in a hurry, go ahead and proceed to next step.
Mix the butter and garlic or garlic salt in a small bowl.
Roll the dough out on a floured surface into about a 10x15 rectangle. Spread or drizzle the surface of the dough with melted butter and garlic mixture. This step is optional, you may simply sprinkle the dough with grated cheese, but the flavor is much better with the garlic butter mixture spread on top first.
Grease a jelly roll pan with cooking spray. Pre heat oven to 400 degrees. Place rack in middle of oven.
Using a pizza cutter, cut the bread sticks in to 8-12 pieces (width wise), depending on the desired size. Take one end of the dough strip and fold upward to meet the top of the other end of the strip (see photo). Continue until all of the strips are folded. Pick up one dough strip and gently twist in one direction, holding the other end while twisting. Place the twisted dough strip on the greased baking sheet. Repeat until all of the dough has been twisted and placed on baking sheet. Dough may be brushed with beaten egg and sprinkled with poppy or sesame seeds.
Let the dough sit in a warm place for about 20 minutes.
Place in oven and let bake for about 15-20 minutes or until golden brown.
Serve immediately.

Tips:
-When making any type of bread, the kitchen should be warm and draft free. The microwave oven is a great place to put a bowl of rising bread dough. Place a cup of water in the microwave on high for one minute. Remove the water and place the bowl of bread in the microwave oven with the door shut. The temperature inside of the oven is perfect!
-While this recipe is supposed to be a thirty minute recipe, the texture of the bread is better if you let it raise a bit before baking. If you have lots of time, let it raise for 30-40 minutes after making the dough, then another 30-40 minutes after shaping into breadsticks and before baking.

1/19/15

Banana Bread with Coconut Oil


A while back, a reader suggested I try using coconut oil instead of butter in my favorite banana bread recipe. I was a bit hesitant, but so glad I switched out coconut oil for butter because the result was
W O W! Sometimes a fat substitution = less flavor, or inferior flavor, or a less than desirable texture. Not so with coconut oil.


Opinions differ on the benefits of coconut oil, but most critics agree coconut oil is better for your body than butter.  If it's better for you, and taste is not compromised, I'm in.
I also experimented a bit with a pineapple banana bread and a chocolate loaf variation.
Loved all three, recipes below.
Give it a try.
I think you'll love it too.


Banana Bread with Coconut Oil 
A Bountiful Kitchen
print recipe

1/2 cup coconut oil
1 cup granulated sugar
1/2 cup brown sugar
1 teaspoon vanilla
2 eggs
1/2 cup buttermilk
2 1/4 cups flour
1 teaspoon baking soda
1 teaspoon salt
2 very ripe, mashed bananas

Grease and line (with parchment paper) one large or two medium loaf pans.
Preheat oven to 350 degrees, place rack in middle of oven.
Place the coconut oil, sugars and vanilla in a bowl. Mix on medium speed until oil and sugars are combined and smooth. Add eggs. Beat for an additional minute on medium speed, add buttermilk until combined.
Add all dry ingredients. Mix on low speed just until wet and dry ingredients are combined, about 20 seconds. Add mashed bananas and mix on low for about 1-2 minutes, scraping down sides and bottom of bowl one time to make sure the ingredients are all incorporated. Blend until bananas are mixed in well with other ingredients. Do not over mix, do not mix on high speed.
Spoon batter into prepared pans.
Bake at 350 degrees for 40 minutes (for two medium pans) 50-55 minutes for one large loaf pan, or until toothpick inserted in middle of loaf comes out with a few moist crumbs attached. When the loaf is touched in the middle, the loaf should spring back.

Pineapple-Coconut Bread
1/2 cup coconut oil
1 cup white sugar
1/4 cup brown sugar
2 eggs
1/2 cup buttermilk
1/2 cup crushed pineapple, drained
1/2 cup sweetened flake coconut
2 1/4 cups flour
1 teaspoon baking soda
1 teaspoon salt
2 ripe bananas, mashed

Chocolate Banana Bread
same ingredients as original banana bread with the addition of:
1/3 cup unsweetened cocoa powder
1 cup semi sweet chocolate chips
Add the cocoa powder and chocolate chips at the same time the flour is added to the bowl. Mix as directed.

Tips:
-To line the pans with parchment, I place the paper on a counter, then place the pan on top of the paper. Trace around the bottom of the pan with a pen, then cut out the shape and place in the bottom of the pan. I usually double or triple the paper and cut several out at one time. You may also purchase pre cut liners in a baking supply store. I always recommend using a liner so the bread does not stick to the bottom of the pan. I also always grease with spray oil the bottom and sides of the pan to insure the bread does not stick.
-For the best banana bread, the bananas should be very ripe. I use bananas that have black skins and are so soft, they can easily be mashed with a fork in a small bowl. If the bananas are extremely ripe, and you are using a stand mixer, the bananas may be added whole and will easily break up with the use of a paddle attachment.
-Remember, do not over mix the bread. If the mixer is set on a high setting, air will be mixed into the batter and the bread will have a light texture, instead of a dense texture, which is desired in a quick bread.
-If you have an abundance of bananas and no time to make banana bread:
Peel the whole, ripe bananas.
Place the whole bananas in a ziplock bag. Freeze until ready to use.
When ready to use, thaw on counter, or place in microwave for a few minutes or until softened and thawed. Drain any water off of thawed bananas before using.


10/21/14

Great Harvest Pumpkin Chocolate Chip Bread


I'm not usually a fan of  store bought pumpkin bread. It always tastes like a mix (because it probably is) or it is: too airy, too dry, too much like a cake. The one exception is Great Harvest Pumpkin Bread. If you've ever eaten a slice, you know that Great Harvest makes a killer loaf of pumpkin bread! I decided it was time to recreate their recipe at home.  I compared the ingredient list on the GH package to recipes online that claimed to be GH copycats. Hmmmm.  A lot of those recipes included ingredients not on the Great Harvest ingredients list. Ingredients like: honey, brown sugar, wheat flour.  All good guesses, but not accurate if you're trying to recreate the bakery version...


After several test batches, and experimenting with different temperatures of baking, amounts of flour, spices, pumpkin, and eggs,  I think I've finally nailed it.
This bread is lightly spiced, super moist, dense, and has a rich pumpkin flavor.  At over $9 a loaf (in SLC locations),  you'll be saving a few dollars and your house will smell great too!
Happy baking.


Great Harvest Pumpkin Chocolate Chip Bread
A Bountiful Kitchen
print recipe

4  large eggs
2 cups granulated sugar
1 1/4  cups vegetable or canola oil
1-15 oz can Libby's pumpkin (not pumpkin pie filling)
2 teaspoons vanilla
3 cups flour
1 teaspoon baking soda
1 teaspoon baking powder
1 teaspoon salt
2 teaspoon cinnamon
1 teaspoon allspice
1/2 teaspoon cloves
1 1/2 cups semi sweet chocolate chips


Place the rack in the center of the oven, and generously grease and line the bottom of two loaf pans with parchment or wax paper. Preheat oven to 325 degrees.
Place eggs in a mixing bowl. Beat for about 1 minute. Add sugar beat again for 1 minute. Add the oil, pumpkin and vanilla. Beat until all ingredients are incorporated.
Place the flour, baking soda, baking powder, salt, spices and chocolate chips into the bowl with the pumpkin mixture. Mix just until the wet and dry ingredients are incorporated.
Pour the mixture into the prepared loaf pans.
Bake for 50-60 minutes or until knife inserted in center of loaf comes out with a few moist crumbs attached.
Remove from oven. Let sit for 5 minutes in pan. Loosen sides of loaf if necessary with butter knife. Remove and cool completely.
Yields 2-3 loaves, depending on size of pans used*


Tips:
-I make a liner for the loaf pan by placing parchment or wax paper under the pan and tracing around the bottom of the pan. Cut the paper on the line. Place the paper in the bottom of the loaf pan and spray sides of pan and bottom (on top of the paper liner) generously with cooking spray.
-I bake in  4 1/2 x 8 1/2 pans. When I place the batter in the pans, they fill the pans over 3/4 full. There is about a 1/2 - 3/4 inch space to the top of the loaf pan.  This recipe will easily yield 3 smaller loaves. Adjust the baking time to 45 minutes then check to make sure loaf is set.


10/5/14

Creme Brulee French Toast with Creamy Maple Syrup (Cheesecake Factory Copycat)


I've been to Cheesecake Factory for lunch and dinner, but this summer was my first time eating breakfast at the popular restaurant. Our server recommended his favorite dish- Creme Brulee French Toast. It was bite-after-bite of melt in your mouth deliciousness. I knew it had to be filled with butter and cream to taste this good. After a lengthy discussion with our server about the dish he shared this:

1. They soak the bread overnight in the egg mixture. (which I found is not necessary)
2. A lot of cream is involved.
3. The bread is a brioche loaf. Perfect bread for making decadent french toast.  At our local Harmons, the brioche is made with flour, eggs and butter. Top three ingredients, in that order.


Brioche loaf from Harmons. 


The texture of this french toast is like a very moist bread pudding, with a little bit of caramelization on top due to the sugar sprinkled on while cooking.
The french toast was amazing.  But the syrup. Oh. My. 
I could not stop tasting it. I wanted to take a gallon home so I could figure out what was in the buttery, ever so slight maple, creamy mixture. I looked online, but nothing for CF's syrup.  I finally came up with this recipe that is a perfect topping for the Creme Brulee French toast.
If you're out for breakfast, try this at Cheesecake Factory, if you're at home this weekend, cooking for your peeps, try my version.
Have a great weekend :)


Creme Brulee French Toast with Creamy Maple Syrup
A Bountiful Kitchen
print recipe

1- 1.5 lb loaf Brioche sliced thick (about 8- one inch slices) day old is best
5 large eggs
1 egg yolk
1 1/4 cups half and half
1 tablespoon vanilla
2 tablespoon sugar
butter for cooking

Beat eggs, egg yolk, half and half, vanilla and sugar together in a 9x13 pan. 
Place the bread in the pan and let the bread soak up the egg on one side for about 5 minutes, then turn and let soak on other side. If the bread does not fit all at once in the pan, let the bread soak, then remove to plate to allow other pieces to fit in pan. Let any excess egg mixture drip off into pan.
Heat frying pan or griddle up to 350 degrees. Melt a small amount of butter in pan. Place french toast pieces in pan and fry until golden on first side. While cooking the first side, sprinkle a small amount of sugar on the uncooked side. Flip and cook other side until golden and sugar is caramelized.
Serve with Maple Cream Syrup.
Serves 4-6


Maple Cream Syrup
1 cup heavy cream
1/2 cup butter
1/2 cup brown sugar
1/4 teaspoon maple extract
dash salt
1/2 teaspoon vanilla

Place cream, butter and brown sugar in a pan over medium heat. Bring to a boil. Cook for one minute. Remove from heat and add maple extract, dash of salt and vanilla.

Tips:
-The cooking time will vary according to the pan/heat source you are using. I use a built in griddle, which gets hotter than the typical griddle (plug in type). I've also used a Teflon pan over a flame. I believe the best crust is formed on the french toast when using a cast iron or other non Teflon type coated pan. This allows the sugar to form a bit of a caramelized layer on the outside of the french toast. That said, this recipe tastes delicious when using an electric griddle with a Teflon coating. If you are cooking several batches you may need to wipe out the pan to prevent the bread from sticking to the melted sugar. Remember to butter the pan after each batch.
-Remember the bread is thick, and time needs to be allowed to cook the inside of the french toast as well as the outside of the bread. Don't turn the heat up too high, or the outside will burn and you'll be left with a soggy inside. We're looking for tender and creamy, not soggy.
-You can find Brioche in many specialty bakeries. I have also used a Challah loaf.
-Store any leftover syrup in refrigerator, covered. It will keep for a month or so. Just heat up when ready to use.


2/17/14

Great Harvest Honey Whole Wheat Bread (copycat)


I'm trying to figure out where the past 12 months went.
A year ago, this was our  life…


February 2013.
The coldest February in the history of the world to move. Not kidding when I say the snow stayed on the lawn until April.  It was that kind of winter.
Hooray for 2014. Yesterday, it was 55 and no snow in sight in the neighborhood. It's feeling like SPRING out there. It's kind of weird, really. This time of year is usually reserved for comfort food recipes. You know, "stay inside and bake up a storm while it's snowing outside" type of food. It was practically shorts weather yesterday, but I was inside, pretending it was cold, baking bread.


This recipe is the closest I've tried to the Great Harvest Honey Whole Wheat recipe. It's made with five ingredients you can pronounce, and it is absolutely delicious. If you haven't experimented with making wheat bread yet,  read the tips on this post, it will give you some helpful pointers.
Happy Baking!


Great Harvest Honey Whole Wheat Bread (copycat)
adapted from Eat Cake for Dinner found on Pinterest
print recipe

1 1/2 tablespoons instant yeast ( I like SAF brand)
2 cups warm water
1/3 cup honey
4 1/2 cups whole wheat flour (approx)
1 1/2 teaspoons salt

Combine yeast, water and honey in the bowl of a stand mixer; let sit for 5 minutes or until frothy and bubbly.
Place the paddle attachment on the mixer, if using a stand mixer.
Add 3 cups of flour, mix. Add salt and another cup of flour, mix until combined. 
At this point you should have added a total of four cups of flour. The recipe may take a little less, or a little more, depending on climate.
The dough should barely pull away from the sides of the bowl when it has the proper amount of flour added. Using the dough hook, knead for 4 minutes on low.  Cover dough and let rise in a warm, draft free place until doubled.
After the first rise, punch down dough with floured or greased hands, shape and place in a greased loaf pan. 
Let rise again until doubled.
Preheat oven to 350, set rack in middle of oven.
Bake at 350 degrees for 30 minutes. Remove bread from oven.
Cool in pans for 10 minutes, then remove loaf and cool completely.


Tips:
-This recipe is easily doubled, I made two batches, side by side. I didn't want to crowd the mixing bowl, so the flour would mix in properly.
-If you use freshly ground wheat flour, you might need to add 5- 5 1/2 cups of flour.
-You may omit 1/2 cup of the flour and add 1/2 cup of seeds such as sunflower, flax, oats, etc.
-When mixing the bread, add the flour a little at a time to make sure the flour is mixed well into the dough. I used about 4 1/4 to 4 1/2 cups total in my dry climate. If you live in a more humid climate, you may need to use less flour.
-It is important to let the dough mix properly in the bowl.  I set the timer to make sure it has kneaded for four full minutes after all of the flour is added. You will be surprised at how long 4 minutes is, when you are mixing and have the timer set!
-30 minutes seems like a short bake time, but it turns out perfectly.
-I used King Arthur 100% Whole Wheat Flour you can purchase at your local grocery, or purchase on Amazon, through this link.

11/13/13

Maddox Ranch Rolls


If you have lived in the Beehive State for any length of time, you've been to the Maddox in Perry, Utah. My favorite meal at Maddox is fried chicken, a Ranch Roll with honey, and a slice of fresh strawberry or peach pie with whipped cream.  I know- grease, carbs and sugar. I didn't say it was healthy.

 Maddox has been around for a looong time-
Maddox Ranch Rolls are famous in our state. They're light and fluffy. Best served warm from the oven with some honey or raspberry butter.  I wanted to recreate the Maddox roll at home, so I set out to find a recipe that baked up like the rolls at the restaurant.  After one failed attempt (the rolls tasted alright but not similar in shape),  I remembered my blogger friend, Bonnie, at City Home Country Home posted a recipe for Maddox Ranch Rolls a while back. I gave it a try last Sunday. Jackpot. This is it. The same roll I've scarfed in my car while driving back from trips to Logan. 
If you want to attempt making rolls for Thanksgiving, but are looking for an alternative to traditional shaped rolls, this is the recipe for you.  No rolling or cutting out. Just mix, raise and plop into muffin tins. 
Thanksgiving. It's coming. 


Maddox Ranch Rolls
Adapted from Bonnie at City Home, Country Home

To insure success, read all of the tips below the recipe before starting the process of making rolls

2 cups whole milk ( I used 1/3 cup of powdered milk and 2 cups lukewarm water)
1/2 cup butter, cut into chunks
1/3 cup granulated sugar
1/2 cup of warm water
1 Tablespoon plus 1 teaspoon yeast
3 large eggs, beaten
1 1/2 teaspoons salt
5 1/2 - 6 1/4 cups flour

Warm milk in microwave for 2 minutes. Place butter in milk and let melt. Add sugar and mix with whisk or fork to dissolve. Set aside and let cool a bit. The butter will continue to melt as the milk cools.
Pour 1/2 cup of warm water into a large bowl, sprinkle yeast over top of water, sprinkle about 1 teaspoon sugar on top of yeast. Let sit for a few minutes until yeast bubbles.
Pour the the cooled milk, (the milk should be warm- not hot), butter and sugar into the yeast mixture (never add a hot liquid to yeast).  Add beaten eggs and salt to yeast mixture. Mix in flour  with a large spoon one a cup at a time, just until blended and no lumps of flour remain. Do not over-mix. 
Let the dough raise until doubled, about 45 minutes in a warm kitchen.
Spoon or scoop dough (grease the scoop for easier handling) into greased muffin tins and let the dough  raise again for about 30-45 minutes. 
Place rack in middle of oven. Preheat the oven to 375 degrees. 
Bake for 12-15 minutes or until the rolls are golden brown.
Loosen rolls by running a table knife around the edge of muffin cup.
Yields about 30 dinner-size rolls.

Tips, aka Si's epistle on Maddox Ranch Rolls made at home:
-I often use powdered milk when making rolls or breads that call for milk. It's a good way to use up the dry milk I have in my food storage. I buy the dry non-fat milk at the LDS Dry Pack Cannery, and have found it mixes up best with warm or lukewarm water and a whisk.  
-Make sure to grease the muffin tins, this is a sticky dough. 
- Use a large cookie scoop to fill the muffin tin. I greased the scoop a few times with cooking spray to prevent dough from sticking to the inside of scoop. 
-The first recipe I tried for Maddox Rolls had too much liquid and not enough flour in the dough. I believe this is why the rolls tasted good, but didn't bake up into a nice dome shape. Also, after the rolls cooled a bit, they shriveled, which I believe was a result of not enough flour in the dough in relation to the liquid. I wanted a roll that looked beautiful even after cooling a bit. Not asking too much, right?  The recipe from Bonnie had two tablespoons of yeast, I reduced it to 1 tablespoon plus one teaspoon, because I wanted the dough to have a little less of a rise and hold its shape better. If you are looking for a roll that is a bit puffier, use two tablespoons of yeast. 
-Add just enough flour to take away the wet look of the dough. This should be between 5 1/2 to 6 cups of flour total. I added about 6 1/4 cups of flour total, keep in mind I live in a very dry climate. The dough should still be "scoopable".  The dough will be very soft. Do not add too much flour, or you will not be able to scoop the dough out of the bowl. When in doubt, use less, not more flour. See the photo below to see what my dough looked like during the rise in muffin pan. 
- To create the perfect place for dough to raise, I use a trick Frieda taught me in a bread making class. Place a cup of water in a microwave. Microwave on high for 1-2 minutes. Remove cup of water. Place covered bowl (I use plastic wrap) in microwave, close door and let dough raise. I have an oven with a "proof" setting, but prefer Frieda's method. This is also a great tip for making bread in a small kitchen! 
-Of course, It may be easier to just jump in the car and pick up rolls at Maddox :)


This photo was taken just before the rolls were placed in the oven. 

11/6/13

Bread Cubes for Stuffing


Hey there. You and I have been friends for a long time now. You know what to expect this time of year. Thanksgiving talk.
I'm going to start out the month with a post about making your own stuffing. Because I believe stuffing, not turkey, is the crown jewel of an amazing Thanksgiving feast. I purposely make huge batches so I can eat it for days after the celebration. If you are scratching your head and asking "what's wrong with instant stuffing out of a box?" We need to have the talk.
Yes, that talk.
Never, ever, use pre-made "just add water and serve" boxed stuffing.
Homemade. Your new mantra. Homemade. Homemade. Homemade.
Homemade= a new life.
Your new life starts with a simple task. Drying bread.
Every time you have extra bread sitting around the house and you know you aren't going to eat it all up before it gets stale, cube it and bake. Every time you have spare bread (Baguettes, French bread, Sandwich bread, rolls, Artisan bread) cut it up.
It's that simple.
Here are a couple of recipes I've posted in past years. The first is my mom's tried and true (for over 50 years) Apple and Sausage Stuffing. It's simple, delicious, and it's on our holiday table every year. If you are looking for a starter dressing, this is it.


The second recipe is a less traditional, but delicious Artisan Stuffing with big chunks of mushrooms, onions, Italian Sausage, cornbread, Artisan, French Bread and fresh herbs. It's fresh and fun and a nice addition to your traditional feast.


Today- instructions on how to prepare the bread for your home made stuffing. In a few days, I'll post a new stuffing recipe. If you have a favorite stuffing/dressing you'd like to share, post a link in the comments, we would all love to see what you're planning for the big day...


Bread Cubes for Stuffing
print recipe

Loaf of Artisan or French Bread or any other type of leftover bread or rolls
Olive oil
sea salt and fresh ground pepper

Cube the bread, spread out onto a large cookie or baking sheet.
Drizzle with olive oil.
Sprinkle generously with sea salt and fresh ground pepper.
Bake in 250 degree oven until bread is lightly toasted and completely dried out.
About 1-1 1/2 hours, depending on density of bread and oven.
Cool completely, bag until ready to use.

Tips:
-Also delicious as croutons.
-Save the crumbs as well to use in dressing.
-You may also up the temp on the oven to 300 and bake for about 30-40 minutes.